Auth0 and React + Redux

Recently, I have been experimenting with Auth0 inside a side project I have been working on. Its quite interesting and, for the most part, easy to use. However, I have found the Quick Starts for ReactJS lacking, especially with respect to React implementations that utilize Redux. So I thought I would take a crack at it.

Setting up the Application

Head over to auth0.com and create your free account and setup your application. I will spare  rehashing this as the Auth0 tutorials did this far better justice than I would. The important thing is to come away with the following bits of information:

  • domain
  • audience
  • clientID
  • redirectUri
  • scope
  • responseType

Simply choose to Create an Application once logged into Auth0 and you can pick the Quickstart of your choice. For readers here, its probably going to be ReactJS + Redux.

Assumptions

I am going to assume you have created your Auth0 application and have already configured the various bits of Redux into your ReactJs application (or at least expect that you know how to).

Ill also assume you are going to use routing in some degree within your ReactJS app, that plays a vital role in ensuring the authentication is done properly.

Let’s get started

If you read through the Auth0 getting started guide you will find it tells you to to create a file which holds the bits of information above, do that but instead using it as a modular function.  Here is my code:

Selection_004

The instance variable webauth is an instantiation of auth0.WebAuth which will take our data and allow us to interact with the Auth0 APIs.  You notice that I only ever create the client once, this is intentional. The one lesson I learned while doing this was to ensure you dont create things too much as it tends to screw with Redux.

By taking this approach I found it much easier to reference the Auth client.

Next…

You need to initiate the login process, by calling login on our Auth client. This will initiate the authentication process with Auth0.  The important thing to understand is what happens at the end of that process.

One of the values we collected and added to our WebAuth client was a callback. This callback is where the browser will go once authentication is complete. Within this route you need to be able to parse the result (using our processResult method).  This gets tricky with Redux due to state changes. You will find the process succeeding and then failing often putting your app into a weird state.

To mitigate this, you want to look at your Routing.   Here is an example my routing:

Selection_005

You can see that we want to intentionally not render the /callback route if the user is logged in. The flow here is interesting. Let’s explain.

Let’s assume you click a button to start the login process. Your application, when complete, will redirect to your callback URL, /callback in our case. Here is what this page looks like for me:

Selection_006

As soon as the component mounts we grab our authClient and call processResult. If it works, we initiate our saveLogin action. In my case, this will end up sending the login result into a Redux Saga which saves it into Local Storage. I then use the push method off Connected Router to go to my authenticated landing page.

However, doing this will cause parts of the application to check for changes. This action, I found, causes a second call to the Auth0 API which fails. This can make it seem like the login is failing when in fact it is working. The answer here is to eliminate the chance that callback remounts; for this reason I used isLoggedIn in my routing to remove that routing rule if the user is authenticated.

Conclusion

The important thing to remember with Redux is to limit the number of potential refresh vectors that can cause code to execute again. In this case, we can use selective routing features to ensure that certain Route rules are only published when they are appropriate.

Deploying to Kubernetes with Azure DevOps: A first pass

Kubernetes is all the talk around town these days as the next generation deployment platform for containerized applications. It has a lot of benefits and the full support of the major cloud providers (Google, Amazon, Microsoft) and a whole movement behind it represented by the Cloud Native Computing Foundation (CNCF).

My interest is mostly from how it can be used with respect to DevOps and deployments. Having tinkered considerably with MiniKube locally, EKS via labs, I decided to dive into setting up a deployment pipeline with AKS (Azure Kubernetes Service). I found it rather easy to be honest. Might finally be getting to the point where I can wrap my head around this.

The Setup

So, the prerequisite to this is an application that builds using (preferably) a Docker container. This is the Dockerfile I am using (generated via the Docker extension in VSCode):

FROM microsoft/dotnet:2.1-aspnetcore-runtime AS base
WORKDIR /app
EXPOSE 80
FROM microsoft/dotnet:2.1-sdk AS build
WORKDIR /src
COPY [“WebApp.csproj”, “./”]
RUN dotnet restore “./WebApp.csproj”
COPY . .
WORKDIR “/src/.”
RUN dotnet build “WebApp.csproj” -c Release -o /app
FROM build AS publish
RUN dotnet publish “WebApp.csproj” -c Release -o /app
FROM base AS final
WORKDIR /app
COPY –from=publish /app .
ENTRYPOINT [“dotnet”, “WebApp.dll”]

What needs to be understood is, when executed, this will produce a Docker image that can be stored in a registry and referenced later via a service supporting container (Azure AppService, FarGate, etc). For our purposes we will want to create a DevOps Build Pipeline that creates this image and stores it in Azure Container Registry.

The main goal of this section is that you have an application (does not have to be in .NET Core, could be in Python) that builds to a container.

Create the Build Pipeline

When you are dealing with containerized applications your build pipelines goal (along with integration checking and testing) is to produce an image. The image is the static format of a container. When we start an image in Docker that running instance is referred to as the container.

Azure DevOPs makes this relatively easy but, before we can do that, we need to create a registry which is a place we can store images. It is from here that Kubernetes will pull them to create the containers that allows the application to be executed.

Easy enough to create an Azure Container Registry through the Azure Portal, just remember to Enable admin mode.

With this created we now have a place to output the builds from our automated processes. The way the registry works is you create a repository. This is really a collection of similar images. You then tag these images to indicate a version (for development I often use the builder number and the Git commit hash, for releases I use a semantic version identifier).

To start off with, you need to define the source of your pipeline, this is going to be your source repository and appropriate branch, I am using develop in accordance with the gitflow approach to source management.

After you select your source you get to pick how you want to start your pipeline. Conveniently, Microsoft has a Docker container template which will get you 90% of what you will need.

You need to check the following fields for each of the two tasks that are created as part of this template:

  • Build an image
    • Docker File – should be the location of your Dockerfile. Default works well here, but I like to be specific (make sure you update Use Default Build Context if you take something other than the default)
    • Image Name – this is the image name with tag that you want to build. More simply, this what you will save to the registry.  Here is an example of what I used for a side project I have:
      • feedservice-dev:$(Build.BuildNumber)-$(Build.SourceVersion)
        • feedservice-dev – this is the name of the respository in ACR that the image will live under (the repository gets created for you)
        • $(Build.BuildNumber)-$(Build.SourceVersion) – this is the tag which will differentiate this image from others. Here I am using build variables to denote the tag.
  • Push an image
    • Image Name
      • This needs to match the image name specified in Build an image

On Using :latest
Within Docker there is a convention of :latest to designate the latest image created. I tend to not use this custom very often for production scenarios simply because I favor specificity. If you choose to use it, you just need to publish two images instead of one to the ACR (overwrite :latest each time)

Make sure to select Triggers and turn on Continuous Integration so we get builds that kick off automatically.

If all is working correctly, you should see the build kick off almost instantly after you push to the remote repo for the target branch. Once that build completes you should be able to see the new image in your registry.

Setting up Kubernetes

Azure actually makes this very easy. But first, a quick primer on Kubernetes.

Kubernetes is a container orchestration framework with a focus on maintaining the ideal state. It is composed of nodes which house its various resources. There are three core ones that you should be aware of:

  • Pod – equivalent to a VM, houses a container (or containers). A normal deployment will feature MANY pods depending on the level of scale being targeted
  • Deployment – A group of pods with conditions around ideal state. At the simplest level, we can specify the minimum number of pods that represent at deployment (generally in production you want no less than three here)
  • Service – A resource that enables access to pods either internally or externally. Often serves as a LoadBalancer in cloud based deployments

More information: https://kubernetes.io/

Beneath the pod concept, everything in Kubernetes resides on nodes. These nodes reside within a cluster. You can have as many clusters as you like and they can reside in different environments, both on-premise and in the cloud; you can even federate between them enabling more flexible deployment scenarios.

For the purposes of this tutorial we will create a hosted Kubernetes cluster on Microsoft Azure using their Azure Kubernetes Service (AKS).

It is easy enough, simply create an instance of the Kubernetes Service. Here are some important fields to be aware of as you create the Cluster:

  • Project Details
    • Resource group: I like to specify a separate one for the cluster however, I have noticed that AKS will still create other Resource groups for other components supporting the AKS instance
    • Kubernetes cluster name: Anything you can, no spaces
    • DNS prefix name: Anything you want
  • Authentication
    • Create a new service principal
    • Enable RBAC: Yes
  • Networking
    • HTTP Application Routing: Yes

Take the default for everything else

This process will take a while so go grab a cup of coffee or be social while it is happening.

Once it completes, Azure will provide you with some commands you can run through the Azure CLI (I recommend downloading this if you do not have it installed)

Kubernetes can be administered from ANY machine via kubectl. Supporting this is done via the notion of context. You can change your kubectl context to any Kubernetes deployment. Azure makes this easy by executing the following command

sudo az aks install-cli

This will install kubectl (if you dont have it) and set your context to AKS.

Kubernetes features a nice web dashboard to give you insight into what is happening within a cluster. You need to run a couple commands to get this to work:

az aks get-credentials –resource-group <YourRG> –name <YourClusterName>

Followed by

az aks browse –resource-group <YourRG> –name <YourClusterName>

This will launch your default web browser with the Kubernetes dashboard proxied to your localhost. I have found that sometimes when I start this I get a punch of warnings around configmaps and other errors. This stems from a permissions problem that requires a role be created. Use this command to fix things

kubectl create clusterrolebinding kubernetes-dashboard -n kube-system
–clusterrole=cluster-admin
–serviceaccount=kube-system:kubernetes-dashboard

After this runs, rerun the browse command from above and the errors should be gone.

The Kubernetes dashboard offers a wealth of information that can assist with analyzing and debugging problems with deployments. It is one of the best tools at your disposal when dealing with cluster management.

If everything is green you are good to move on to performing the initial deployment.

Perform the initial deployment

As I said above, the easiest way to manage your Kubernetes cluster is via local usage of kubectl with the context pointing at AKS. This will allow you to directly apply changes and perform the initial deployment; note this assumes you have your container image in ACR.

Here is the YAML file we are going to use: https://gist.github.com/xximjasonxx/47151a9274ae732dd063c7f9605365c4

You notice that there are two discrete sections defined: Deployment and Service. The deployment here indicates that ideal state for this “application” has 2 pods at minimum (indicated by replicas). Each Pod should host a container named giftlist-feedapi which is an instance of a feedservice-dev image; here I manually specified a certain image to start from. Not sure if this is best practice, but its just what I did through testing.

In the second section, we define the Service which acts as a LoadBalancer to grant external access to the pods. I should point that LoadBalancer really only works in the Cloud since you wont get a Load Balancer locally by default, need to use NodePort in that case.

Before we can apply our configuration, however, we need to give AKS the ability to talk to ACR so it can pull the images we stored there.  We do this by running the following sequence of commands:

AKS_RESOURCE_GROUP=<Your AKS Resource Group>
AKS_CLUSTER_NAME=<Your Cluster Name>
ACR_RESOURCE_GROUP=<Resource Group with Container Registry>
ACR_NAME=<Your ACR Name>

CLIENT_ID=$(az aks show –resource-group $AKS_RESOURCE_GROUP –name $AKS_CLUSTER_NAME –query “servicePrincipalProfile.clientId” –output tsv)

ACR_ID=$(az acr show –name $ACR_NAME –resource-group $ACR_RESOURCE_GROUP –query “id” –output tsv)

az role assignment create –assignee $CLIENT_ID –role acrpull –scope $ACR_ID

The use of environment variables here is done to ease the various commands involved. With this in place we are now ready to update our Cluster to support the various resources that will be needed to host our application.

We apply this configuration by using the apply subcommand of kubectl like so:

kubectl apply -f development.yaml

This command will return almost instantly. If you have the Dashboard still open you can watch everything happen. Once all of the deployments are fulfilled you can flip over to the Services section to see your service being created. This process tends to take a bit of time but should end with a public IP address being available that redirect to a Pod running your containerized service.

Alternatively you can use

kubectl get deployments

and

kubectl get services

To check on the status of the resources that are being deployed. I tend to favor the Dashboard since it will also expose the logs on the web, you can still get the logs, but the web makes it easier.

If everything goes right your Service which eventually yield an External-IP which you can access from a web browser.

Adding a Release Pipeline

Ok, so full disclosure, this part I am still working through as I am not 100% sure if this is the way it should be done.  But I figured its a good place to start.

First step, create a release pipeline in Azure DevOps and make sure the Continuous Integration trigger is set (click the lightning icon as shown below).

Selection_002

This artifact should be configured as the output from the build you created previously, shown here is mine:

Selection_003.png

With this configuration and enabling the CI trigger we can ensure that ANY build that is processed by our build pipeline also correlates to a release as well.

Next for Stages we will have only one. Make sure the Tasks are configured as such

  • Deployment Process
    • Name: Anything you want but, make it descriptive
  • Agent Job
    • Display name: Anything you want
    • Agent Pool: Ubuntu

Add a single Task of type Deploy to Kubernetes, configure it to run the set command with the following arguments (assuming you are following alone)

image deployment.v1.apps/feed-api-deployment giftlist-feedapi=giftlistregistry.azurecr.io/feedservice-dev:$(Build.BuildNumber)-$(Build.SourceVersion) –record

Please do not copy the above verbatim, there is some nuance here

Ok, so when you run apply as we did earlier you actually create entries in the Kubernetes data controller plane. We can actually make changes to these values using the set command which is what we are doing here

Basically we are using the set to change the image being used for our deployment. This will cause Kubernetes to begin orchestrating an update so, if you run the get deployments command enough, you will see Kubernetes spin up a third Pod while it replaces each Pod so as to maintain the ideal state.

Now, if everything works, you should be able to commit a change, see it automatically build which will generate a new image that gets saved to your ACR. Next, it kicks off a Release pipeline which updates your Kubernetes configuration to use the newly created image.

Pretty slick eh?

Closing Thoughts

Kubernetes is nothing more than a new way to deploy code for applications that use containers, which is becoming increasingly common across development teams. The use of K8s is a response to the problem of managing hundreds if not thousands of containers. In this example, I showed a very simple example of applying this process with Azure DevOps but there are many other topics I did not cover such as Helm charting.

The goal though is to understand that Kubernetes is a solid option but is NOT the only option for new applications. Like all things, it has its uses. Though, different from other things, Kubernetes seeks to provide a new platform that houses all environments for your applications so you can get as close to production as possible, if not all the way.

I hope to give more insight into this as I continue to look deeper into ways to use this though the creation of side projects.

Creating an Automated Blazor Deployment in AWS

Blazor is a framework I have written about previously that enables C# developers to build SPA applications similar to Angular and React in C# using WebAssembly. Principally, this showcases the ability for WebAssembly to open the web up to other languages beyond JavaScript without any plugins or extensions; WebAssembly is already widely supported in all major browsers.

In this article, I would like to discuss how we can deploy the output of Blazor to S3 on AWS and host it via a Static Website; this is a very common pattern for hosting SPA due to decreased cost and efficient scale. For this process we will use two Amazon services: CodeBuild and CodePipeline.

Creating the Blazor Application

I wont go into this step other than to say you can use the default app if you so desire, though I recommend the standalone and not the one that features a WebAPI backend. Our goal here is the deployment of static web assets, an API would not be included in that categorization.

Steps are here: https://blazor.net/

Once you have the source drop it into GitHub (we will reference this later) or you can use CodeCommit which is the AWS GitHub repository service. In my experience, there is not a significant advantage to using CodeCommit over GH.

Setup Code Deploy

In your AWS Console, look under Developer Tools for CodeBuild

Click Create Build Project – this will launch the wizard

Here are the relevant fields and their associated values:

  • Source
    • Pick GitHub and your repository (you will need to authorize access if you haven’t done so before)
  • Environment – Pick Linux as the OS
    • For Role: name it something logical, you will need to modify it later
  • Buildspec
    • Select Use Buildspec file – AWS does not support dragging and dropping for the creation of its build process. Using this option we will need to create a buildspec.yml file at the root of your application (you can add it now and we will cover the syntax in the next section)
  • Artifacts
    • No Artifacts – this seems weird but, we are going to have CodeBuild do the deploy since CodeDeploy does NOT support deploying a SPA to S3

Click Create Build Project to complete the creation.  You can run it if you want to verify it will pull the source but, the build is going to fail as we dont have a valid buildspec.yml file. Let’s create that next

Creating the BuildSpec

One of the areas that I knock AWS is its lack of a good visual way to build DevOps pipelines. While it has gotten better, developers are still left manually define their build processes via YAML or JSON. This is in contrast to Microsoft which leverages a more visual drag and drop designer.

The first thing is to be aware of the syntax for these files, Amazon Docs are here: https://docs.aws.amazon.com/codebuild/latest/userguide/build-spec-ref.html

For our application the main step we need to be aware of is the build step. This is a simple test application and so it requires only a simple standard build operation. Here is my recommendation:

commands:
  – dotnet restore
  – dotnet publish –no-restore -c Release
All this does is leverage the dotnet command line tool (which will be installed on the container hosting our build) to restore all NuGet packages and then publish. This will end up creating some folders in /bin/Release/netstandard2.0 which will be involved in the post_build step.

The next part is where I can only shake my head with AWS. Since code deploy does not support S3 deploys like this we need to invoke the aws command line tool to copy the relevant output artifacts into our S3 bucket. Obviously, before we do that we need to create the S3 bucket that will host the website.

Creating the S3 Bucket to host your site

Amazon allows you to serve static web content from S3 buckets for a fraction of the cost of using other services. Best of all, no setup, automatic scalability and the same 11 9’s reliability bucket objects get from S3. It is no wonder this has became the defacto way to serve SPAs. Since the output of a Blazor build is static web content we can (and will) use S3 to host the application.

Under Storage pick S3. You need to create a bucket. Take the defaults for permissions, I will give you the Bucket Policy JSON at the end that allow objects to be served publicly.

Once the bucket is created select it and access the Properties tab. Select Static Web Site Hosting. Be sure to fill in the Default Document with index.html. I am not sure if this is necessary but, I always do it just to be safe. You should also take note of the endpoint as this is where you will access your website.

Now select Permissions and select Bucket Policy. You can use the Policy Generator here if you want but, this is the general JSON that comprises the appropriate policy to enable public access:

{
“Version”: “2012-10-17”,
“Statement”: [
{
“Sid”: “PublicReadGetObject”,
“Effect”: “Allow”,
“Principal”: “*”,
“Action”: “s3:GetObject”,
“Resource”: “arn:aws:s3:::YourBucketName/*”
}
]
}

Note: This is a very simply policy created for this example. In a real production setting, you will want to lock down the policy as much as possible to prevent nefarious access.

When you save this you should see the orange Public tag appear in the Permissions tab.

With this, you bucket is now accessible. Our next step is to get our content in there

Updating the Buildspec to copy to S3

As I said earlier, the normal tool used for deployments, AWS CodeDeploy does not, as of this writing, support static web asset deployment to S3, an opportunity missed in my opinion. This being the case, we can leverage the aws cli to copy to our bucket. There are a number of ways to organize this, here is how I did it.

I added a post_build step to the build spec which consolidated everything I was going to copy into a single folder:

commands:
  – mv ./WeatherLookup/bin/Release/netstandard2.0/dist ./artifact
  – cp -R ./WeatherLookup/bin/Release/netstandard2.0/publish/wwwroot/css ./artifact/

You dont have to do it this way, I just find it easier and more sensible than targeting the files/folder individually with the S3 copy command.

Next, we need to perform the copy to S3. I choose to use the finally substep within post_build to perform this operation

finally:
  – aws s3 cp ./artifact s3://YourBucketName –recursive

By using the –recursive the CLI will handle copying ONLY the contents of artifact into our bucket. We do not want the root folder since that would interfere with our pathing when users access the website.

If you run your build now it will get father but, it will break on the final step. The reason is, the role we defined for CodeBuild does NOT have the appropriate permissions to communicate with S3. So we have to update that before things will work.

Updating the Permissions

Within your AWS Console access IAM from Security, Identity, and Compliance. From this menu access Roles. Look for your role, we will need to attach a policy to it that gives it the ability to perform PutObject against our S3 bucket. There are two ways to do this:

Option 1:
You can apply the AmazonS3FullAccess which will grant the role full access to all S3 buckets in your account. I do NOT recommend for anything outside a simple test case. Reason, its never a good idea to give this sort of access to a role as it could be abused.

Option 2:
You can create a custom policy that provides the permissions specifically needed by this role. This is what I choose to do and is what I recommend others do to get into good habits.

For this demonstration we are going to use Option 2. Select Policies from the IAM left hand navigation menu. Select Create Policy. For most cases I would recommend the Visual Editor as it will greatly assist in creating policy documents. For this, I will give you the JSON I used:

{
“Version”: “2012-10-17”,
“Statement”: [
{
“Sid”: “VisualEditor0”,
“Effect”: “Allow”,
“Action”: [
“s3:PutObject”,
“s3:ListAllMyBuckets”,
“s3:ListBucket”,
“s3:HeadBucket”
],
“Resource”: [
“arn:aws:s3:::YourBucketName”,
“arn:aws:s3:::YourBucketName/*”
]
}
]
}

This policy grants the ability for the executor to access our S3 bucket and use the PutObject command.  Click Save after Reviewing the Policy.

Go back into roles, select the role associated with your CodeBuild project and Attach the Policy. When you rerun the build everything should work. Once you get a Completed status, you can browse to your S3 url and see your site.

Automating the Build

Our build works now but, there is a problem: it has to be kicked off manually. Ideally for any sort of process such as this, whether around integration or deployment we need the action to start automatically.  This is where AWS CodePipeline comes into play.

CodePipeline wraps a source provider, build agent, and deploy agent so that it can operate as an automated pipeline, hence the name. We are going to do the same

From Developer Tools select CodePipeline and on the ensuing menu select Create Pipeline.

On the ensuing page fill in the configuration options, there are two sections of particular note:

  • Service Role – this is the role that is assumed by the Pipeline as it reaches into other services. Notable it is to communicate with the various APIs for the supporting services.
    • Provide a service role here, we will not be modifying it at a later step
  • Artifact Store – Pipelines often deal with artifacts that come out of the various steps. Here we specify where those get stored. S3 is a great location. Keep in mind that for our example we will have no artifacts.

Once you press Next you are asked to configure the Pipeline source. Here you will want to specify our GitHub repository (you will need to connect again, but not reauth). This is to allow CodePipeline to register the GitHub webhooks that will be used to tell the Pipeline when a PUSH occurs.

Next comes to Build Provider, select the CodeBuild instance we created earlier.

Next comes Deploy, here we will press Skip and not define a deploy step. For something that would deploy to Lambda, ELB, EC2, ECS, or something like that you would need to select your deploy project. As we stated, we cannot use CodeDeploy with an SPA to S3 deployment.

The final step is to review and initiate the creation of the pipeline. The process is pretty quick. Once complete, select your build from the list. Amazon has done a great job making the pipeline visualization screen look much more appealing.

By convention, CodePipeline will run an initial build. If your CodeDeploy step worked before this should complete in a few minutes.

To test the pipeline, make a change to your local repo and push the change to the remote repo. If all is correct, you will see your Pipeline begin executing almost immediately. Once it completes, refresh your S3 website Url and your change should be visible (remember to check your cache if you dont see it).

Congrats, you have a working Blazor web app deployment in AWS.

Closing Thoughts

S3 is an ideal place to host a static website like an SPA where API requests are used to get data for the execution. The biggest win here is constant which is going to substantially less than something like EC2 or ELB.

One of the considerations I did not cover above is environmentalization of this process, we are always pushing the code to the same bucket. Normally we would have different buckets (perhaps across different Amazon accounts) that hold the specific version of the web code for that environment. This is when you might need to use CodeDeploy to deploy the artifact from CodeBuild to a Lambda to copy the contents into the bucket serving the content.

My goal here was to take a very simple deployment and determine how Amazon’s capabilities compare to those of DevOps. Needless to say, I found Amazon wanting, the DevOps aspect is certainly an area where Microsoft has the advantage. Between not being able to target S3 with their deploy tool and thus resorting to a copy from the build step to not supporting an easy visual way to build the sequence of build steps, more work is needed here.

Using Active Directory Authenticate with Web API from Xamarin

After the week I had, this is a very necessary blog post. I spent the week, among other things, helping my new client setup their Xamarin and Web API to talk to each other and use AD Tokens as the validation mechanic. Speaking frankly, Microsoft has A LOT of information out there, not helped by the transition from ADAL to MSAL and the many forms AD on Azure takes (B2C, Vanilla, B2B, I am sure others). It was immensely difficult to bring this together.

For this we will be using a standard WebAPI backend which leverages the normal AspNetCore Authentication libraries, Xamarin.Forms on the front end using the ADAL libraries

Setup the Web API

Contrary to popular belief you do NOT need to use the Authentication/Authorization feature for an App Service. You can, but, honestly, I found this feature pretty useless. You can honestly accomplish the same thing with just straight Azure configuration.

Head into the Azure Active Directory portion of Azure (below) and select App Registrations from the sub navigation.

Screen Shot 2018-08-18 at 9.50.22 AM

We have to register our backend app with Azure AD so that Active Directory can create tokens for that API that will pass validation down the road.

When you Add a new App Registration you need to provide a few values:

  • Name: Whatever you want, it should be something that adequately describes the App
  • Application type: Web app / API (this will govern the next field so make sure this is selected)
  • Sign-on Url: This is the domain of your service that is the API that will be used. Hint: if you are using Azure App Service it will be something like https://<your name>.azurewebsites.net

The final step is to select your new registration after Creation and go into the Settings -> Reply URLs.

At the top you will see the base Url that you provided above. Modify it so it ends with /.auth/login/aad/callback

Registration is complete. Now let’s add the code that checks the token for us with each request.

It’s coding time – part 1

I am assuming you are using ASP .NET Core 2.1 for this project, if you aren’t, you might want to skip ahead or find a different guide for this portion of the process. Of course, you are welcome to read and perhaps my words will inspire the right path forward 🙂 Maybe

Ok, so in Startup.cs we need to look at the ConfigureServices method. The first thing you will want to add the following bit of code:

Screen Shot 2018-08-18 at 12.56.09 PM

Quick note: AddAzureBearer is not something that exists, you have to create it. What it really is doing is fronting the configuration for the Jwt (JSON Web Token) Bearer and passing some very important configuration options to the underlying provider. It actually comes out of the GitHub Azure Samples from Microsoft (hopefully it will find its way into the actual BCL at a later date) here.

You will also want to make sure you add the associated AzureAdOptions class which will receive the values from our Configuration when we call Bind based on the AzureAd key. Here is an example:

Screen Shot 2018-08-18 at 1.01.27 PM

Let’s talk about TWO of these values: Instance and TenantId

If you return to the Azure Active Directory section on the Azure Portal and select the App Registration you will notice there is a button called Endpoints at the top. Select this and you are given your Tenant specific endpoints for common Auth flow operations. Copy the top one (Federation Metadata document).

The Guid in this value is your TenantId so you can copy and paste that into the above configuration.

If you take the same Url you copied from the Federation box and paste it into a browser you will see an XML document. In the very first block you will see entityID. The Url prefix is the Instance value. Also, the Guid here is your TenantId as well. That is where these two values in particular come from.

ClientId always refers to the ApplicationId for the registration in the Azure App Portal

We now have our configuration set, but we need a way to generate a token. You CAN do this through Postman. This blog explains how though, its a bit convoluted.

Register the Xamarin Application

We now have our Backend set, so let’s turn our attention to the Frontend Xamarin app. First we need to register our app, same as above though we will select Native for the Application Type.

When this change is made the SignOn Url box is replaced with Redirect Uri. At a high level, this is the redirect point within the flow that signals the authentication is complete and control should be handed back to the App.

Use the value https://<your api>.azurewebsites.net/.auth./login/done – yes it does match the SignOn Url of the API, that is intentional.

Once the app is created click on Settings and confirm the .login value is present in the Redirect URIs section.

Next go to Required Permissions, use the search feature at the top to find the API app you created previously. After you finish adding REMEMBER to hit Grant Permissions so the new permissions take effect.

Congrats that is all you need to do for the Xamarin application

Its coding time – part 2

Ok, this gets a bit different, really is pick your poison. Rather than walking through both sections, here is a sample that has all of the code for this: https://github.com/rcervantes/xamarin-adal

It does rely on the now less used Mobile App application type but it has solid code for how to use ADAL.Net with Xamarin (as of this writing MSAL does not yet work properly).

Here are some notes:

  • The actual logic which handles the Authentication is identical in both Droid and iOS with the exception of what is passed as PlatformParameters. You could easily pass this value to the PCL and centralize all auth logic there
  • Droid is a bit weird and requires override of the OnActivityResult callback for the flow to complete. You can basically copy paste the code from the sample
  • When the sample refers to Resource you can pass the string of your Backend app Application Id Guid
  • Authority is a Url of the format: https://login.windows.net/<TenantId&gt;
  • Auth Redirect Uri format is: https://<Api Base Url>/.auth/login/done

Feed these values into your call to AquireToken and the app should start the AD Auth flow and, at the end, return to you an Access Token that you can pass up to your API as a Bearer token and things should work.

So that’s it. I hope this works for you, it was quite the slog to get it to work for myself and there are still some edge cases I want to look at it. In particular, if I use a custom domain for my Azure App Service, how does that effect the login flow, or does it use the Azure Urls anyway under the hood.

As always, if you have problems with your token, check our jwt.io. Leave me a comment if you need any additional help. Cheers

Reporting on Unit Tests with VSTS Containerized Apps

I am a purist at heart and when I do something I want to take full advantage of the tools I am using. In the case of Docker, that means emphasizing that ALL of my code should run in the same container as my final product. What is the value otherwise?

To that end, I set up about exploring how I might report on unit tests with a VSTS build. It is not an easy process because, in my view, VSTS and .NET do not naturally lend themselves to the containerized architectures. Microsoft is working hard on changing this and have made great strides but, there are still some issues to work out.

However, in this case the central problem has to do with what Docker creates, an image, which is immutable meaning, during its construction you can not read from it, nor would you want to.

Approach 1: Run the Tests before Image Creation

The simplest approach is to run the unit tests before you create the image and add a dependent build phase which only executes if all unit tests pass. While this is simple and would work, it violates, in my mind, the principles of containerization.

Code is run in the same way for all environments

This matters for testing as it is the idea spot you might find a difference. If someone was using a different version of a library and it worked there and even worked on the build server but didnt work in the container, you would never know until you deployed.

Admittingly this is rare for any experienced development team who would be keeping close tabs on this but, it does happen (happened at West Monroe when a member of our team insisted on using the Alpha branch while everyone else used Stable for Xamarin.

My goal was to find a way to perform the unit tests in the very same containerized environment the code would run. So, I turned to the God of Wisdom: Google

Approach 2: Docker Compose to the rescue

Docker Compose is one of those tools that was created for one purpose but, I think, ended up fulfilling another. While you can still deploy production code using Compose, the trend right now is towards Orchestration with something like Kubernetes. Still, Compose is great for applications that wont use Kubernetes but still need mimic local representations of production dependencies.

In my searching I came across this fantastic article on Medium by a fellow developer who found an ingenious way to accomplish what I was seeking using Docker Compose.

Running your unit tests with VSTS and Compose

The gist is, we can use a Dockerfile which creates a “test” image which has no ENTRYPOINT defined. We can then create a docker-compose file which references that Dockerfile and specifies the ENTRYPOINT in the compose file as the dotnet test command. Here is a sample from my final output.

version: ‘3’
services:
  myapp.tests:
    build:
      context: .
      dockerfile: MyApp.Tests/Dockerfile
    entrypoint: dotnet test MyApp.Tests/MyApp.Tests.csproj –logger trx -r /results
volumes:
  – /opt/vsts/work/_temp:/results

As you scan this Compose file it becomes a bit clearer what is happening. VSTS supports the ability to perform a Docker Compose command. We use this to launch our Test Image and mount its results location for the test results to a local folder (last line above). This way when we run our subsequent step to report the results we have access to the files (they are built and stored in the container remember).

Note: I recommend keeping the directory the same since you can be sure it exists

Here is the Docker Compose up command we will use from the VSTS task

up –abort-on-container-exit –build

Note: the task will preprend docker-compose for us, so we need only specify the arguments.

The –abort-on-container-exit and –build flags just ensure that we build the container image if it is not cached already and the container is exited when our ENTRYPOINT command finishes.

Finally, we come to publishing our Test Results, we can use the existing VSTS Publish Test Results task. Point the task at our mounted directory, specify the desired extension as .trx and the test type ise VSTest (even if you are using a different runner, say NUnit).

Now you should be able to run and see your test results. Should point out that, since we are using dotnet test as our entrypoint, the task WILL FAIL if a test does not pass. So keep that in mind so you can create the proper control flow to not create Docker images from builds that do not have passing unit tests

I hope that helps, I hope you got some good information out of this. Be sure to visit the link above and send thanks to Christian. That article really helped me out.

View at Medium.com

DevOps with a Containerized app in Visual Studio Team Services

With any modern development project, I feel, you need to have good DevOps if you want a chance to be successful. Luckily, Microsoft has done a lot of investing into Visual Studio Online so that it is a one stop shot for development teams. Among these tools is a cutting edge Build and Release pipeline system.

In this post, I wanted to walk through my approach to handling a CI/CD pipeline with VSTS and containerized builds being deployed using App Services.

By the end you will end up with two builds: One which performs your typical CI Dev build that runs after each remote push, this will have a linked Release that deploys the created image to a Dev App Service. Similarly, you will have a Release Build that is triggered when a tag is pushed to the remote. It builds the image and tags it with the value from the Git tag. Finally, we will create a Staging Deployment where by users manually create releases and deploy specific versions to higher environments.

This is not a short post so, let’s get started.

Creating the CI Build

One of the most important builds for any development team is the CI or Continuous Integration builds. For this build, whenever we merge to our develop branch we want to build an image and, if valid, deploy it to our Azure Container Registry (ACR).

For starters, we need a Dockerfile that can create the image we will deploy to ACR. Here is the Dockerfile I used:

Selection_008

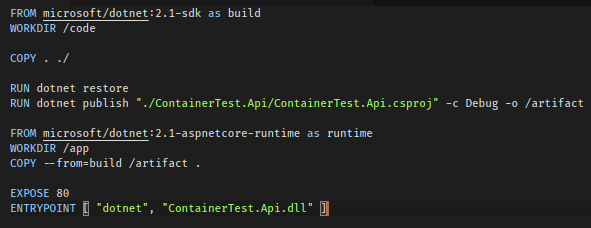
This is what is known as a multi-stage build where we separate the build and runtime components of our container, this reduces the size of the final container as SDKs can be rather large and are not needed to actually run code.

Here are the steps:

  • Download version 2.1 of the dotonet core SDK and refer to this stage as build
  • Set the working directory on the image to /code
  • Copy everything from the current directory into /code (our current working directory)
  • Run the dotnet restore command to restore our Nuget packages
  • Run the dotnet publish to build our application in Debug (it is a Dev build) and send the contents to /artifact
  • Download version 2.1 of the aspnetcore-runtime and name this stage runtime
  • Create your working directory /app
  • Copy all contents from /artifact from the build stage to the current working directory (/app)
  • Expose port 80 on spawned containers
  • Set the Entrypoint for the container as ContainerTest.Api.dll

We will create a derivative of this for the release build later on.

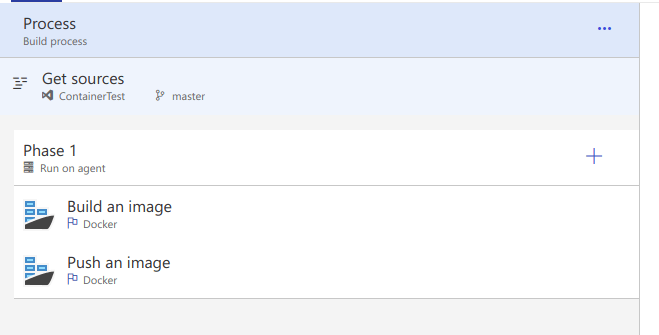
On VSTS, you will need to enter into the Builds and Releases section and click New +this will open the wizard to create a new pipeline.

First screen is selecting the source you want to download, we want to use develop since this is the branch our task and feature branches will ultimately come into. So this build will happen very frequently as an attempt to make sure changes dont break anything.

Next screen we pick our base template, Docker Container will be our selection. This will call our Dockerfile and expect to publish the image to a registry, we will use ACR for this, but you could use any Registry you so desired.

Selection_009

Important: You must make sure that the image(s) you build and the image(s) you publish are the same, or this process will fail.

Selection_011

Let’s go through the fields here, all of them are duplicated in the Publish task as well:

  • Azure Container Registry – because I indicated that this would be where my images are stored I was asked to select the registry. There is a field above this to select the Azure subscription, I have hidden it here for security
  • Action – this is obvious, the values will differ between Building and Publishing for obvious reasons
  • Dockerfile – again, obvious, we can leave the default here.
  • Image Name – Ok, so this is the actual name and tag of the image you will create. In ACR the image maps to a Repository and each individual item in that repository will be a tag
    • In this case we use the repository name as the repo name and the BuildId value as the tag. We can update the tag to be whatever we want
    • Ex: $(Build.BuildNumber)-$(Build.SourceVersion)
  • Additional Image Tags – new line delimited list if you want to create additional tags within the repo, or if your tag structure is long
  • Include Source Tags – will create a tag for any Git tag that is pushed
  • Include Latest – common practice in Docker, latest refers to the latest build for the image. You can also not include any tags and latest will get pushed

Again, it is critical that we duplicate the image name fields in the publish task so that it can find the image we just built.

Finally, we need to indicate that this is a build that is kicked off when the develop branch is pushed to. To do this, we edit our Build Pipeline and select the Trigger tab. Click to Enable Continuous Integration. Make sure you have develop specified. This will ensure the build is kicked off when develop is modified.

Releasing

Now, oddly enough even if you create a latest image and set your App Service to use the latest container it will not update when you push, because the App Service has to be told to update, and that is where the Release pipeline comes in.

First, hit Azure and create an App Service (Web App for Containers), when creating be sure to select Container (if you select Web App for Containers you wont have a choice).

Now, you will be asked to define a default image so, best to do this once one of your build from CI has completed. Be sure to test that it works after the provisioning process is complete.

Returning to VSTS, go to Releases. Release pipelines can do all the same things as Build pipelines but, their targeted purpose is to respond to a completed build or manually release code selected from completed builds.

When you select to Create a release pipeline you will be met with a side menu that requests selecting a template. For this case, we select Azure App Service Deployment.

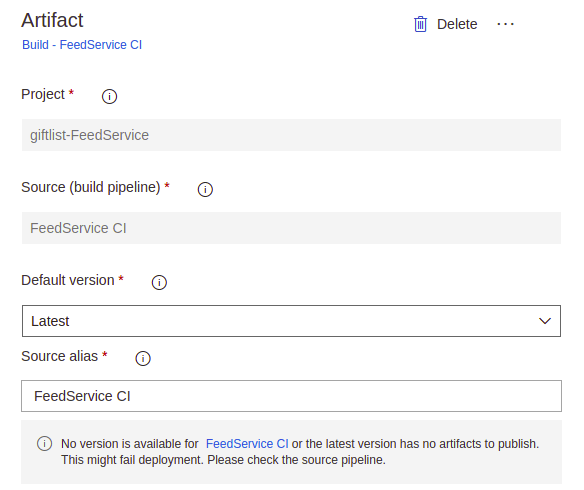
Our next step is to determine what will be released and that means selecting an Artifact. There are many options here but, for this step since we want this release to happen whenever the CI build finishes we select Build. When you do this, most of the fields will get filled in, the Source Version Alias can be whatever you want, its just the name of the incoming artifact.

After we select our artifact we need to tell the release what to do. For our case, this is going to be super simple: we are going to deploy the image built in the Build Phase to our Dev environment AppService. Click the Phase link beneath the Environment.

Selection_013

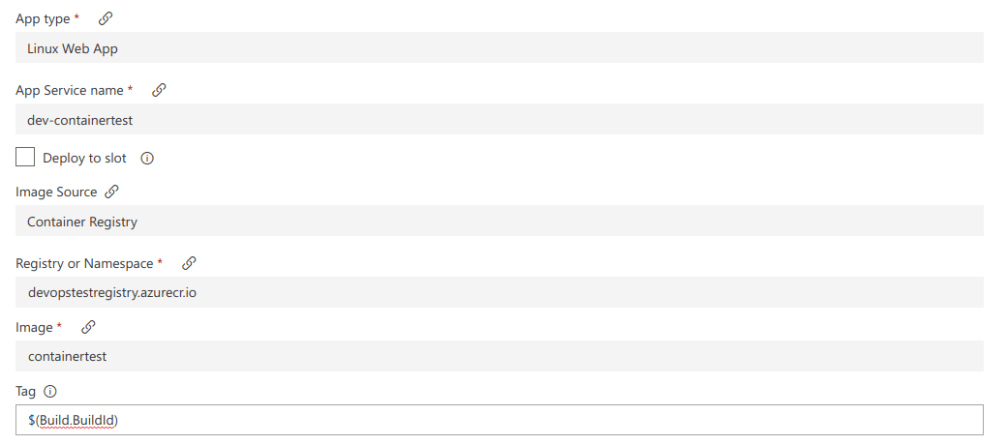
So, let’s go through these settings cause they are important to understand:

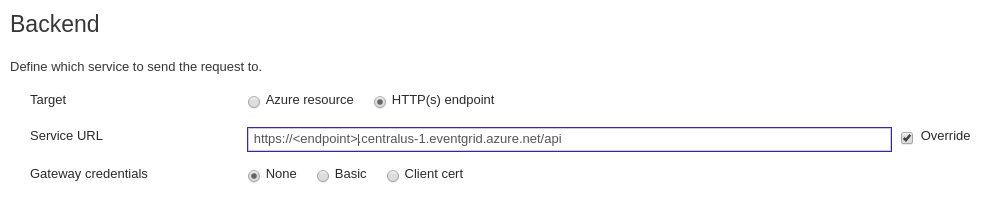
  • App type: Must set this to Linux Web app because the images are all using Ubuntu
  • App Service name: So, I have noticed that if you dont use the Web App for Containers that it doesnt seem selectable in the menu, hence I mentioned using that template above
  • Image: The image you want to target, this is case sensitive
  • Tag: the tag you are deploying. Some of the environment values are carried over from the build, one of them is the BuildId

The last thing we need to do is set up our Release trigger. We can trigger releases manually, which will be the case for UAT and Production and, to some extent, QA. But for Dev we want it to have the latest and greatest.

So, once you have this in place, its time to test our CI build. Make a change and push to develop.

The build should start up and, hopefully, finish successfully (use the Download log on the Build detail to debug failures). After it finishes, switch over to Releases. You should see the next build start up.

Once that finishes, refresh your AppService endpoint and, after a time, you should see the change. If you get Service Unavailable, it usually means that you attempted to specify with an image tag that does not exist. To confirm this, view the Container Settings for your App Service and, if Tag is blank (or any required fields) it means the deployment specified the wrong tag. You can further confirm this in the Log for the Release.

That completes our first goal, we have a CI build which deploys to our AppService, up next is QA.

Creating the Release Build

Ideally, I wanted this build to kick off whenever a version tag was pushed to the develop branch. From this, we can tag the generated image file with its version and very easily have a historical listing of the versions that can be used by App Services and via the Release pipeline.

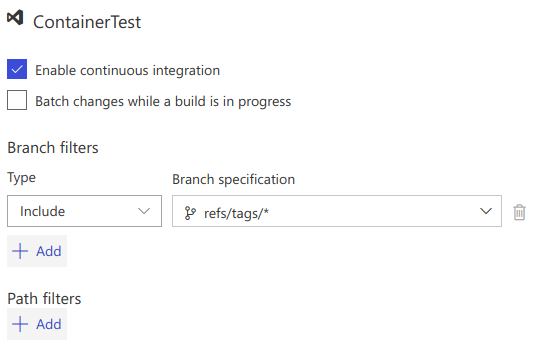
Before going any further its important that we understand how we can automatically invoke a build from a tag push, since it is not immediately obvious.

When you create a tag it is created at the path /refs/tags/<tag name>. Most build engines are wired to look for branch changes using a similar path structure. Knowing this we can hijack this to launch our build when a tag is pushed.

Clone the CI build and go into Edit it, click Triggers. You will need to enable Continuous Integration, as you did for the CI build. But you wont use a branch this time (shown below)

Selection_015

That is all there is to it. Now we just need to make some changes to our build process.

Tagging the Image

Simply put, we want to translate our Git tag to the tag for our container. This value is available to us, oddly enough through the Build.SourceBranchName environment variable. So we can use this in our Image Build and Push steps to correctly tag and push the right image.

Admittingly, this is a bit weird but, if you remember how we triggered it does make sense. I do hope Microsoft exposes this in a cleaner way moving forward because, it is not obvious you can do this.

Selection_017

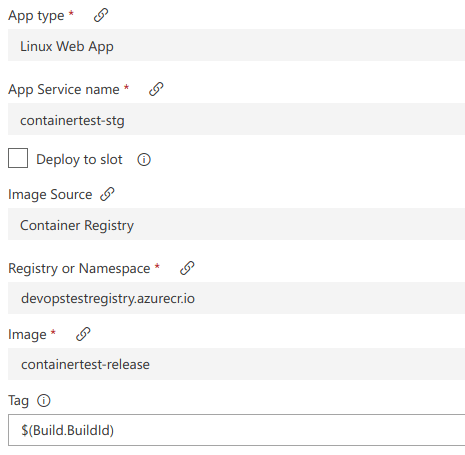
The last thing we want to do is make sure that we build our .NET code in Release mode, since this is code that could potentially go into Production. The easiest way to do this is to create a copy of your Dockerfile and update Debug to Release.

Also note in the Image name the -release suffix added to the Image Name. This is so we do not drop this into our Dev repo (containertest). While there is no harm in doing such, I find this is easier to know which builds are releases and prevent mistakes.

Methodology

When we create a QA release we should view this as something that MIGHT go to Production. In reality, the vast majority of Release builds will be discarded somewhere along the way, but at least one will/should make it all the way through.

Additionally, in a proper build process we NEVER want to rebuild code that has been validated by a testing process as it opens the chance that a bug slips by. Thus, when we create a Release build that is the last time that code is compiled. This is where Containers really shine vs something like ZipFile deploy as they are specifically designed with this case in mind.

Finally, by separating our Dev and Release builds we are able to have a history and allow for easy rollbacks and deployments. By having this history, we can see a timeline of how an application developed.

Releasing the Release

So, we can use the same methodology to kick off his release build as we did with the CI build, when the build changes the release is kicked off.

Go ahead and Create a new Release Pipeline, as before we want to use Azure App Service Deployment as our template. For the Artifact, select the Release Build that was created previously. The beauty here is that since that build is ONLY triggered when a version tag is added, so this release pipeline will only ever fire when that release build is successful; this makes it ideal to deploy to QA environments.

Similar with the Release Build we created earlier, we need to reference the Build.SourceBranchName in the Deployment task so we indicate what Image we are deploying with.

As a tip, when a Release run finishes you can look at its details and click Logs and see a COMPLETE dump of all variables in context. This is VERY helpful for knowing what you have access to; this was more helpful than hours of Googling for me 🙂

Also, a good way to verify that the Release worked (in addition to visiting the Url or checking the Container Settings in the Web App) you can see the actual image and tag it attempts to deploy (you will not get an fail if the image does not exist, just Service Unavailable).

Selection_018

To test, create a tag anywhere in your Git commit history and push that tag to your remote. As a warning, when you do a git push it does NOT, by default, push tags. I use GitKraken so I can push tags individually. Just keep that in mind.

Also, if you are using the free tier of VSTS, it may take a second to start. You can check Queued Builds if you want to see the change was detected.

Once the build finishes, flip over to Releases and, again after some waiting, you will see the Release start. When it finishes you can check your AppService. Congrats.

Higher Environment Deployment

As we talked about before, once you build a QA release you are, effectively, creating a build that you might potentially release and, as such, rebuilding this code should absolutely be avoided. Using containers make this much easier over something like Zip.

Because we do not need to build anymore, additional actions take place only in the Release Pipeline. To close out this post, I will create a Staging Deployment where the user indicates what version they are deploying.

In Releases, choose to create a new Release Pipeline, I called mine Staging Deployment. The important thing with this pipeline is that for the Artifact Type you select Azure Container Registry (or whatever registry you are choosing to use).

Next go into the Tasks for your App Service Deployment task. Make sure we select the right Image Name (remember it is case sensitive) and use Build.BuildId for the tag. This is weird I know but, when the user creates the release they will specify a version (from the versions we have created) and it will be surface as the BuildId. Here is what mine looks like:

Selection_019

This is literally it for the configuration of the pipeline. Now, let’s invoke it.

From the Releases main landing screen select the Staging Deployment (or whatever you called it) Pipeline and from the three dots menu select + Release.

A side menu will appear prompting the user for certain details on this release, one of the, is version. When you click the dropdown a selection of available versions from the ACR will appear. Select the one you want. Here is what my screen looks like:

Selection_020

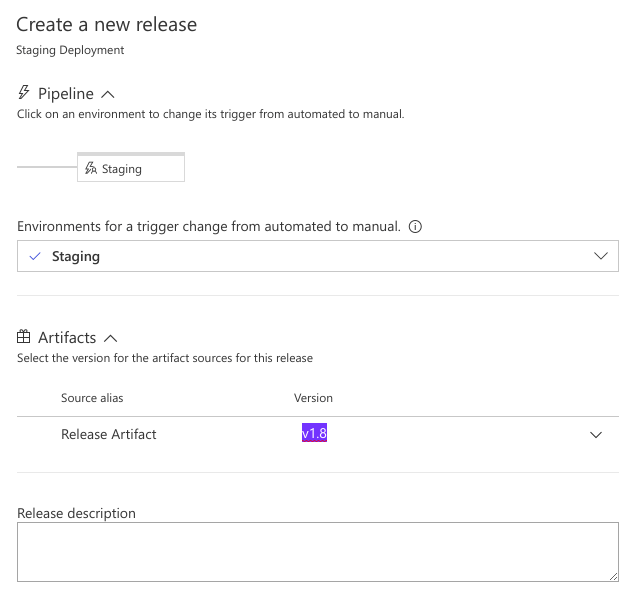
Click Create and the Pipeline will move to a Standby state, it wont actually deploy it yet, that is, correctly, a separate step.

FYI, the Refresh on these screens is a bit wonky so, make use of the manual Refresh button in the table’s upper left corner.

Here is what my screen looks like when I drill into this New Release I created.

Selection_021

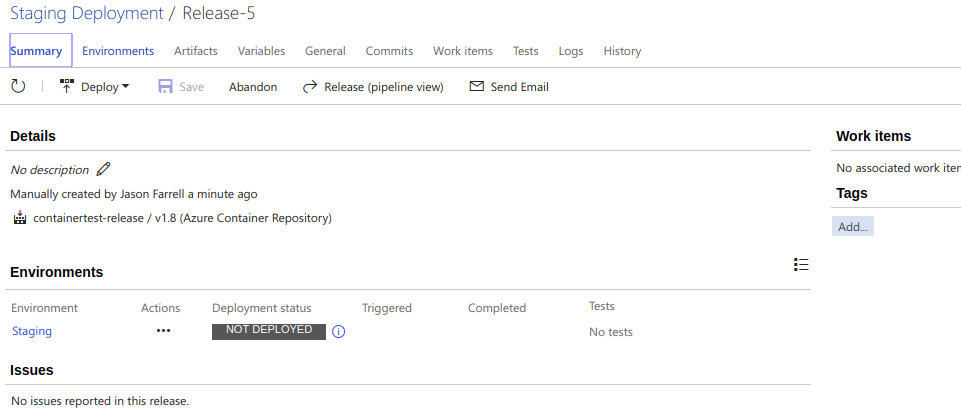
Now, we click Deploy and wait till the process ends. Mine took 3m, though I use the free tier and a local agent built on an Agent Docker Container (future post for that).

Once its complete, go verify things and you should be go.

Closing

Let me be frank, there is NO REASON to not use Containers for applications these days. Orchestration is another matter but Containers should now be the defacto standard for the vast majority of applications.

In the example above, we were able to use Git tags and tagging to identify versions and make our builds but, more than that, there is a consistency here. We have a guarantee that our applications work because they are contained and have everything they need right inside, regardless of the host OS.

Building a Real Time Data Pipeline in Azure – Part 3

Part 1 – here Part 2 – here

In the first two parts of this series we created an Event Hub that we could blast with data in high amounts, this is a common use case one sees with the sort of real time application we are building the backbone for. Next, we showed how to setup a Stream Analytics job to output query results on the data based on a bounding window which allowed us to output these results to a storage medium.

At the conclusion of Part 2 we had these results streaming into Blob storage which is good, but not overly practical (at least not until Azure has something like Athena). Truthfully to effectively use this data we need it in a storage medium that supports querying.

Rules of the Land

I am a huge fan of Azure CosmosDB and the various DB providers it offers including DocumentDB. At the time of this writing the ONLY supported CosmosDB API that allows an Analytics Job output to as a destination. For now, this rule must be followed as you cannot use anything else; if you do not follow it, be prepared for a cryptic error.

Setting the output

Returning to your output screen (and you can have multiple outputs if you want) you can click Add and select Cosmos DB. As with the previous section, you will want as much automated as possible, I would even recommend having your DB prepared ahead of time but, the wizard can do it for you as well.

Testing the process

Once you have all of this in place you can turn on the hose (make sure the Analytics job is started) and wait for data to appear. The truth is, debugging this is simply a matter of checking the flow at each point and seeing where data is stopping if its not making it all the way through.

Your next step is to write an application that queries this data as you need it to provide insights into the data you are creating. Once you have it in the output you can just write your normal queries against it.

Building a Real Time Data Pipeline in Azure – Part 2

Part 1 here

Continuing on with this series, we now turn our attention to how to ingest and process the data collected through the Event Hub. For real time apps, this is where we want to perform our bounded queries to generate data within a window. Remember, traditionally we naturally get bounded queries because we are querying a fixed data set. With this sort of application our data is constantly coming in and so we have to be cognizant of limiting our queries within a given window.

Creating our Stream Analytics Job

Click Add within your Resource Group and stream for Stream Analytics and look for Stream Analytics job.

For this demo, you can set Streaming Units to 1. Streaming Units is a measure of the scalability for the job, you should adjust this based on your incoming load. For more information see here.

When we look at this sort of service we concern ourselves with three aspects: InputQuery, and Output. For the job to work we will need to fulfill each of these pieces.

Configure the Input

For Input, we already have this, our Event Hub. We can click on Inputs and select Add Stream Input. From here you can select your Event Hub, you will be promoted to fill in values from the right side panel. As a tip, try to use the EventHub selection, dont try to specify the values. I have found that things wont work properly.

This provides an input into our analytics job for our next section we will configure the query.

Configure the Query

As I mentioned before, the thing to remember with this sort of process is you are dealing with unbounded data. Because of this we need to make sure the queries look at the data in a bounded context.

From the Overview for your Stream Analytics Job click the Edit Query which will drop you into the Query editor. Some important things to take note of here:

  • When you created your Input you gave it a name, this serves as the table you will use as the source for your data
  • The query result is automatically directed to your output. There are ways to send multiple outputs, but I wont be talking that here

So here is a sample query that I used to select the sum of shares purchased or sold on a per minute basis:

Selection_004

There are a couple things to point out here:

  • We use System.Timestamp to produce a timestamp for the event. This will be used on the frontend if you want to graph this data over time. It also serves as a primary key (when combined with symbol) in this case
  • StockTransactionsRaw is the input that we defined for this Stream Analytics job, you can call this whatever
  • TumblingWindow is a feature supported within Analytics job to allow for creating a bounded query. In this case, we slide a window on a per minute basis. Here is more information on TumblingWindow – click

One big tip I can give here is using Sample Data to test. Once you have your Input stream going for a bit you can return to the Inputs list and click Sample Data for that specific input. This will generate a file you can download with the data being received through that input.

Once you have this file, you can return to the Edit Query screen and click the Test button, this will let you upload the file you downloaded and will display the query results. I found this a great way to test your query logic.

Once you have things working to your liking you need to move on to the Output.

Configure the Output

For now, we are going to use Blob Storage to handle our data. We will cover hooking this up to Cosmos in Part 3. I want to break this up a bit just so its not too much being covered in one entry and, I like 3 as a number 🙂

Click on Outputs and select Add and choose Blob Storage. Here is what my configuration looks like:

Selection_005

This will drop the raw data into files within your blob storage that you can read back later. Though, the real value here will be the ability to query it from something like Cosmos which we cover in the next section.

So, now you have an Event Hub that is able to ingest large amounts of data and it pumps the data into the Analytics Job which runs a query (or queries) against it and it sends the outputs, for now, to our Blob Storage.

Looking to catch you in Part 3.

Building a Real Time Data Pipeline in Azure – Part 1

Previously I walked through the process of using the Amazon Kinesis Service to build a real time analytics pipeline in which a bunch of data was ingested and then processed with the results pushed out to a data store which we could then query at our leisure. You can find the start of this series here.

This same ability is available in Microsoft Azure using a combination of Event Hubs, Analytic Streams, and CosmosDB. Let’s walk through creating this pipeline.

Event Hubs

Event Hubs in Azure are similar to Kinesis Firehose in that the aim is to intake a lot of data at scale. This is where it differs from something like Service Bus or Event Grid both of which are more geared towards enabling event driven programming.

To create an Event Hub you need to first create a namespace, it is within these namespaces that you created the hubs you will send data to. To create the namespace search for and select Event Hubs by Microsoft.

One of the important aspects here is the determination of your throughput units which determines how much load your Hub can accommodate. For a simple demo, you can leave it at 1, for more advanced scenarios you would increase it.

Enable Auto Inflate allows you to specify the minimum number of throughput units but lets Azure automatically increase the number as needed.

Once you have your Namespace, click the local Add button to add your Hub. As a convention, I always suffix these with hub.

When creating the Hub you need to be aware of the Partition count. Partitions are an important part of this sort of big data processing as they enabling data sharding which lets the system better balance the amount of data.

The number here MUST range of 2 to 32. You should try to think of a logical grouping of your data so that you can balance it. For example, in my sample I only have 10 user Ids so I create 10 partition and each one handles an individual user. In a real life scenario I might have users so this would not work.

Regardless, selecting the appropriate partition key is essential for maximizing the processing power of Event Hubs (and other stream services).

This bit of documentation explains this better: https://docs.microsoft.com/en-us/azure/event-hubs/event-hubs-features

Connecting to your Hub

So now that you have a hub up we need to write events to it. This can be accomplished in a variety of ways, but I have not yet found a way to do it via API Management. I sense that this sort of data processing is of a different nature than pure Event Driven programming.

For starters you will need the Microsoft.Azure.EventHubs NuGet package which will make writing to the endpoint much easier.

Within your application you need to create a client reference to EventHubClient this is created using your Endpoint and Shared Access Key.

You can get these values in one of two ways: globally or locally.

  • At the Namespace level, you can click on Shared access policies to work with policies that apply to ALL Hubs within that namespace – by default Microsoft expects this is what you will do and so creates the RootManageSharedAccessKey here
  • At the Hub level, you can click on Shared access policies to work with policies that apply ONLY to that Hub – this is what I recommend as I would rather not have my Namespace that open

Regardless of how you do this, a policy can support up to three permissions: ManageSend, and Listen. In the context of eventing these should be pretty self explanatory.

Returning to the task at hand, we need to select the appropriate policy and copy the Connection String – primary key value. As a note, if you copy this value at the Namespace level you will NOT see the EntityPath included in the connection string, if you copy at the Hub level you will.

EntityPath can be applied via EntityHubsConnectionStringBuilder. The value is the name of the Hub you will connect to within the namespace.

Selection_002

Again, if you copy the Connection String from the Hub level you can OMIT the EntityPath specification that I have in the code above. I think that is the better approach anyway.

Sending Events

Once we have our client up and configured we can start to send events (or messages) to our Hub. We do this by calling SendAsync on the EventHubClient instance. The message can be passed in a variety of ways, but the standard is as a UTF8 byte array. This is easy to do with the Encoding class in .NET.

Selection_003

As with any sort of test involving streaming you need to make sure you generate a considerable amount of data so you can see the ingestion rates in the Hub metrics.

Ok so, we now have events streaming from our apps up to the Hub, now we need to do something with our data. In the next section, we will set up a Stream Analytics Job that runs against our incoming data, produces results, and drops the data into a Blob storage container.

Part 2 – here

Getting Started with Azure Event Grid

One of the most interesting scenarios the Cloud gives rise to is better support for building event driven backends. Such backends are necessary as the complexity and scale of applications grow and developers want to decouple service references. Additionally, cloud providers are raising events from their own services and allow developers to hook into these events, this is most noticeable on AWS.

While this tend is not new on Azure (EventHubs have existed for a while) support for it compared to AWS has lagged. But by introducing EventGrid, Microsoft seems to be positioning themselves to support the same sort of event driven programming as allowed with in Amazon with the added benefit of additional flexibility supported, mainly, by EventGrid.

What is Event Grid?

In the most simplest sense, EventGrid is a router. It allows events to be posted to a topic (similar to a Pub/Sub) and can support multiple subscriptions, each with differing configurations, including what eventType to support and what matching subjects will be sent to subscribers.

In effect, EventGrid allow you to define how you want the various services you are using to communicate. In that way, it can potentially provide a greater level of flexibility, I feel, than AWS, whose eventing generally lacks a filtering mechanism.

Creating an Event Topic

So, the first thing to understand is that the concept of topic will be appear twice. The first is the name of the EventGrid itself, which is a topic itself.

Choose to Add a Resource and search for event grid. Select Event Grid Topic from Microsoft from the returned results.

By default, the name of the topic will match the given name of the Event Grid so, pick wisely if this is for something where the name will need to have meaning.

Once this completes we will need to create a subscription.

Before you create a subscription

When you create a subscription you will be asked to give an endpoint type. This is where matched events to the topics will be sent. If you use a standard Azure service (ie Event Hubs) you can select and go, however, if you use an Azure Function you will need to do something special to ensure the subscription can be created.

If you fail to follow this, you will receive (at the time of this writing) an undefined error in the Portal. The only way to get more information is to use the Azure CLI to create the subscription.

The error is in reference to a validation event that is sent to the perscribed endpoint to make sure it is valid. There is a good guide on doing this here. Essentially, we have to look for a certain event type and return the provided validation code as proof that we own the event endpoint.

I do not believe you have to do this with other Azure service specific endpoints, but you certainly have to do it if your endpoint is going to be of type WebHook.

The destination for this Event Grid subscription is the Azure Function Url.

Regardless of your endpoint type…

You will need to setup the various filtering mechanisms that indicate which events, when received, are passed through your subscription to the endpoint.

Most of these are fairly self explanatory except for the Event Schema field which refers to the structure of the data coming through the topic. It is necessary for the subscription to understand the arrangement so it can be analyzed.

The default is the pre-defined EventGridEvent which looks like this:

[
    {
        "id": "string",
        "eventType": "string",
        "subject": "string",
        "eventTime": "string",
        "data": "object",
        "dataVersion": "string"
    }
]

The key here is the data object which will contain your payload.

I am not sure of the other schemas as I have not explored them, mainly because the .NET EventGrid libraries have good native support for the EventGridEvent schema.

Let’s Send an Event

There are quite a few ways to send events to EventGrids. For any attempt you are going to need your Topic Endpoint which you can find on the Overview section for your Event Grid. This is the Url you will submit new events to for propagation within Azure, it is also the value you will need to get from any Azure service that you want to submit events to the Event Grid.

Disclaimer: At the time of this writing, there was some weirdness in the portal where you needed to use the CLI to route events from Azure services (like Storage) to an EventGrid.

Receiving Events from an Azure Resource
https://docs.microsoft.com/en-us/azure/storage/blobs/storage-blob-event-quickstart?toc=%2fazure%2fevent-grid%2ftoc.json

Within this tutorial you are shown how to use the Azure CLI (via the command shell or through the portal) to create the appropriate subscriptions. Do note that, once created, you will not see this listed in the portal

Send a Custom Event
This is probably the case you came here to read about. Principally, sending custom events involves posting to the Event Grid Topic Url with a schema for the body that matches a subscription.

Doing this is easiest if you use the Microsoft.Azure.EventGrid NuGet library which will expose the the PublishEventAsync method, here is an example:

Selection_001

You can also send to this endpoint manually using the HttpClient library, but I recommend using the NuGet package. To be a better idea of what is in there, here is the source page: https://github.com/Azure/azure-sdk-for-net/tree/psSdkJson6/src/SDKs/EventGrid/DataPlane

Keep in mind that this will send an event using the EventGridEvent schema, which is what I recommend.

How do I test that things are working…

Once you have things in place, I recommend selecting the Azure Function and clicking the Run button. This will enter into a mode where you can see a streaming log at the bottom. This is the stream for the function and is not relegated to just what is passed via testing.

Once you have this up, send an event to your Event Grid Topic and wait for a log message to appear which will tell you things are connected correctly.

What are my next steps?

This gets into a bigger overall point but, in general, I do NOT recommend using the Event Grid Topic Url for Production because it couples you to a Url that cannot be versioned and breaks the identity of your API.

Instead, as should be the case when you use Azure Functions you need to set things up behind an Azure API Management service. This lets you customize what the Url looks like, version, and maintain better control over its usage.

Additionally, in an event driven system you should view events as a way to maximize throughput so users should be posting to this endpoint and the event should fan out.

To put our Event Grid Topic endpoint behind an Azure API Management Route, do this:

  1. Create an API Management service instance (this will take time) and wait for it to activate
  2. Create a Blank API
    • Tip: When you create the API you will be asked to select a Product. Without getting too much into what this is, select Unlimited to make things easy on yourself
  3. Access your API definition via the APIs link navigation bar
  4. Add a POST route –  you can provide whatever values you want to the required fields
  5. Copy the aeg-sas-key from the Access Keys section under your Event Grid Topic and make this a required header for your POST route
  6. Once the route is created selected the Edit icon for the Backend
  7. Select Http(s) endpoint and paste the Event Grid Topic Url, make sure to NOT include the /events at the end of this URL
    Selection_003
  8. Hit Save
  9. Click on your API Operation (POST route) in the selection method to the left
    Selection_004
  10. Select Inbound Processing
  11. Change the Backend line such that it reads with the POST method and the resource is /events
  12. Hit Save and you can click Test to check this. Building the payload is a bit tedious. Use the source here to understand how the JSON should look for the EventGridEvent that I assume you are sending.

Ok so let’s recap.

The first bit of this is to create an Azure API Management service instance and then create a POST path. Azure API Management is a huge topic that I have covered part of in the past. It is an essential tool when building a MicroService architecture in Azure as it allows for unification of different service types (serverless, containerized, traditional, etc) into what appears to be a single unified API.

All requests to Azure Event Grid require the aeg-sas-key so, we make sure that Azure API Management does not allow any requests to the proxy to come through unless that header is at least present. Event Grid will determine its validity.

Once the general route is created we need to tell it where to forward the request it receives. This is simply the Event Grid Topic endpoint that we can get from the Event Grid Topic Overview page in the Azure Portal. However, we do NOT want to take the entire Url as we will need to use Url Rewriting instead of Url Forwarding. So, I recommend taking everything but the trailing /events which we will use in the next section. Be sure to also check Override to allow for text entry into the Url field.

Ok, now lets complete the circle. You need to click Inbound Processing and change the default processing from URL Forwarding to URL Rewrite. There is a bit of a quirk here where you cannot leave the text field for your backend blank. This is where you will want to drop the /events that we omitted from our backend URL.

You will want to use the Test feature to test this. I provided the source code for the Azure Event Grid EventGridEvent class so you can see how the JSON needs to be in test.

Conclusion

Event Driven Programming is a very important and vital concept in enabling high throughput endpoints. The design is inherently serverless and enables developers to tap into more of Azure’s potential and easily declare n number of things that happen when an endpoint is called.

API Management is a vital tool in creating a unified and consistent look interface for external developers to use. There are many tools it comes with including Header enforcement and event event body validation and transformation and it can integrated with an authentication mechanism. If you are going to create a Microservice type API or if you intend to break up a monolith, API Management is a create way to get free versioning and abstraction.

The biggest thing to remember is that Event Grid is geared towards enabling Event Driven scenarios, it is not designed for processing a high number of events, that is the realm of Event Hubs. If you were going to do real time processing, you would feed your data pipeline into Event Hubs and route those events to Event Grid (potentially).

More information here