Previously I walked through the process of using the Amazon Kinesis Service to build a real time analytics pipeline in which a bunch of data was ingested and then processed with the results pushed out to a data store which we could then query at our leisure. You can find the start of this series here.
This same ability is available in Microsoft Azure using a combination of Event Hubs, Analytic Streams, and CosmosDB. Let’s walk through creating this pipeline.
Event Hubs
Event Hubs in Azure are similar to Kinesis Firehose in that the aim is to intake a lot of data at scale. This is where it differs from something like Service Bus or Event Grid both of which are more geared towards enabling event driven programming.
To create an Event Hub you need to first create a namespace, it is within these namespaces that you created the hubs you will send data to. To create the namespace search for and select Event Hubs by Microsoft.
One of the important aspects here is the determination of your throughput units which determines how much load your Hub can accommodate. For a simple demo, you can leave it at 1, for more advanced scenarios you would increase it.
Enable Auto Inflate allows you to specify the minimum number of throughput units but lets Azure automatically increase the number as needed.
Once you have your Namespace, click the local Add button to add your Hub. As a convention, I always suffix these with hub.
When creating the Hub you need to be aware of the Partition count. Partitions are an important part of this sort of big data processing as they enabling data sharding which lets the system better balance the amount of data.
The number here MUST range of 2 to 32. You should try to think of a logical grouping of your data so that you can balance it. For example, in my sample I only have 10 user Ids so I create 10 partition and each one handles an individual user. In a real life scenario I might have n users so this would not work.
Regardless, selecting the appropriate partition key is essential for maximizing the processing power of Event Hubs (and other stream services).
This bit of documentation explains this better: https://docs.microsoft.com/en-us/azure/event-hubs/event-hubs-features
Connecting to your Hub
So now that you have a hub up we need to write events to it. This can be accomplished in a variety of ways, but I have not yet found a way to do it via API Management. I sense that this sort of data processing is of a different nature than pure Event Driven programming.
For starters you will need the Microsoft.Azure.EventHubs NuGet package which will make writing to the endpoint much easier.
Within your application you need to create a client reference to EventHubClient this is created using your Endpoint and Shared Access Key.
You can get these values in one of two ways: globally or locally.
- At the Namespace level, you can click on Shared access policies to work with policies that apply to ALL Hubs within that namespace – by default Microsoft expects this is what you will do and so creates the RootManageSharedAccessKey here
- At the Hub level, you can click on Shared access policies to work with policies that apply ONLY to that Hub – this is what I recommend as I would rather not have my Namespace that open
Regardless of how you do this, a policy can support up to three permissions: Manage, Send, and Listen. In the context of eventing these should be pretty self explanatory.
Returning to the task at hand, we need to select the appropriate policy and copy the Connection String – primary key value. As a note, if you copy this value at the Namespace level you will NOT see the EntityPath included in the connection string, if you copy at the Hub level you will.
EntityPath can be applied via EntityHubsConnectionStringBuilder. The value is the name of the Hub you will connect to within the namespace.

Again, if you copy the Connection String from the Hub level you can OMIT the EntityPath specification that I have in the code above. I think that is the better approach anyway.
Sending Events
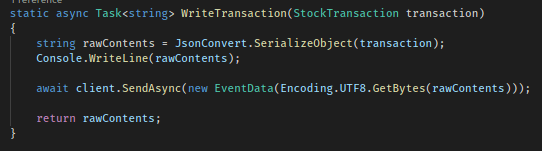
Once we have our client up and configured we can start to send events (or messages) to our Hub. We do this by calling SendAsync on the EventHubClient instance. The message can be passed in a variety of ways, but the standard is as a UTF8 byte array. This is easy to do with the Encoding class in .NET.
As with any sort of test involving streaming you need to make sure you generate a considerable amount of data so you can see the ingestion rates in the Hub metrics.
Ok so, we now have events streaming from our apps up to the Hub, now we need to do something with our data. In the next section, we will set up a Stream Analytics Job that runs against our incoming data, produces results, and drops the data into a Blob storage container.
Part 2 – here

3 thoughts on “Building a Real Time Data Pipeline in Azure – Part 1”