Recently, I began experimenting with Amazon Kinesis as a way to delve into the world of real time data applications. For the uninitiated, this is referred to a “streaming” and it basically deals with the ideas of continuous data sets. By using streaming, we can make determinations in real time which is allows a system to generate more value for those wanting insights into their data.
Amazon has completely embraced the notion of streaming within many of their services, supported by Lambda. This notion of being event driven is not a new pattern but, by listening for events from within the Cloud they become much easier to develop and enable more scenarios than ever before.
Understanding Our Layout
Perhaps the most important thing when designing this, and really any Cloud based application, is a coherent plan of what your after and what services you intend to use. Here is a diagram of what we are going to build (well parts of it).
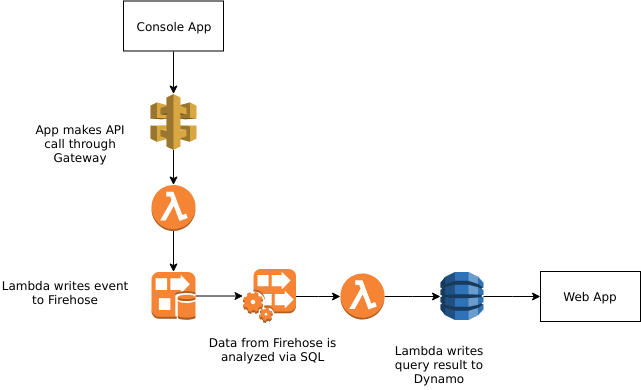
Our main focus will be on the Amazon components. For the Console App, I wrote a simple .NET Core app which randomly generates stock prices and shares bought. Really you can build anything that will just generate a lot of data for practice.
This data gets written to an API Gateway which allows us to create a more coherent mapping to our Lambda rather than exposing it directly. API Gatways enable a host of useful scenarios such as unifying disparate services behind a single front or starting the breakup of a monolith into microservices.
The Lambda takes the request and writes it to a Kinesis Firehose which is, as it sounds, a wide pipe that is designed to take A LOT of data. We do this to maximize throughput. Its like a queue, but much more than that and its all managed by Amazon and so will scale automatically.
The Firehose than writes the data it receives to another Kinesis Stream, but its an Analytics stream, designed to be queried to see trends and other aspects of the incoming data. This outputs to a stream which is then sent to another Lambda. The thing to remember here is that we are working against a continious data set, so bounding our queries is important.
The final Lambda, takes the query result from analytics and saves it to Dynamo. This gives us our data, time based, that we can query against from a web application.
Creating our Kinesis Ingestion Stream
Start off from the AWS Console, under Analytics selecting Kinesis. You will want to click the Create Firehose Delivery Stream.
For the first screen, you will want to give the stream a name and ensure the Source is set to Direct PUT. Click Next.
On the second screen, you will be asked if you want to do any kind of preprocessing on the items. This can be very important depending on the data set you are injesting. In our case, we are not going to do any preprocessing, click Next.
On the third screen you will be asked about Destination. This is where the records you write to Firehose go after they pass through the buffer and into the ether. For our purposes, select S3 and create a new bucket (or use an existing one). I encourage you to explore the others as they can serve other use cases. Click Next.
On the fourth screen, you will be asked to configure various settings. including the all important S3 Buffer Conditions. This is when Firehose will store the data it receives. Be sure to set your IAM Role, you can auto create if you need to. Click Next.
On the final screen click Create Delivery Stream. Once the process is complete we can return and write some code for the Lambda which will write to this stream.
Creating the Ingestion Lambda
There are many ways to get data into Kinesis each of which is geared towards a specific scenario and dependent on the desired ingestion rate. For our example, we are going to use a Http Trigger Lambda written in C# (.NET Core 2.0).
Setup: I am quite fond of Visual Studio Code (download) and it has become my editor of choice. To make this process easier, you will want to run the following command to install the Amazon AWS Lambda templates (note: this assumes you have installed .NET Core SDK to your machine)
dotnet new -i Amazon.Lambda.Templates::*
More information here
Once this is installed we can create our project using the EmptyServerless template, here is the command:
dotnet new lambda.EmptyServerless –name <YourProjectName>
This will create a new directory named after your project with src/ and test/ directories. Our efforts will be in /src/<ProjectName> directory, you will want to make sure you cd here as well as you must be in the project root to run the installed dotnet lambda commands.
Our basic process with this Api call is to receive a payload, via POST, and write those contents to our Firehose stream. Here is the code that I used: https://gitlab.com/RealTimeApp/StockTransactionApi/blob/master/src/StockTransactionApi/PostTransaction.cs
A few things to take note of here:
- The first parameter is of type object and it needs to match the incoming JSON schema. Amazon will handle the deserialization from string to object for us. Though we end up needing the raw contents anyway.
- We need to install the AWSSDK.KinesisFirehose (I used version 3.3.5.3) which gives us access to AmazonKinesisFirehoseClient
- We call PutItemAsync to write to our given Delivery stream (in the case of this code that stream is named input_transactions)
- I have changed the name of the function handler from FunctionHandler (which comes with the template) to PostHandler. This is fine, but make sure to update the aws-lambda-tools-defaults.json file to ensure function-handler is correct
Once you have your code written we need to deploy the function. Note that I would rather do it from the command line since it avoids the auto creation of the API Gateway path. I have done both and I find I like the clarity offered with doing it in stages. You need to run this command to deploy:
dotnet lambda deploy-function <LambdaFunctionName>
LambdaFunctionName is the name of the function as it appears in the AWS Console. It does NOT have to match what you call it in development, very useful to know.
As a prerequisite to this, you need to define a role for the Lambda to operate within. As with anytime you define an IAM Role, it should only have access to the bare minimum of services that callers will need.
When you run the deploy, you will receive a prompt to pick an applicable role for the newly created function, future deployments of the same Lambda name will not ask this.
Our next step is to expose this on the web, for that we need to create a API Gateway route. As a side note, there is a concept of lambda-proxy which I could not get to work. If you can, great, but I made due with the more standard approach.
Add Web Access
I think API Gateways are one of the coolest and most useful services offered by Cloud providers (API Gateway on Azure and Endpoints on Google). They enable us to tackle the task of API generation in a variety of ways, offer standard features prebuilt, and offer an abstract to let us make changes.
I will be honest, I can never find API Gateway in the Services list, I always have to search for it. Click on it once you find it. On the next page press Create API. Here are the settings you will need to get started:
- Name: Anything you cant, this doesnt get exposed to the public. Be descriptove
- Endpoint type: Regional (at this point I have explored the differences between the types)
Click Create and you will be dropped on the API configuration main page.
The default endpoint given is / or the root of the API. Often we will add resources (i.e User, Product, etc) and then have our operations against those resources. For simplicity here we will operate against the root, this is not typical but API organization and development is not the focus of this post.
With / selected click Actions and select Create Method. Select POST and click the checkmark. API Gateway will create a path to allow POST against / with no authentication requirements, this is what we want.
Here is a sample of the configuration we will specify for our API Gateway to Lambda pipe, note that my function is called PostTransaction, yours will likely differ.
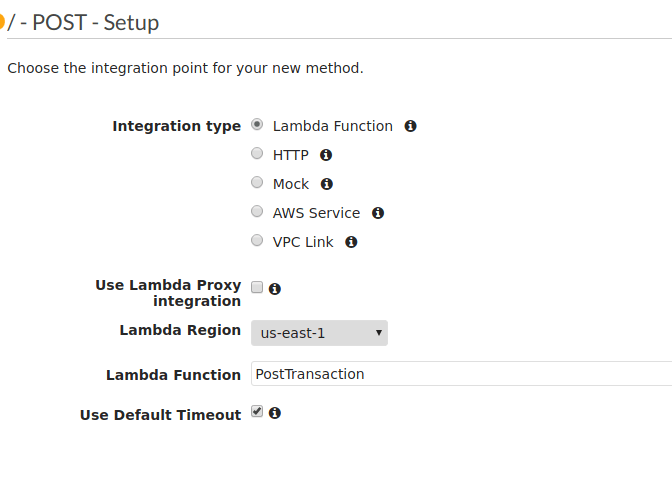
Click Save and you will get a nice diagram showing the stages of the API Gateway route. We can test that things are working by clicking Test and sending a payload to our endpoint.
I wont lie, this part can be maddening. I tried to keep this simple to avoid problems. There is good response logging from the Test output you just have to play with it.
So we are not quite ready to call our application via Postman or whatever yet, we need to create a stage. Stages allow us to deploy the API to different environments (Development, QA, Staging, Production). We can actually combine this with Deploy API.
IMPORTANT: Your API changes are NEVER live when you make them, you must deploy, each time. This is important because it can be annoying figuring out why your API doesnt work only to find you didnt deploy your change, as I did.
When you do Actions -> Deploy Api you will be prompted to select a Stage. In the case of our API, we have no stages, we can create one, I choose Production, you can choose whatever.
Once the deploy finishes we need to get the actual Url that we will use. We can go to Stages in the left hand navigation and select our stage, the Url will be displayed along the top (remember to append your resource name if you didnt use /). This is the Url we can use to call our Lambda from Postman.
The ideal case here is that you create an app that sends this endpoint a lot of data so we can write a large amount to Firehose for processing.
Debugging
In this part, we did not write that much code and the code we did write could be tested rather easily within the testing harnesses for both API Gateway and Lambda. One thing that is useful is to use Console.WriteLine as CloudWatch will capture anything in Logs from STDOUT.
Next Steps
With this we have an endpoint applications can send data to and it will get written to Firehose. By using Firehose we can support ingesting A LOT of data and with Lambda we get automatic scaling. We abstract the Lambda path away using API Gateway which lets us also include other API endpoints that could be pointing at other services.
In our next part we will create a Kinesis Analytics Data Stream which allow us to analyze the data as it comes into the application – Part 2

4 thoughts on “Scratching the Surface of Real Time Apps – Part 1”