See Part 1 here
If you followed Part 1, we have a Lambda that sits behind an API Gateway that writes the contents of the payload it receives to an Amazon Kinesis Firehose Delivery Stream. This stream is currently configured to dump its contents, at set conditions, to S3.
It being S3 does not really lend itself to real time processing, though we could use something like Athena and query it, our aim is to see our data changes in real time. For that we want to hook our Firehose stream up to a Data Analytics stream where the principal job is to process “bounded” data.
Planning
The most important thing with this step is having an idea of what you want to look for before you start. Generally, these are going to be time based metrics, but they dont have to be. Once you have established this ideas we can move on to the creation phase.
Create the analytics application
Configure the source of you Analytics Application
Go to your Amazon AWS Console and select Services -> Kinesis. This will bring up your Kinesis Dashboard, you should see the Firehose stream you created previously. Click Create analytics application.
Similar to the Firehose process we give our new stream an application name and click the Create action button.
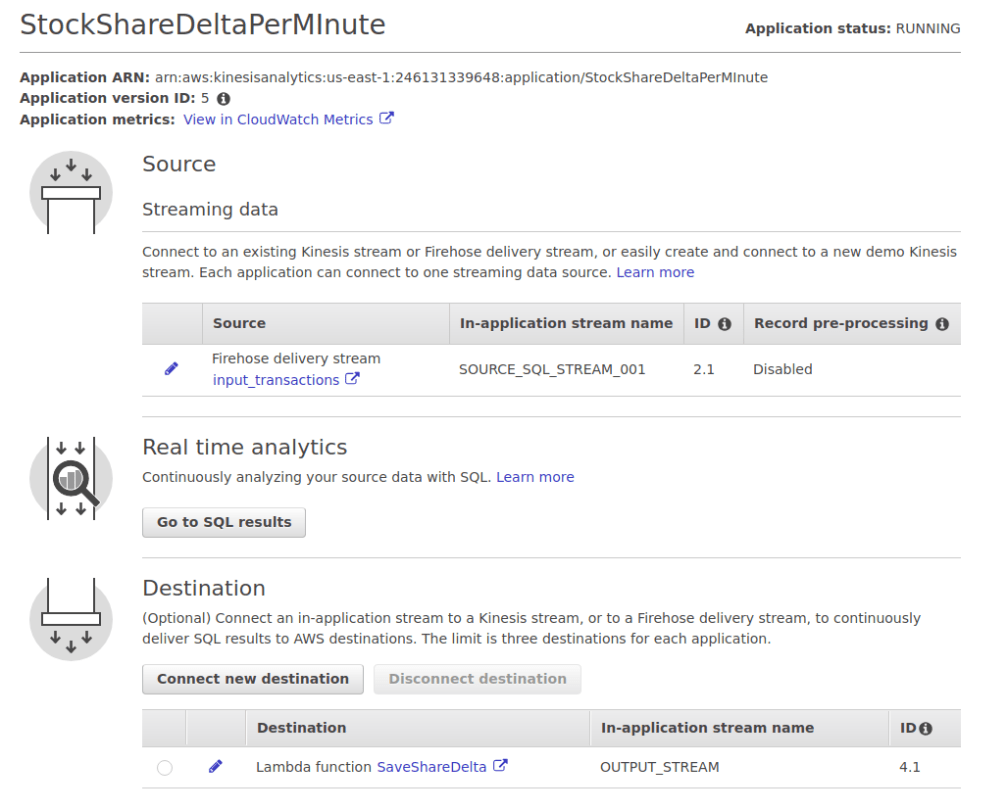
An analytics application is comprised of three parts: Source, Processor, and Destination. You need to configure these in order. Amazon makes it pretty easy, except for the part on debugging which we will talk about in a bit.
For the Source you will want to connect it to your Firehose Datastream that was created previous, if you are following this tutorial. You can also use a Kinesis Data Stream as well. This part is pretty straightforward.
The important thing to take note of is the name of you incoming In-Application stream, this will serve as the “table”.
In order to save the configuration the application will want to discover the schema from the incoming data. This is done using the Discover Schema button at the bottom, you need to have data flowing through.
As a side note, when I wrote my application with sends data I wrote logic to limit the size of the result set being sent. This helps speed up development and lets you explore other data scenarios you way want to explore (pre-processing). I find this approach is better than truly opening the firehose before you are ready, pun intended.
Configure the Processing of your streaming data
When you think about writing a SQL Query against a database like MySQL you probably dont often think about that data set changing underneath you, but that is what you need to consider for many operations within Analytics, because you are dealing with unbounded data.
The term “unbounded data” specifically applies to doing things like averages, mins, maxs, sums, etc, values that are calculated from the complete set of data. This cant happen with Analytics because you are dealing with a continuous stream of data. So you could never compute the average because it will keep changing. To mitigate this, query results need to operate on bounded data, especially for aggregates.
This bounding can be done a few ways but the most common is the use of a Window. Amazon has some good documentation on this here, as well as the different types. Our example will use Tumbling Window because we will consider the set of data relevant for a given minute, specifically the number of stock shares purchased or sold within a given minute,
https://docs.aws.amazon.com/kinesisanalytics/latest/dev/tumbling-window-concepts.html
For stage 2 (Real Time Analytics) of the Analytics Application you will want to click the Go to SQL Results button which will take you into the SQL Query editor. This is where you define the SQL to extract the metric you want. Remember you, MUST provide criteria to make the query operate on a bounded data set, otherwise the editor will throw an error.
For my application this is the SQL I used:
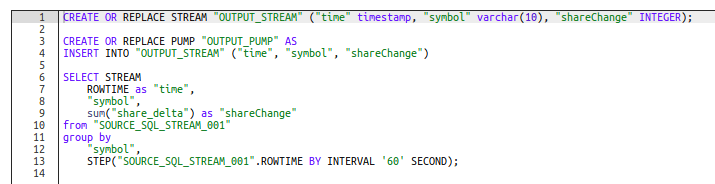
There is a lot going on here so let’s unpack it.
The first step you need to take is to create a stream that will contain the results of your query. You can KIND OF think of this as a “temp table” from SQL land, but its more sophisticated.
In our example, we defining a STREAM called OUTPUT_STREAM, we will be able to select this in Step 3, when we determine what happens after the query. This stream will feature 3 columns (time, symbol, and shareChange).
Our second step focuses on getting data from the query into the stream, which is done using a Pump. This will run the INSERT statement with each query result and insert the data into the stream.
The final bit is the query that actually does the lifting. Its pretty standard with the exception of the STEP operator in the GROUP BY clause – this is what creates the tumbling window we mentioned before.
Once you have set your query you can click the Save and Run, this will save the query and execute it. You will be much more pleased with the outcome of this if you are sending data to your Firehose so the Analytics application has data it can show.
Connect to a Destination
The final configuration task for the Analytics Application is to specify where the query results are sent. For our example we will use a Lambda. However, doing this with C# can be somewhat confusing so, we will cover it in the next part.
You can specify this configuration by access the Destination section from the Application homepage (below):
Alternatively, you can select the Destination tab from within the SQL Editor. I find this way to be better since you can directly select your output stream as opposed to free typing it.
For both of these options, Amazon has made it very easy and as simple as point and click.
Closing
Congrats. You now have a web endpoint that will automatically scale and write data to a pipe that will store things in S3. In addition, we created an Analytics Application which queries the streamed data to derive metrics based on a window (per minute in this case). We then take these results and pass them to a Lambda which we will cover in Part 3, its going to write the results to a DynamoDB table that we can easily query from a web app and see our results in real time.

3 thoughts on “Scratching the Surface of Real Time Apps – Part 2”