After the week I had, this is a very necessary blog post. I spent the week, among other things, helping my new client setup their Xamarin and Web API to talk to each other and use AD Tokens as the validation mechanic. Speaking frankly, Microsoft has A LOT of information out there, not helped by the transition from ADAL to MSAL and the many forms AD on Azure takes (B2C, Vanilla, B2B, I am sure others). It was immensely difficult to bring this together.
For this we will be using a standard WebAPI backend which leverages the normal AspNetCore Authentication libraries, Xamarin.Forms on the front end using the ADAL libraries
Setup the Web API
Contrary to popular belief you do NOT need to use the Authentication/Authorization feature for an App Service. You can, but, honestly, I found this feature pretty useless. You can honestly accomplish the same thing with just straight Azure configuration.
Head into the Azure Active Directory portion of Azure (below) and select App Registrations from the sub navigation.
We have to register our backend app with Azure AD so that Active Directory can create tokens for that API that will pass validation down the road.
When you Add a new App Registration you need to provide a few values:
- Name: Whatever you want, it should be something that adequately describes the App
- Application type: Web app / API (this will govern the next field so make sure this is selected)
- Sign-on Url: This is the domain of your service that is the API that will be used. Hint: if you are using Azure App Service it will be something like https://<your name>.azurewebsites.net
The final step is to select your new registration after Creation and go into the Settings -> Reply URLs.
At the top you will see the base Url that you provided above. Modify it so it ends with /.auth/login/aad/callback
Registration is complete. Now let’s add the code that checks the token for us with each request.
It’s coding time – part 1
I am assuming you are using ASP .NET Core 2.1 for this project, if you aren’t, you might want to skip ahead or find a different guide for this portion of the process. Of course, you are welcome to read and perhaps my words will inspire the right path forward 🙂 Maybe
Ok, so in Startup.cs we need to look at the ConfigureServices method. The first thing you will want to add the following bit of code:

Quick note: AddAzureBearer is not something that exists, you have to create it. What it really is doing is fronting the configuration for the Jwt (JSON Web Token) Bearer and passing some very important configuration options to the underlying provider. It actually comes out of the GitHub Azure Samples from Microsoft (hopefully it will find its way into the actual BCL at a later date) here.
You will also want to make sure you add the associated AzureAdOptions class which will receive the values from our Configuration when we call Bind based on the AzureAd key. Here is an example:
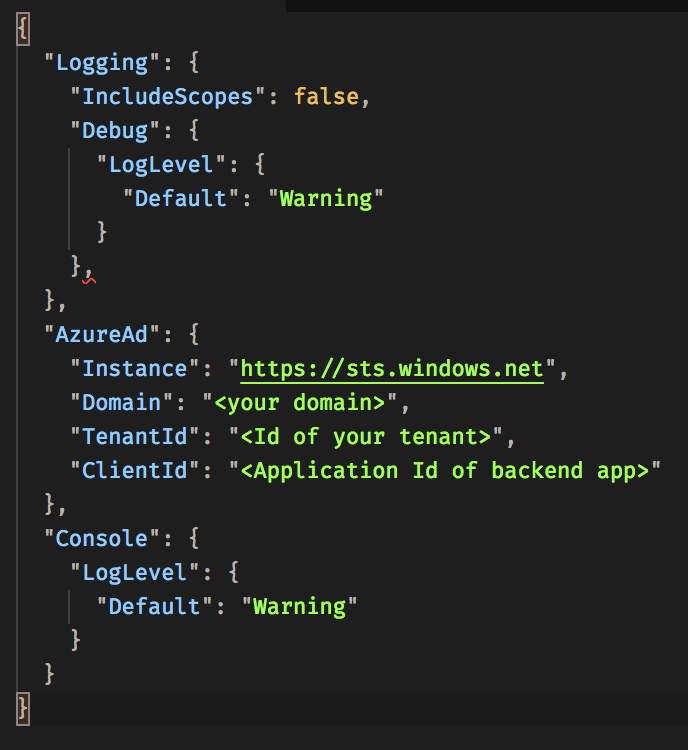
Let’s talk about TWO of these values: Instance and TenantId
If you return to the Azure Active Directory section on the Azure Portal and select the App Registration you will notice there is a button called Endpoints at the top. Select this and you are given your Tenant specific endpoints for common Auth flow operations. Copy the top one (Federation Metadata document).
The Guid in this value is your TenantId so you can copy and paste that into the above configuration.
If you take the same Url you copied from the Federation box and paste it into a browser you will see an XML document. In the very first block you will see entityID. The Url prefix is the Instance value. Also, the Guid here is your TenantId as well. That is where these two values in particular come from.
ClientId always refers to the ApplicationId for the registration in the Azure App Portal
We now have our configuration set, but we need a way to generate a token. You CAN do this through Postman. This blog explains how though, its a bit convoluted.
Register the Xamarin Application
We now have our Backend set, so let’s turn our attention to the Frontend Xamarin app. First we need to register our app, same as above though we will select Native for the Application Type.
When this change is made the SignOn Url box is replaced with Redirect Uri. At a high level, this is the redirect point within the flow that signals the authentication is complete and control should be handed back to the App.
Use the value https://<your api>.azurewebsites.net/.auth./login/done – yes it does match the SignOn Url of the API, that is intentional.
Once the app is created click on Settings and confirm the .login value is present in the Redirect URIs section.
Next go to Required Permissions, use the search feature at the top to find the API app you created previously. After you finish adding REMEMBER to hit Grant Permissions so the new permissions take effect.
Congrats that is all you need to do for the Xamarin application
Its coding time – part 2
Ok, this gets a bit different, really is pick your poison. Rather than walking through both sections, here is a sample that has all of the code for this: https://github.com/rcervantes/xamarin-adal
It does rely on the now less used Mobile App application type but it has solid code for how to use ADAL.Net with Xamarin (as of this writing MSAL does not yet work properly).
Here are some notes:
- The actual logic which handles the Authentication is identical in both Droid and iOS with the exception of what is passed as PlatformParameters. You could easily pass this value to the PCL and centralize all auth logic there
- Droid is a bit weird and requires override of the OnActivityResult callback for the flow to complete. You can basically copy paste the code from the sample
- When the sample refers to Resource you can pass the string of your Backend app Application Id Guid
- Authority is a Url of the format: https://login.windows.net/<TenantId>
- Auth Redirect Uri format is: https://<Api Base Url>/.auth/login/done
Feed these values into your call to AquireToken and the app should start the AD Auth flow and, at the end, return to you an Access Token that you can pass up to your API as a Bearer token and things should work.
So that’s it. I hope this works for you, it was quite the slog to get it to work for myself and there are still some edge cases I want to look at it. In particular, if I use a custom domain for my Azure App Service, how does that effect the login flow, or does it use the Azure Urls anyway under the hood.
As always, if you have problems with your token, check our jwt.io. Leave me a comment if you need any additional help. Cheers

One thought on “Using Active Directory Authenticate with Web API from Xamarin”