Google Cloud: Image Upload

When we talk about using a “public cloud” we are most often referring to Amazon and Azure. These two represent the most mature and widely available public clouds in the world. But, Google has also been working to enhance its public cloud offerings, and given their history and technical prowess, it would not be wise to ignore them. So, given that Google gives you a nice $300 credit per month, I decided to take some time and see what I can build.

Recently, I decided to dive into GCP (Google Cloud Platform) and see what its like to build my standard microservice based Image Processor application in the platform, mostly to get a feel for what its like and its level of maturity. What I found was what I expected, good offerings but still in need of polishing when compared to AWS and Azure. Let’s walk through my example.

Setting up the function

I really do like the UI of Google Cloud, its clean and makes sense; though this could be do the lack of offerings compared to Azure and AWS which have to provide access to many more. Nevertheless, I found the UI easy to navigate.

The Project

Everything in your Google Cloud is organized into “projects”, near as I can tell. Within these projects you turn on various APIs (like Cloud functions) and define the various cloud resources the project will use; very similar to resource groups in AWS and Azure. When you access APIs, you will need to use your Project Id as a key value. Google Cloud displays your current project context in the top bar making switching between very easy.

gcp1

As soon as you select the Cloud Functions options from the sidebar nav (the site is clearly built using the Material UI) you will be asked, if this is the first time, to Enable API which will allow you to actually use the feature.

Google Cloud Functions use ExpressJS under the hood. Use that to inform your Google searches.

The Function

Given they have been around only since 2016 it makes sense why this area feels behind compared to AWS and, especially, Azure. By default, Google will lay out a nice example for you but its kind of raw; I do not like the fact that when I call my trigger it will respond to ANY verb leaving it to me to write the verb isolation logic, so I hope you like that if statement to return 405s.

The inline editor is nice but, quickly becomes irrelevant once you start adding packages. I recommend using something like Visual Studio Code or Atom to do most of your code editing. As a tip, you will want to use the ZIP options when you add new files since the editor will not let you create files, at least not right now.

 gcp2

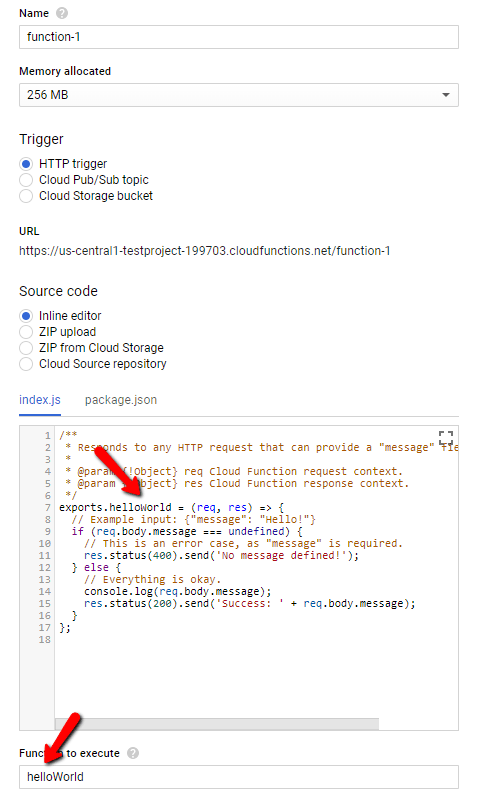
Given this, you can leverage the trigger Url (look for the Trigger tab), drop it into Postman and play with the request (only verbs supporting a body work out of the box). Also notice the above, the values indicated by the arrows must match, standard JavaScript stuff.

Meet the Emulator

Google provides a Cloud Functions emulator that you can install via an NPM package (instructions). It provides a good way to play with functions locally and easily see a result. However, this product is still very much in alpha and I ran into some problems:

  • You need to deploy after any file change. While I sometimes saw my function updated in real time, it was not consistent and I chased a bug for a good while because I thought my code was updating
  • Get familiar with functions logs read –limit=## this is the best way to debug functions. I couldnt get the debug command to work. Using console.log you can drop messages into the local logs.
  • When you deploy  you are deploying to the emulator, NOT the Cloud
  • File Uploads do not seem to work. Hard as I tried, even using the exact code form the Cloud Functions tutorial (here) my file would always appear absent, even though Content-Length was correct. Not sure what is going on.

Overall, the Emulator is a nice add on, but it needs a bit more add before I can say its a valuable tool for development. I lost a few hours on my File Upload try before I did a sanity check and discovered that the file was being passed in the Cloud verison but not the emulator.

Development Flow

What I ended up doing to get this working was I would write my changes, do my NPM stuff in VSCode and then copy paste into the online Function Editor, Deploy it and run it. All the while I had my Log Viewer open and actively streaming new log entries to me. There is a process that allows use of Source Control to deploy changes, I didnt get to look at that (here). The code I am going to show below was mostly built using this copy and paste approach; nostalgically, this is what I used to do with AWS Lambda and Azure Functions before the tooling got better.

The Code

I kept the Busboy library reference, though I never got it to call its finish action, not sure why. The final version just calls my success once the save to Cloud Storage finishes. Here is our code which accepts the file being uploaded:

const Busboy = require('busboy');

exports.upload = (req, res) => {
    if (req.method === 'POST') {
        const busboy = new Busboy({ headers: req.headers });

        // This callback will be invoked for each file uploaded.
        busboy.on('file', (fieldname, file, filename, encoding, mimetype) => {
            console.log('got the file');
            res.sendStatus(200);
        });

        busboy.end(req.rawBody);
    } else {
        res.status(405).end();
    }
}

My hope is this runs straightaway in your inline editor (I did test this). Make sure Postman is set to use form-data as its type (I always also drop a Content Type multipart/form-data into the headers as well to be safe) and you send a file up. If all goes well, in your logs you see a message got the file.
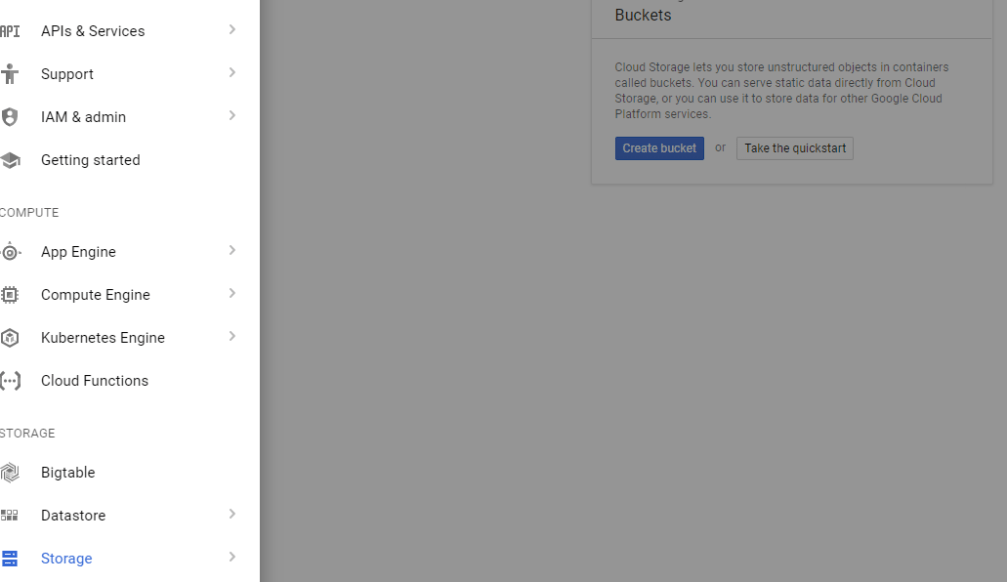
Enter Storage

Ok, so what we wrote above is pretty worthless. What we want to do is drop this into a Storage bucket for long term storage. To create storage in Google Cloud, revisit the left hand nav bar and select Storage. From the subsequent interface create a new storage bucket.

gcp3

Remember the name of you bucket, you will need it in our next section.

Save to Storage

This is an area where I found a pain point. I do not like to save a file to disk and THEN upload it to storage, I want to upload the stream; its faster. With the current NodeJS Client (npm install @google-cloud/storage) you cannot do this, you MUST provide a physical path for upload to use [link]. Am hoping that gets added in future versions.

Here is the code, changed with our Storage upload call (note the save to a temporary directory preceding the storage upload).

const bucketFileName = uuid();
const tmpPath = path.join(os.tmpdir(), bucketFi
console.log(tmpPath);
file.pipe(fs.createWriteStream(tmpPath));
const storage = new Storage({
    projectId
});
const bucketName = 'image-processor-images';
storage
    .bucket(bucketName)
    .upload(tmpPath, {
        destination: bucketFileName
    })
    .then(() => {
        console.log('write complete');
        res.sendStatus(200);
    })
    .catch((error) => {
        console.log(error);
        res.sendStatus(500);
    });

This code happens inside the busboy.on(‘file’,…) handler. To ensure uniqueness of the blobs I use the uuid library to generate a unique name. Finally, you can see the reference to projectId which is the Id of the project. You can get this by clicking your project in the top bar.

If you run the same call as before in Postman, it should store the uploaded file in your Storage account. One note, Max is 10MB per file. Google has a way to take larger files, but I didnt look into it yet.

Overall Thoughts

Overall, I was impressed with Google and I like what I saw. Sure it wasnt the smoothest development process, but I find it better than AWS and Azure were at the same points in development. I think the big focus needs to be on the developer experience, because ultimately that is how you get developers to want to use your platform and, ultimately, push it when they influence the choice.

But, I think Google is going to end up being a serious player just because they are Google and this sort of thing (Cloud and large scale processing) is what they are known for. So, I view this as essential but, it would still need more maturation before I would consider it in the same breath as AWS and Azure.

That hard part for Google will be getting traction. The $300 per month credit is awesome because it gives a lot of flexibility to really explore the platform and potentially recommend it.  Next, I plan to check out their Database offerings.

Comparing React and Angular: Redux

Angular and React are, perhaps, the two most popular frameworks for creating JavaScript Single Page Applications (SPA) though comparing them is a bit of a fools gambit. ReactJS does not pit itself as the end to end framework that Angular is, instead it (React) focuses on allowing easy development of View pages, mainly through JSX. This is perhaps why the support for Redux in Angular feels lacking compared to ReactJS.

Redux in ReactJS

To say that Redux and ReactJS are closely linked is to state the understated. Redux was born from the Flux pattern which, like ReactJS itself, was developed by Facebook. Therefore, we should not be surprised at how much better developed the Redux implementation is on ReactjS vs Angular.

This is mainly done through the use of the react/redux NPM package. This single library allows you to utilize the connect method as a way to automatically wire React Components (called Containers in this context) to the store and listen for events. Example:

redux_compare1

connect takes a couple parameters and returns a function which then takes the connected components. These parameters are the mapStateToProps and mapDispatchToProps. Through each of these methods we can define simple objects which create props that our component will receive.

This pattern is very easy, though can take some getting used to (more), but it offers a very easy way to bring elements of state into a component, as well as defining the methods that will dispatch actions to mutate state.

Redux in Angular

As a hard contrast to ReactJS, there is no single library for Angular, though a lot of the community has consolidated to using @ngrx/store. It actually does a very good job of aligning itself with what a developer that has Redux would expect.

Untitled Diagram (1)

Where I had the most difficulty was around properly defining the State Type here – I ended up going with the notion of global state but I realize now there are some better ways to go about this. Here is a sample of my current code:

redux_compare2

In Typescript (which is the default language for Angular 2+) you can take an arbitrary JSON object and put an interface on top of it. This allow TS to be aware of what to expect from that object. If we go to the app.module.ts file which has the responsibility for setting up our store

redux_compare3

We can see that our “store” defines an object with imagesTable property to which we have assigned our imagesReducer; this makes more sense if you view your reducers as being a “table” in the sense that it holds and manipulates only a certain segment of your data.

Now, as a rule, this really is a pure JSON object. GlobalState is an interface. As I said before, you can leverage interfaces as a means to give defined structure to JSON objects. Here is the definition of GlobalState:

redux_compare4

The really important thing here is to make the connection of the properties defined for the store above and the properties of GlobalStateimageState here is simply the interface we placed on our reducer data, as defined through our initial state.

redux_compare5

What happens with the store.select method is it gets passed the object we used in our StoreModel call within app.module. Then, using interfaces we can, effectively, “mask” this object to only see the state we wish to see; this is what gets passed into the select callback.

Thus, returning to our Component we can know understand this call better

redux_compare2

Finally, as with most things in Angular 2+ we rely heavily on observables via the RxJS library; we do this in React as well using the redux-observables package, though that setup is slightly more complicated than Angular, which can leverage the built in support for observables, whereas React must rely on middleware, fore Redux anyway.

The one key point with observables in Angular, at least with those that are bound to the UI is that we must use the async directive to ensure the UI updates as the value within the observable changes.

redux_compare6

Why I like React better?

In this example, I focused on the @ngrx/store library which seems to be what a lot of Angular developers are gravitating towards for their Redux. In React, this choice is already clear via the react/redux package and there are ample tutorials on how to set things up. With @ngrx/store there was not really a single good tutorial that I could find that would give me the step by step.

Further, I ran into breaking changes with @ngrx where I had to change things out as I went to build. This tells me the project is still very much under development and is still changing, as is Angular itself. I have not had the experience of running into such changes when dealing with react/redux.

The reality is, I wont truly recommend one over the other mainly because you can use both (React can be used as a view engine for Angular) and they are aimed at different purposes. I do feel the redux story is more refined with React but, that is not to say that Angular should be avoided, it just needs better docs and more maturation.

Development Agnosticism and its Fallacies

Over the latest weekend I spent time looking at a tool called Serverless (http://www.serverless.com) whose premise was that I can write Serverless functions independent of any one provider and deploy them up to any provider seamlessly. Basically, a framework to let you build for the cloud without choosing a single provider.

It took some effort but I got things working with the basic case over the course of a few hours. The hardest part was getting the process to work with Azure. Where I was left (relient on various Azure credentials being present in the environment variables) was hardly ideal. Further, the fact that, at least right now, that .NET Core is not supported on Azure through Serverless is disappointing and harkens to the fact that, if using something like this, you would be dependant on Serverless to support what you are trying to do.

All of these thoughts are familiar to me, I had them with Xamarin and other similar frameworks as well. In fact, frameworks like Serverless stem from a peculiar notion of future proofing that has propagated within the developer community. We are terrified of trapping ourselves. So terrified that we will spend hundreds of hours over complicating a feature to ensure we can easily switch if we need to; this despite there being very cases of it happening. And when it does happen, the state of the code is often the least of our worries.

My first experience with this was around the time that Dependency Injection (DI) really cemented the use of interfaces in building data access layers. At the time, the reasoning was it “allows to move to a totally different data access layer without much effort.”. For the new developer this sounded reasonable and a worthwhile design goal. To the seasoned pro this was nonsense. If your company was going to change from SQL Server to Oracle the code would be the least of your worries. Also, if you had designed your system with a good architecture and proper separation to begin with, you would already be insulated from this change.

The more important aspect of using interfaces in this way was to enable easier unit testing and component segregation, also for testing. Additionally, with the consideration of DI, it meant that we could more easily control the scope of critical resources. But, in my 10 years as a consultant, never once have I been asked to change out the data access layer of my application; nor do I anticipate being asked to do it on a regular enough basis where I would advocate an agnostic approach.

I feel the same way with Cloud. I was working with a company that was being reviewed for acquisition last year. One of the conversation topics with their developers was around the complexity of a cloud agnostic layer. Their reasoning was to support the move from Azure to AWS if it became necessary and because they “had not fully committed to any one cloud vendor”.

My general point was, I understand not being sure but neither Azure and or AWS are going away. Being agnostic means not taking advantage of some of the key features that help your application take full advantage of the infrastructure and services offered by that Cloud vendor.

And this is where I have a problem with a tool like Serverless it represents giving developers the impression that they can write their code and deploy it how ever they want to any provider. The reality is, similar with the database point, its not likely your enterprise is going to switch to another Cloud vendor and demand that, in one week, everything be working. Chances are you can reuse a lot of what you have built but changing also means you have the chance to take advantage of what that vendor offers. I personally would relish that versus just lifting and shifting my code to the new platform.

At the end of the day, I believe we, as developers, need to take stock and be realistic when it comes to notions of agnosticism. While its important to not trap ourselves, it is equally important to not plan and burn effort for something that is not likely to be an issue or, if it becomes an issue, is something that requires an organizational shift. If your organization switches from AWS to Azure and then wonders why things dont just work you either have a communication problem or an organization problem.

So, to sum things up. Tools like Serverless are fun and can probably be used for small projects that are simple; I have similar feelings when it comes to Xamarin. But they will be behind the curve and enforce certain restrictions (lack of supporting .NET Core on Azure) and conventions that are made to promote agnosticism. In a lot of cases, these end up making it harder to build and, the truth is, the farther down the path you get with an application’s development the more difficult it is to justify changing the backend provider. For that reason, I would not support using a tools like Serverless or Xamarin for a complex applications.


Serverless Microservice: Conclusion

Reference: Part 1, Part 2, Part 3, Part 4, Part 5, Part 6

Over the last 6 parts of this series we have delved into the planning an implementation of a serverless microservice. Our example, while simple, does show how serverless can ease certain pain points of the process. That is not to say Serverless is without its own pain points, the limited execution time being one of the largest. Nevertheless, I see serverless as an integral part of any API implementation that uses the Cloud.

The main reason I would want to use Serverless is due to the integration with the existing Cloud platform. There are ways, of coursem to write these operations into an existing implementation, however, such a task is not going to be a single line and an attribute. I also believe that the API Manager concept is very important; we are already starting to see its usage within our projects at West Monroe.

The API management aspect gives you greater control over versioning and redirection. It allows you to completely change an endpoint without the user seeing any changes to it. Its a very powerful tool and I look forward to many presentations and blog entries on it in the future.

Returning to the conversation on serverless, the prevailing question I often hear is around cost: how much more or less do I pay with serverless vs a traditional approach that might be stand alone services or through something like Docker and/or Kubernetes.

Pricing

Bearing in mind that you are automatically granted, monthly, 1 million serverless executions per month ($0.20 per million after that). There is also a cost for the execution time. The example that Microsoft lays out is a function that uses 512MB of memory and executes 3,000,000 times (4,000,000 considering the free million) would cost about $18 a month.

On the whole I feel this is a cost savings over something like App Service, though it would depend on what you are doing. As to how it compares to AWS Lambda, it is more or less equivalent, Azure might be cheaper, but the difference is slight at best.

Closing Thoughts

As I said above, I see a lot of value in using Serverless over traditional programming, especially as more and more backends are adopting event driven architectures. Within this space Serverless is a very attractive because of the each with which it integrates and listens to the existing cloud infrastructure.

I would be remiss if I didnt call out the main disadvantages of Serverless. While there is work going on at Microsoft, and I assume Amazon, to reduce the cold startup time, it remains an issue. That plus the limited execution time (5m) mean that developers must have a solid understanding of their use case before they use Serverless; a big reason why I started this series with a Planning post.

The one other complaint I have heard is more of a managerial notion which is, when I create a traditional application in Visual Studio, its associated with a solution and project and its very clear what is associated with what. With serverless, it feels like a bunch of loose functions lacking any organization.

From what I have seen in AWS this is a fair complaint, AWS Lambda functions are just a list of functions that one would need to understand what is what and how it is used; not ideal. In Azure, however, you can logically organize things such that relevant functions are grouped together; Visual Studio Serverless tools make this very easy. In my view, on Azure, this complaint does not hold water, on AWS, based on what I know this is a difficulty.

Outside of these drawbacks the other area I am focusing on is how to work DevOps into a serverless process. While both Lambda and Azure Functions offer the ability to debug locally (Azure is better IMO) the process of publishing to different environments needs more work.

The topic of Serverless is one I am very keen on in both AWS and Azure. I plan to have quite a few posts in the future directed at this, in particular some of the more advanced features supporting the development of APIs within AWS and Azure.

Fixing Visual Studio Docker

One of the things I have been focusing on building, skillset wise, over the last several months is Docker. From a theory standpoint and with Docker itself I have made good progress. The MVP Summit gave me the chance to dive into Docker with Visual Studio.

Unfortunately, this process did NOT go as I expected and I hit a number of snags that I could not get past, specifically an Operation Aborted error that popped up whenever I attempted to run locally.

Google indicated that I needed to Reset Credentials, Clean the solution, and remove the aspnetcore Docker image. None of these seemed to work but, with the help of Rob Richardson I was able to get the Container to work properly on Azure and even experiment myself with adding updates. But we still could not get anywhere locally.

I therefore took advantage of so many Microsoft employees being around and was able to get Lisa Guthrie and Lubo Birov from the Visual Studio tools team to help me. It wasnt easy but we managed to find the problem; happily it was not rooted in something I had done which was what I suspected.

It turned out that the VS Debugger had decided to go haywhire and needed to be replaced.

Lubo showed me the vsdbg folder located here: C:\Users\<Your User>. By changing the name of this folder we forced Visual Studio to recreate it and everything was fine.

So that is it, just wanted to share this to hopefully spare someone from my pain and to give another shoutout to Lisa, Rob, and Lubo and everyone else who helped. One of the great things about being an MVP is the great community and the knowledge that there are some uber smart people out there ready and willing to help others.

Serverless Microservice: Reading our Data

Reference: Part 1, Part 2, Part 3, Part 4, Part 5

Returning to our application we know have a service, sitting behind an Azure API Manager (APIM) that requires a token to access. The APIM layer can also be used to enforce rate limiting and CORS rules, as well as other common API features. Additionally, this feature gives us access to a couple portals where we can administer the API and even provide users with self service for getting tokens.

Now, we are going to add our final endpoint which performs a GetAll for our data. This is similar to what we did in Part 2 when we created the Upload handler, though it will just peform a read against our Cosmos (Mongo) table.

Create the endpoint in Visual Studio

One of the things I like about how Microsoft has approached Azure Functions is the solution based approach that Visual Studio helps promote. Unlike with Lambda, your functions are not simply floating but can be easily grouped.

In this way, I recommend opening the SLN file which holds the Upload endpoint. You can right click on the Project and indicate you want to Add a new Azure Function.

microservice17

This will walk you through the same sequence as before and again you will want to create an HTTP Trigger.

Per the convention laid out by REST we are going to want to ensure that our endpoint responds to a GET verb. We can use Anonymous for security. (Note: this does NOT control whether a token is required or not, that is controlled by APIM).

Here is some code that I wrote up that selects our results from Cosmos, its all pretty straight forward.

microservice18

Now we can Publish our project and see our new function in the Portal. Now, we need to add it to our API.

Adding a Route in APIM

So in Part 4 we added an APIM layer which allows us to govern the AI and set up routes independent of what we specify for the function itself; this allows us to present a model of consistency for the API, even if under the hood the services are varied and support a variety of different route forms. Here we want to add a route in APIM for our GetAll operation.

Here are the steps for doing this (assuming this call is being added to an existing APIM):

  1. Access the APIM instance
  2. Select APIs and select Add Operation
  3. This will ask you to provide a route – remember route forwarding happens with each communique into the APIM
  4. Test the connection with Postman – remember if you followed the Products discussion in Part 5 you will have to provide the token

I mentioned route forwarding with point #3 and this is important to understand, its also discussed in Part 3. When APIM receives a matching route it calls the mapped call with the route part beyond the version:

Ex. http://www.somehost.com/api/v1/version -> /version is passed to mapped resource

You can override this behavior, as is discussed in Part 3. For this /version call, it is likely not necessary.

Closing

We know have a full fledged microservice that is focused on image processing and retrieval. Our next section will focus on why Serverless is a big deal for Microservices and other lessons learned in my experience

Serverless Microservice: Understanding Products

Reference: Part 1, Part 2, Part 3, Part 4

In the previous post we talked about the building the API using Azure API Management. This is a very important part of a modern API, especially one that will be consumable for users not within an organization or for sharing the API. With the sheer number of features and abilities of the API Management service, I felt it necessary to dive in a bit deeper and talk about a core concept of the APIM layer: the Product.

Product, its not quite what you think

To be fair, I think this is a terrible name choice. The Product is effectively the “thing” you will select to gain access. Most developer sites I have seen would simply do this as you register a particular product and then give the option to select a tier of access; that is effectively what a Product is: a tier of access for a given set of APIs.

Just to clarify that last point, a Product can span multiple APIs that are being managed by the layer. To access your Products you need to select the appropriate option in your APIM options:microservice16

By default a new APIM instance is given two products: Starter and Unlimited. These products are designed to give you a sense of how these things work; though I have found that Starter doesnt actually work the way Microsoft’s docs suggest. But let’s get a sense as to what these allow.

Register for a token

So, if we access the Unlimited we can note two checkboxes:

  • Require Subscription – means in order to access APIs using this Product you will need to be subscribed
  • Requires Approval – means that subscription requests need to be approved by an administrator

For our purposes in this posting, you will want to make sure the Require Subscription is checked. Once you save this change, if you have been following along you wont be able to access your API.

I should point out that, if your API is accessible by a Product which does NOT require a subscription, it will still allow the anonymous access. So, in order to see the security in action, you will need to make Starter require a subscription or remove your API from Starter.

Assuming the Require Subscription checkbox is checked, attempting to access the API calls now, you will get a message indicating you need a subscription key. To do that, we need to go to the Developer Portal.

First, a gripe. There is a navi  link in this site that shows APPLICATIONS. Unlike Facebook, Twitter, and other popular APIs this is purely just a gallery, it has little purpose outside providing links to other applications using the API. Its a weird feature with a bad name.

What you will want to do is select PRODUCTS which will list out the Products you APIM layer supports. Let’s click on Unlimited – Products that do not require a subscription are not visible in this list.

Once you hit a Subscribe you will enter the flow to either login or create a user. Once you complete this process you will receive a set of keys. Use one of these values as your Ocp-Apim-Subscription-Key header. This will allow your request to go through.

Other Features

The APIM service is an extremely deep service with a wide variety of features, I could not hope to dive into all of them but, I felt that Products was especially underserved. So I hope this post makes sense. Future posts will assume you have this setup appropriately.

Serverless Microservice: The API

Continuing from our Planning in Part 1, our creation of our Upload Azure Function in Part 2 and our backend processing pipeline in Part 3, Part 4 (this) goes up a level and talks about the API.

This may seem somewhat strange since, technically, when we deployed our Upload function we got a Url, so isnt that our API? Well yes, and no. Let me explain.

The entire purpose behind the Microservice architecture is to spread things out and allow for more parallel development and processing. When things are separated they can scale and follow different release cycles and be managed by different teams. These are all good things but, any organization, is going to want to still build an API that makes sense. And when you have a bunch of Azure Functions like this, you can very easily wind up with names or paths you dont want. This is where Azure API Management comes.

The Azure API Management service lets you lay a layer over n microservices and allow users to see it as a single API rather than a hodgepodge collection of services with no consistency. You can even combine Azure Functions with traditional services and the end users are none the wiser. On top of that, you get things like rate limiting, token provisioning, and a variety of other features built in natively. Azure API Management is a HUGE topic so we will be doing a few parts on this.

Let’s set things up

Just to get a clear picture of this, here is a diagram which, at a basic level, shows our setup:

Untitled Diagram

Essentially, you can have any number of services behind the proxy layer, and they can be anything (the proxy is basically using Url Rewriting). What the proxy provides is, authentication, rate limiting, CORS, and other general API features you are familiar with. For the remainder of this post we will do the following:

  • Create the API Management Service
  • Setup our API endpoints
  • Remove the requirement for tokenization (basically make it allow anonymous access)
  • Access the endpoint via Postman

Creating the API Management (APIM) is straightforward though the provisioning process can take a while; mine took around 20 minutes.

microservice7

Once you begin this process you will, as per usual, be asked to supply details for your new API. The two fields that are important here is Name and Pricing Tier. The former because it ultimately drives the name of the proxy and therefore the URL that users will use to access your service(s). The later because it drives your SLA agreement. If you are just playing around, I recommend the Developer SLA as it is part of the free tier.  For kicks, I named by APIM imageService.

Once the provisioning process is completed you can access the APIM instance. Before we talk technical I want to point out two things on the Overview section: Developer Portal and Publisher Portal.

One of the nice things I like about APIM is what it gives you out of the box. The Developer Portal contains an automatically generated set of documentation that provides multi language code examples and interactive API test tool.

The Publisher Portal contains information about the API and includes a way to “request” tokens. Basically, it gives you the sort of site that Twitter, Facebook, and others give to request tokens and learn more about the API. Both portals are fully customizable. There is also a reference to something called Products in the Developer Portal. These are important and we will be talking about them later.

Let’s add an endpoint

So, if you are following this series you should have an endpoint to upload an image. Right now this is coded as a pure Azure Function with its own Url and everything. Adding this to an APIM is fairly straightforward.

We can manage our APIs under the APIs options:

microservice8

For our purposes, we will select Functions App. This will be the easiest way to add our endpoint which is sourced in an Azure Function.

Notable fields in the creation dialog:

  • API Url Suffix – this allows you to prefix ALL calls to your API with a qualifier. Very useful if the API also serves web content as in a traditional MVC setup.
  • Version this API – gives your common versioning options for APIs. Honestly, you should always take this for any serious project because, you are going to have to version the API. Better to assume yes and not, than assume not and have to.
  • Products – This is the product association for how access is determined. We will discuss Products in more depth later. For now you can select Unlimited.

It is also likely that you will also get the follow message for your Azure Function during this process:

microservice.warning

In order to understand what endpoints are “there” and thereby automate the mapping, APIM looks for an API Definition, usually a Swagger definition. This is not generated by default, but luckily its pretty easy.

microservice9

As you can see, under Function App Settings there is a section for API Definition. In this section you are able to either copy/paste or define your Swagger definition. There is also a nice preview feature for Azure Functions that will introspectively build you definition for you – use the Generate API Definition template.

As a side note: I have observed that sometimes this doesnt work the first time the button is clicked but seems to be fine when you do it a second time

Once the definition is generated you can head back to APIM and complete the add process.

API Building

So, let’s walk through this flow

microservice10

I am going to enumerate each of these pipeline areas to give you an idea of what is happening.

Frontend

This is the face of your API call, the path that is matched which invokes this “lane”. Now this is very important to understand because when your path is matched everything, except the host (and optional API suffix and version identifier) are passed through. Let me use a diagram to better illustrate this:

microservice11

So, in this example look very carefully at the route for the APIM service. Notice that we configured it to use api as the prefix. So when it is matched the APIM layer will forward (rewrite) the request to the Azure Function endpoint you have configured maintaining the unique portion of the route.

Azure Function endpoints have an interesting property where they MUST have api/ in front of their path (I have yet to find out how to disable this). As you can see, this creates a weird path to the Azure Function. You can easily fix this by adding a rewrite rule to the Inbound stage but, just something to keep in mind if you have trouble connecting.

So, to summarize, the Frontend is the outward facing endpoint that your APIM exposes. Ultimately it will get rerouted internally to whatever is backing that specific endpoint.

Inbound Processing

In this situation the Frontend has matched the Url and is forwarding the request, this is the point where we can check for certain headers and perform Url rewriting (if needed) for the ultimate destination of our request.

Given this is a processing node, it offers a much wider array of capabilities vs the Frontend node. Microsoft does not provide a full featured editor for this yet, but does expose the Code View with shortcuts which allow you to take advantage of most common features fairly easily.

microservice12

Backend

This layer is pretty easy, it is the node that the request will be routed to. Notice that, in the case of an Azure Function, you point at the Azure Function node and not a specific function. This is where the rewritten route comes in handy as Azure will use that Url to call into the Azure function, so the new Url has to match what is supported in the Azure Function endpoint.

There are some great test tools here, but the most common problem that I ran into was, by far, getting the wrong Url out of Inbound processing and getting a 404 with my Azure Function. To correct this, I employed the time tested validate independently each component so I knew the plumbing was the problem.

You can also drop into Code View here, similar to the Inbound processing section but, take heed, as it may not make sense to do certain things here. Also, CORS usually will not not be needed here if you are using strictly Azure resources; only at the Frontend node.

Outbound processing

Outbound processing is Inbound processing in reverse. It lets you examine the result of the backend call and perform tasks like adding response headers.

Before you try to query

So, if you are taking most of the defaults here you wont be able to hit the API with Postman, that is because you lack a token. For this post we are going to disable this requirement, later we will discuss how to manage it.

Products

So, the way Microsoft choose to go about this can either make sense to you or be a bit weird; for me it was mostly the later and some of the former. So a “Product” is a single or many APIs that a user can “use”. The Developer Portal, if you remember, allow us to drill into these Products, test them, and understand how to use them.

The Publisher Portal, on the other hand, allows us to get tokens (if needed) to allow use of these APIs. These tokens can be used to implement some of APIMs more global features, such as rate limiting and usage tracking.

microservice13

By default, every new APIM instance is given 2 published Products: Starter and Unlimited. Each of these have their own configuration and can be associated with one or more APIs and access policies. For now, we are going to select Unlimited.

microservice14

There are a number of options here. We can select APIs and see which APIs this Product is associated with. We can click Policies and see the Policy information for this Product. As I have said, Products in APIM is a HUGE topic and not something I want to dive into with this post. For right now, select Settings.

Here, you will want to disable Requires subscription and this will effectively remove the need for a token in the request. Note that this is NOT recommended with a Production type deployment. I am going this route for simplicity sake, we will cover Products in more detail in another post.

With that in place you should be able to hit your API with Postman. This wont yet work from a client app (ala Angular) cause we have not configured CORS on the Frontend, we will do that next.


Serverless Microservice: The Backend

Part 1 – Planning and Getting Started
Part 2 –  Upload File

One of the key pieces when utilizing cloud architecture, be it for a Microservice or a more traditional monolithic approach, is selecting ready made components that can alleviate the need for custom code. For serverless this need is vitally important as going the serverless approach inherently implies a heavier reliance on theses components.

For our application, we are able to upload images and place them in our blob store. For the next step we would like the following to happen:

  • Upon being added to blob storage, an event is fired which triggers an Azure Function
  • The Azure Function will execute and take the new image and run it through Project Oxford (Microsoft Cognitive Services) and use Computer Vision to gather information about the image
  • Update the existing record in Mongo to have this data

BlobTrigger

As with our HTTP handling Azure Functions, we rely on Triggers to automatically create the link between our backend Cloud components and our Azure Functions. This is one of the huge advantages of serverless, it is to be able to easily listen for events that happen within the cloud infrastructure.

In our case, we want to invoke our Azure Function when a new image is added to our blob storage, so for this we will use the BlobTrigger. Here is an example of it in action:

[FunctionName("ImageAddedTrigger")]
public static async Task Run([BlobTrigger("images/{name}", Connection =
   "StorageConnectionString")]Stream imageStream, string name, TraceWriter log)
{
}

As with the HTTP Azure Function, we use the FunctionName attribute to specify the display name our function will use in the Azure portal.

To get this class you will need to add the WindowsAzure.Storage Nuget package, which will give you this trigger.

As with the HTTP Trigger, the “thing” that is invoking the function is passed as the first parameter, which in this case will be the stream of the newly added blob. As a note, there is a restriction on the type the first parameter can be when using the BlobTrigger. Here is a list: https://github.com/MicrosoftDocs/azure-docs/blob/master/articles/azure-functions/functions-bindings-storage-blob.md#trigger—usage

Within the BlobTrigger the first parameter is a “route” to the new blob. So, if we dissect this, images is our container within the blob storage and the {name} is the name of the new image within the blob storage. The cool thing is, we can bind this as a parameter in the function, hence the second method parameter called name.

Finally, you will notice the named parameter here Connection. This can either be the full connection string to your blob storage which has your container (images in this case) or it can be a name in your Application Settings which represents the connection string. The later here is preferred as it allows things to be more secure and easier to deploy to different environments.

Specifying the Connection

Locally, we can use the local.settings.json file as such:

microservice5

On Azure, as we said, this is something you would want to specify in your Application Settings so it can be environment specific. The Values properties are surfaced in the application.

Executing Against Cognitive Services

So, with BlobTrigger we get a reference to our new blob as it is added, now we want to do something with it. This next section is pretty standard, it involves including Cognitive Services within our application and call the AnalyzeImageAsync which will run our image data through the Computer Vision API. For reference, here is the code that I used:

log.Info(string.Format("Target Id: {0}", name));
IVisionServiceClient client = new VisionServiceClient(VisionApiKey, VisionApiUrl);
var features = new VisualFeature[] {
    VisualFeature.Adult,
    VisualFeature.Categories,
    VisualFeature.Color,
    VisualFeature.ImageType,
    VisualFeature.Tags
};

var result = await client.AnalyzeImageAsync(imageStream, features);
log.Info("Analysis Complete");

var image = await DataHelper.GetImage(name);
log.Info(string.Format("Image is null: {0}", image == null));
log.Info(string.Format("Image Id: {0}", image.Id));

if (image != null)
{
    // add return data to our image object&lt;span id="mce_SELREST_start" style="overflow: hidden; line-height: 0;"&gt;&lt;/span&gt;

    if (!(await DataHelper.UpdateImage(image.Id, image)))
    {
        log.Error(string.Format("Failed to Analyze Image: {0}", name));
    }
    else
    {
        log.Info("Update Complete");
    }
}

I am not going to go into how to get the API key, just use this link: https://azure.microsoft.com/en-us/try/cognitive-services/

To get access to these classes for Computer Vision you will need to add the Nuget package Microsoft.ProjectOxford.Vision.

Limitations of the BlobTrigger

So, BlobTrigger is not a real time operation. As stated by Microsoft on their GitHub:

NOTE: The WebJobs SDK scans log files to watch for new or changed blobs. This process is not real-time; a function might not get triggered until several minutes or longer after the blob is created. In addition, storage logs are created on a “best efforts” basis; there is no guarantee that all events will be captured. Under some conditions, logs might be missed. If the speed and reliability limitations of blob triggers are not acceptable for your application, the recommended method is to create a queue message when you create the blob, and use the QueueTrigger attribute instead of the BlobTrigger attribute on the function that processes the blob.

https://github.com/Azure/azure-webjobs-sdk/wiki/Blobs#-how-to-trigger-a-function-when-a-blob-is-created-or-updated

What this means is, you have to be careful with using BlobTrigger because if you have a lot activity you might not get a quick enough response, so the recommendation here is to use QueueTrigger. Queue storage is a fine solution but, I am a huge fan of ServiceBus which also supports queues. So, instead of diving into QueueTrigger I want to talk about ServiceBusTrigger which I think is a better solution.

Create the ServiceBus Queue

First we need to create the queue we will be listening to, to do that we need to go back to the portal and click Add, search for Service Bus.

microservice4

You can take all of the defaults with the create options.

ServiceBus is essentially Microsoft’s version of SNS and SQS (if you are familiar with AWS), but it essentially supports all forms of Pub/Sub, absolutely vital in Microservice so the various services can communicate as state changes occur.

At the top of the screen we can select to Add a Queue. Give the queue a name (any name is fine), just something you will be referencing a bit later.

Once the queue finishes deploying you can access it and select the Shared access policies. Here you can create the policy that permits access to the queue. I generally have a sender and a listener policy. No matter how you do it, you need to make sure you have something that has the rights to read from the queue and write to it.

Once you have created the policy you can select it to get the Connection String; you will need this later so dont navigate away. Ok, lets code.

ServiceBusTrigger

The ServiceBusTrigger is not in the standard SDK Nuget package as the BlobTrigger and HttpTrigger are, for this you will need the Microsoft.Azure.WebJobs.ServiceBus. Now, as we did with the BlobTrigger we need to ensure we can specify the connection string we want the trigger to monitor.

https://docs.microsoft.com/en-us/azure/azure-functions/functions-bindings-service-bus#trigger—attributes

We can do this, similar to above, by specifying the Connection string in our local.settings.json file, just remember to specify the same value in your Azure Function Application Settings. Here is an example of our backend trigger updated to use ServiceBusTrigger.

microservice6

As you can see, its roughly the same (apologies for using the image, WordPress failed to parse the code properly). The first parameter is the name of the queue we are listening to and is accessible by the given Connection string.

There is one thing I want to point before we move on, it has to do with Cognitive Services. I dont know whether its a bug or not but, when you are dealing ServiceBus your queue entries are simple messages or primitives. In this case, I am writing the name of the new image to the queue and this trigger will read that name and then download the appropriate blob from Storage.

For whatever reason, this doesnt work as you expect. Let me show you what I ended up with:

var url = string.Format("https://&lt;blobname&gt;.blob.core.windows.net/images/{0}", name);
var result = await client.AnalyzeImageAsync(url, features);

I actually wanted to read the byte data out of the blob storage based on the name, then I figured I would be able to pass that data into a MemoryStream and pass the stream to the AnalyzeImage and that would be the end of it. Not so, it crashes with no error message when passed. So, I noticed I can also pass a Url to AnalyzeImage so I just create the direct Url to my blob. Granted if you are wanting to keep the images private this doesnt work as well. Just something to note if you decide to copy this example.

The rest of the code here is the same as above where we read back the result and then update the entry inside Mongo.

Writing to the Queue

The final change that has to be made is when the user uploads an image we want to write our message into the queue, in addition to saving the image to Blob storage. This code is very easy and requires the WindowsAzure.ServiceBus Nuget package.

public static async Task&lt;bool&gt; AddToQueue(string imageName)
{
    var client = QueueClient.CreateFromConnectionString(SenderConnectionString);
    await client.SendAsync(new BrokeredMessage(imageName));

    return true;
}

Pretty straightforward. I am simply sending over the name of the image that was added, remember the name is the ObjectId that was returned from the Mongo create operation.

QueueTrigger

I didnt cover it here but there is such a thing as QueueStorage which is effectively a queue using our Storage account. This works similar to the ServiceBus but, as I said above, I really view this as a legacy piece and I think ServiceBus is the future. Nevertheless, it remains an option when dealing with a scenario where BlobTrigger does not work fast enough

Conclusion

Ok, so if everything is working you have a system that can take an uploaded image and send it off for processing to Cognitive Services. This is what we call “deferred processing” and is very common in high volume systems; systems where there is just not the ability to process things in real time. This “deferred processing” model is in widespread use at places like Facebook, Twitter, and others though much more complicated than our example. This even underpins popular design patterns like CQRS (Command Query Responsibility Segregation).

In short, the reason I like this model and, ultimately, Azure Functions (or the serverless model more specifically) is it allow us to take advantage of what is already there and not have to write things ourselves. We could write the pieces of this architecture that monitor and process but why? Microsoft and Amazon have already done so and support level of scalability that we likely cannot anticipate.

In our next section, we will create the GetAll endpoint and start talking about the API layer using Azure API Management.

Serverless Microservice: Upload File

See Part 1: Getting Started

For the first part of this application we are going to create an Azure Function which allows upload of a file. As this file is uploaded its binary data will be stored in Azure Blob Storage while other information will be stored in a MongoDB document. The later will also receive the Cognitive Service Analysis Result data.

I like to look at each project as a “microservice”, that is related functions which together fulfill a logic unit of functionality. Later, we will discuss how to connect these together using Azure API Management.

Before we perform any code, let us think back to our document and the overall flow we are going for. We know that the user will, via HTTP, upload a file which we want to save in Azure Storage and create a record for in Mongo.

Preparing Our Components

Logging into the Azure Portal, we will want to, optionally, create a Resource Group to hold everything in; this is my convention as I find it makes finding things easier as well as cleaning up when you need to tear things down.

I wont walk you through how to do these things but here is a high level summary of what you will need:

  • A Storage Account with a single container – I called my “images”
  • A CosmosDB using the Mongo API. Really you could use whatever API you want but, the rest of the examples will be using MongoDB.Driver for the Nuget package

For the CosmosDB you dont actually have to do anything more than create it as the MongoDB.Driver code will actually handle creating the database and collection for you.

What you will want to do is copy and hold onto the connection strings for both of these resources:

  • For Storage: Access the newly created Storage Account. In the left navigation bar select AccessKeys, the Connection String for the Storage Account is located here
  • For Cosmos: Access the newly created Cosmos Database. In the left hand navigation, select Connection String. You will want the Primary Connection String

Let’s write the code

So far I have tried creating Azure Functions with both Visual Studio and Visual Studio Code and for this case I have found Visual Studio to be the better tool, especially with the Azure Functions and Web Jobs Tools extension (download). This will give you access to the Azure Functions project type.

If we use Create New Project in Visual Studio, so long as you have the above update you should be able to make this selection:

microservice2

To help out, the extension provides an interface to select from the most common Azure Function types; by no means is this exhaustive but its a great starting point. Here is what each type is:

  • Empty – An empty project allowing you to create things from scratch
  • Http Trigger – An Azure Function that responds to a given path (we will be using this)
  • Queue Trigger – An Azure Function that monitors a Service Bus Queue
  • Timer Trigger – An Azure Function that fires every so often

For this we are going to use an HTTP Trigger since the function we are creating will service HTTP requests. For Access Rights just choose Anonymous, I will not be covering how authentication works with Azure Functions in this series.

Here is what the starting template for HTTP will look like:

public static class Function1
{
    [FunctionName("Function1")]
    public static async Task Run([HttpTrigger(AuthorizationLevel.Anonymous, "get", "post", Route = null)]HttpRequestMessage req, TraceWriter log)
    {
        log.Info("C# HTTP trigger function processed a request.");

        // parse query parameter
        string name = req.GetQueryNameValuePairs()
            .FirstOrDefault(q => string.Compare(q.Key, "name", true) == 0)
            .Value;

        // Get request body
        dynamic data = await req.Content.ReadAsAsync();

        // Set name to query string or body data
        name = name ?? data?.name;

        return name == null
            ? req.CreateResponse(HttpStatusCode.BadRequest, "Please pass a name on the query string or in the request body")
            : req.CreateResponse(HttpStatusCode.OK, "Hello " + name);
    }
}

The notable aspects of this code are:

  • FunctionName – This should parallel the name of the file (doesnt have to), but this is the name you will see when the function is listed in Azure
  • HttpTrigger – This is an attribute that informs the underlying Azure workings to map the first parameter to the incoming HttpRequestMessageYou can provide additional helpers to extract data out of the Url as well as provide for Route matching, the same as in WebAPI.

Let’s talk a bit more about HttpTrigger. You will see this sort of pattern through Azure Functions. These “bindings” allow us take the incoming “thing” and cast it to what we need. Depending on the type of binding (HttpTrigger in this case) you can bind it to various things.

Additionally, the HttpTrigger supports verb filtering so the above would only allow POST and GET calls. The named parameter Route allows you to specify the route that the Azure Function will look for to handle; these are the same concepts from WebAPI. This will also be used with BlobTrigger later on.

Finally, there are no limitations around return result. Azure will only look for a method called Run, you can return whatever you want. The default is an HttpResponseMessage but I have used IList and other complex and primitive types.

Here is the code for upload, you will note that I am also using HttpResponseMessage.

[FunctionName("UploadImage")]
public static async Task Run([HttpTrigger(AuthorizationLevel.Anonymous, "post", Route = "upload")]HttpRequestMessage req, TraceWriter log)
{
    var provider = new MultipartMemoryStreamProvider();
    await req.Content.ReadAsMultipartAsync(provider);
    var file = provider.Contents.First();
    var fileInfo = file.Headers.ContentDisposition;
    var fileData = await file.ReadAsByteArrayAsync();

    var newImage = new Image()
    {
        FileName = fileInfo.FileName,
        Size = fileData.LongLength,
        Status = ImageStatus.Processing
    };

    var imageName = await DataHelper.CreateImageRecord(newImage);
    if (!(await StorageHelper.SaveToBlobStorage(imageName, fileData)))
        return new HttpResponseMessage(HttpStatusCode.InternalServerError);

    return new HttpResponseMessage(HttpStatusCode.Created)
    {
       Content = new StringContent(imageName) };
    };

This code is pretty straightforward though, I admit, learning how to read the image data without using the Drawing API was challenging.

Basically, we are reading the contents of the response message as multipart/form-data. We can some basic information about the image from the processed form-data. We then use our helper method to create a record in Mongo thereby generating the unique ID identifying the document. We then use this unique ID as the name for the image in blob storage.

Here is the code for creating the Mongo Document:

public static async Task CreateImageRecord(Image image)
{
    var settings = MongoClientSettings.FromUrl(new MongoUrl(MongoConnectionString));
    var mongoClient = new MongoClient(settings);
    var database = mongoClient.GetDatabase("imageProcessor");
    var collection = database.GetCollection("images");
    await collection.InsertOneAsync(image);

    return image.Id;
}

And the code for adding the image to Azure Storage:

public static async Task SaveToBlobStorage(string blobName, byte[] data)
{
    CloudStorageAccount storageAccount = CloudStorageAccount.Parse(StorageConnectionString);
    CloudBlobClient client = storageAccount.CreateCloudBlobClient();
    CloudBlobContainer container = client.GetContainerReference("images");

    var blob = container.GetBlockBlobReference(blobName);
    await blob.UploadFromByteArrayAsync(data, 0, data.Length);

    return true;
}

To complete this code the following Nuget packages will need to be installed

  • MongoDB.Driver (latest)
  • Newtonsoft.Json (v9.0.1)
  • WindowsAzure.Storage (latest)

I had to use a different version of Newtonsoft because of differences when adding it to a .NET Standard Class Library.

Finishing Up

So, in this walkthrough we created our first service with our first endpoint. Now, we have a way to upload files to our storage. Our next step will be to write the code which, upon adding the file to blob storage, kicks off another Azure Function which runs the image data through Microsoft Cognitive Services Computer Vision API. We want to collect that data and update our existing Image record with the findings and then show that to the user. We still have a ways to go, but we made good strides.

Reference: https://drive.google.com/open?id=1lVo_woIZAAiiGyDECKvuKL97SfibwIja – this is the Image.cs class file I created with supports both serialization to and from Mongo via Bson and via the web using Json.