Part 1 – Planning and Getting Started
Part 2 – Upload File
One of the key pieces when utilizing cloud architecture, be it for a Microservice or a more traditional monolithic approach, is selecting ready made components that can alleviate the need for custom code. For serverless this need is vitally important as going the serverless approach inherently implies a heavier reliance on theses components.
For our application, we are able to upload images and place them in our blob store. For the next step we would like the following to happen:
- Upon being added to blob storage, an event is fired which triggers an Azure Function
- The Azure Function will execute and take the new image and run it through Project Oxford (Microsoft Cognitive Services) and use Computer Vision to gather information about the image
- Update the existing record in Mongo to have this data
BlobTrigger
As with our HTTP handling Azure Functions, we rely on Triggers to automatically create the link between our backend Cloud components and our Azure Functions. This is one of the huge advantages of serverless, it is to be able to easily listen for events that happen within the cloud infrastructure.
In our case, we want to invoke our Azure Function when a new image is added to our blob storage, so for this we will use the BlobTrigger. Here is an example of it in action:
[FunctionName("ImageAddedTrigger")]
public static async Task Run([BlobTrigger("images/{name}", Connection =
   "StorageConnectionString")]Stream imageStream, string name, TraceWriter log)
{
}
As with the HTTP Azure Function, we use the FunctionName attribute to specify the display name our function will use in the Azure portal.
To get this class you will need to add the WindowsAzure.Storage Nuget package, which will give you this trigger.
As with the HTTP Trigger, the “thing” that is invoking the function is passed as the first parameter, which in this case will be the stream of the newly added blob. As a note, there is a restriction on the type the first parameter can be when using the BlobTrigger. Here is a list: https://github.com/MicrosoftDocs/azure-docs/blob/master/articles/azure-functions/functions-bindings-storage-blob.md#trigger—usage
Within the BlobTrigger the first parameter is a “route” to the new blob. So, if we dissect this, images is our container within the blob storage and the {name} is the name of the new image within the blob storage. The cool thing is, we can bind this as a parameter in the function, hence the second method parameter called name.
Finally, you will notice the named parameter here Connection. This can either be the full connection string to your blob storage which has your container (images in this case) or it can be a name in your Application Settings which represents the connection string. The later here is preferred as it allows things to be more secure and easier to deploy to different environments.
Specifying the Connection
Locally, we can use the local.settings.json file as such:
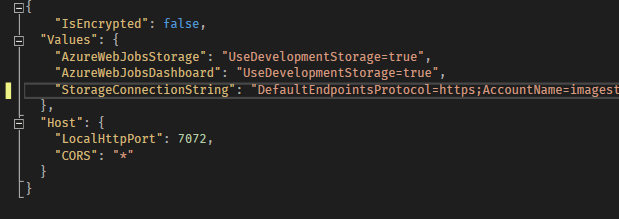
On Azure, as we said, this is something you would want to specify in your Application Settings so it can be environment specific. The Values properties are surfaced in the application.
Executing Against Cognitive Services
So, with BlobTrigger we get a reference to our new blob as it is added, now we want to do something with it. This next section is pretty standard, it involves including Cognitive Services within our application and call the AnalyzeImageAsync which will run our image data through the Computer Vision API. For reference, here is the code that I used:
log.Info(string.Format("Target Id: {0}", name));
IVisionServiceClient client = new VisionServiceClient(VisionApiKey, VisionApiUrl);
var features = new VisualFeature[] {
    VisualFeature.Adult,
    VisualFeature.Categories,
    VisualFeature.Color,
    VisualFeature.ImageType,
    VisualFeature.Tags
};

var result = await client.AnalyzeImageAsync(imageStream, features);
log.Info("Analysis Complete");

var image = await DataHelper.GetImage(name);
log.Info(string.Format("Image is null: {0}", image == null));
log.Info(string.Format("Image Id: {0}", image.Id));

if (image != null)
{
    // add return data to our image object<span id="mce_SELREST_start" style="overflow: hidden; line-height: 0;"></span>

    if (!(await DataHelper.UpdateImage(image.Id, image)))
    {
        log.Error(string.Format("Failed to Analyze Image: {0}", name));
    }
    else
    {
        log.Info("Update Complete");
    }
}
I am not going to go into how to get the API key, just use this link: https://azure.microsoft.com/en-us/try/cognitive-services/
To get access to these classes for Computer Vision you will need to add the Nuget package Microsoft.ProjectOxford.Vision.
Limitations of the BlobTrigger
So, BlobTrigger is not a real time operation. As stated by Microsoft on their GitHub:
NOTE: The WebJobs SDK scans log files to watch for new or changed blobs. This process is not real-time; a function might not get triggered until several minutes or longer after the blob is created. In addition, storage logs are created on a “best efforts” basis; there is no guarantee that all events will be captured. Under some conditions, logs might be missed. If the speed and reliability limitations of blob triggers are not acceptable for your application, the recommended method is to create a queue message when you create the blob, and use the QueueTrigger attribute instead of the
BlobTriggerattribute on the function that processes the blob.
What this means is, you have to be careful with using BlobTrigger because if you have a lot activity you might not get a quick enough response, so the recommendation here is to use QueueTrigger. Queue storage is a fine solution but, I am a huge fan of ServiceBus which also supports queues. So, instead of diving into QueueTrigger I want to talk about ServiceBusTrigger which I think is a better solution.
Create the ServiceBus Queue
First we need to create the queue we will be listening to, to do that we need to go back to the portal and click Add, search for Service Bus.
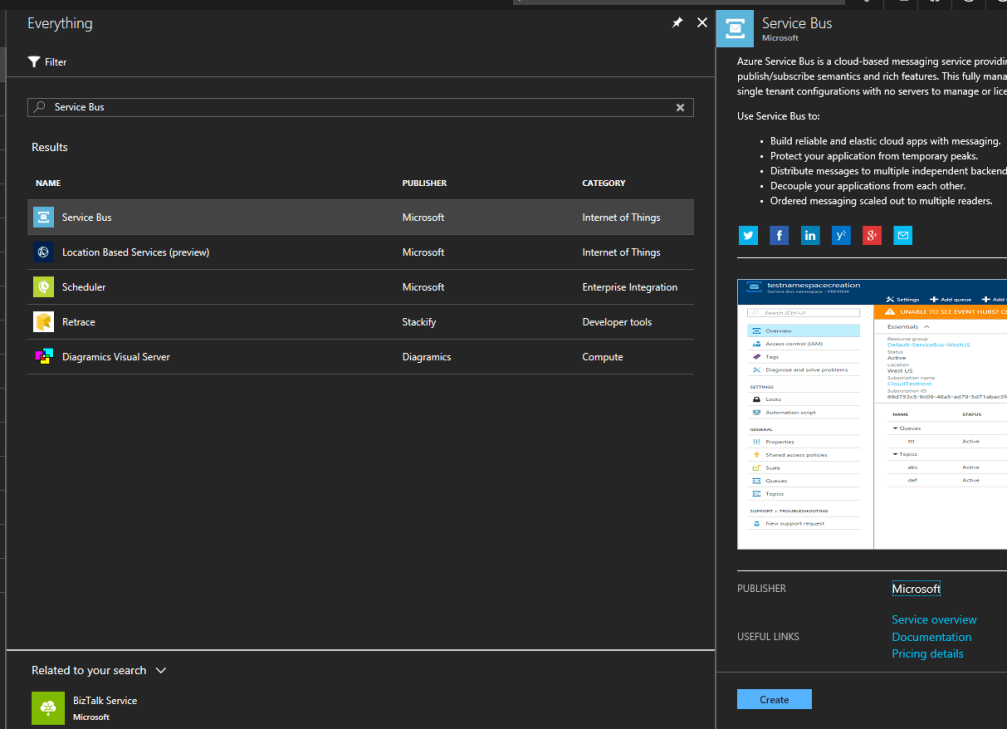
You can take all of the defaults with the create options.
ServiceBus is essentially Microsoft’s version of SNS and SQS (if you are familiar with AWS), but it essentially supports all forms of Pub/Sub, absolutely vital in Microservice so the various services can communicate as state changes occur.
At the top of the screen we can select to Add a Queue. Give the queue a name (any name is fine), just something you will be referencing a bit later.
Once the queue finishes deploying you can access it and select the Shared access policies. Here you can create the policy that permits access to the queue. I generally have a sender and a listener policy. No matter how you do it, you need to make sure you have something that has the rights to read from the queue and write to it.
Once you have created the policy you can select it to get the Connection String; you will need this later so dont navigate away. Ok, lets code.
ServiceBusTrigger
The ServiceBusTrigger is not in the standard SDK Nuget package as the BlobTrigger and HttpTrigger are, for this you will need the Microsoft.Azure.WebJobs.ServiceBus. Now, as we did with the BlobTrigger we need to ensure we can specify the connection string we want the trigger to monitor.
We can do this, similar to above, by specifying the Connection string in our local.settings.json file, just remember to specify the same value in your Azure Function Application Settings. Here is an example of our backend trigger updated to use ServiceBusTrigger.

As you can see, its roughly the same (apologies for using the image, WordPress failed to parse the code properly). The first parameter is the name of the queue we are listening to and is accessible by the given Connection string.
There is one thing I want to point before we move on, it has to do with Cognitive Services. I dont know whether its a bug or not but, when you are dealing ServiceBus your queue entries are simple messages or primitives. In this case, I am writing the name of the new image to the queue and this trigger will read that name and then download the appropriate blob from Storage.
For whatever reason, this doesnt work as you expect. Let me show you what I ended up with:
var url = string.Format("https://<blobname>.blob.core.windows.net/images/{0}", name);
var result = await client.AnalyzeImageAsync(url, features);
I actually wanted to read the byte data out of the blob storage based on the name, then I figured I would be able to pass that data into a MemoryStream and pass the stream to the AnalyzeImage and that would be the end of it. Not so, it crashes with no error message when passed. So, I noticed I can also pass a Url to AnalyzeImage so I just create the direct Url to my blob. Granted if you are wanting to keep the images private this doesnt work as well. Just something to note if you decide to copy this example.
The rest of the code here is the same as above where we read back the result and then update the entry inside Mongo.
Writing to the Queue
The final change that has to be made is when the user uploads an image we want to write our message into the queue, in addition to saving the image to Blob storage. This code is very easy and requires the WindowsAzure.ServiceBus Nuget package.
public static async Task<bool> AddToQueue(string imageName)
{
    var client = QueueClient.CreateFromConnectionString(SenderConnectionString);
    await client.SendAsync(new BrokeredMessage(imageName));

    return true;
}
Pretty straightforward. I am simply sending over the name of the image that was added, remember the name is the ObjectId that was returned from the Mongo create operation.
QueueTrigger
I didnt cover it here but there is such a thing as QueueStorage which is effectively a queue using our Storage account. This works similar to the ServiceBus but, as I said above, I really view this as a legacy piece and I think ServiceBus is the future. Nevertheless, it remains an option when dealing with a scenario where BlobTrigger does not work fast enough
Conclusion
Ok, so if everything is working you have a system that can take an uploaded image and send it off for processing to Cognitive Services. This is what we call “deferred processing” and is very common in high volume systems; systems where there is just not the ability to process things in real time. This “deferred processing” model is in widespread use at places like Facebook, Twitter, and others though much more complicated than our example. This even underpins popular design patterns like CQRS (Command Query Responsibility Segregation).
In short, the reason I like this model and, ultimately, Azure Functions (or the serverless model more specifically) is it allow us to take advantage of what is already there and not have to write things ourselves. We could write the pieces of this architecture that monitor and process but why? Microsoft and Amazon have already done so and support level of scalability that we likely cannot anticipate.
In our next section, we will create the GetAll endpoint and start talking about the API layer using Azure API Management.

6 thoughts on “Serverless Microservice: The Backend”