I think this might be the first time that I have said I was going to create a multi-part series and actually went one to create more than one part. Glad to be getting the new years started well.
Part 2: Redux
State management is hard, in any application, for any reason. Applications today are very complex and have many intricate features that often need to be cross cutting (that is affect area within their scope of responsibility, as well as outside). In JavaScript, this task has long been the bane of developers for as long as I can remember. In recent years, smart people have attempted to find a better way to do this. I think they have stumbled onto something with Flux and now Redux.
So, Flux was the first attempt at patterning a meaningful way for applications, particular SPAs build on React, to tackle this problem. The most notable aspect of the Flux pattern was the “unidirectional flow” of data that emphasized determinism. The concept, simply put, was that if I raise an action, the effect of that action should be determined and not based on the current state of the system, i.e lacking in temporal coupling (http://blog.ploeh.dk/2011/05/24/DesignSmellTemporalCoupling/)
Flux has since fallen out of favor due to risks with keeping state change business logic in the store itself. Redux has supplanted it because it allows for tighter control and better separation of concerns. That is why, predominantly, we see Redux being used for Flux for new applications. YMMV
Returning to the example at the end of Part 1, we see the use of component state in FormComponent. This is not bad, nor does it represent a code smell. However, ideally if other parts of our application are going to need access to this, keeping it inside the component will not suffice. This is where Redux comes in, as it allows a global store of state and tight management of that store; a necessary feature as more applications are turning towards a sync model rather than a direct save.
Before we dive in, here is the overall flow of a Redux application. We will discuss each piece and how to set things up.

Again, you can see the flow of information is uni-directional. The Container concept is a “connected” React component, we will discuss that in a bit.
The Setup
So, this part can be a bit tricky and I am going to assume you already have a React application, maybe even the one from Part 1. Your first step, as usual, is to install the appropriate NPM packages
yarn add redux react-redux
The first thing to understand is the store. The Store is a special construct that you will want to be widely available throughout your application. The store contains all of your applications data. To facilitate this the react-redux provides the Provider element, here is how you use it:
The element works by create a context level variable for the store. Without diving too much into what Context is, its suffice to say that our store will be accessible should we need it. The real magic here is what goes on in the configureStore method.
In general, I recommend create a separate method for this as, depending on the size and scope of your application, store setup can be quite involved, as we will see in Part 3 when we begin to add custom middleware. But for now, this will seem like overkill, though I do like the separation.
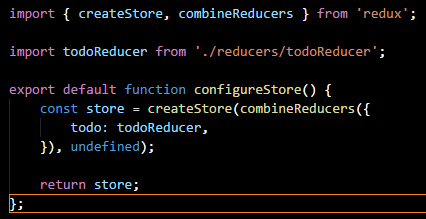
For the store, we are simply giving it a single Reducer which will handle state changes. Now, as a side note I am using the combineReducers method here from redux. Honestly, if you have only one reducer, using this method is overkill, but its important to be aware that it exists.
Reducers are an integral part of Redux because they are charged with replacing state based on events. When an event is raised via an Action ALL reducers are given the action. By default, if the Reducer does not care about this, it simply returns the unchanged state it was given. If it does care then, it replaces the part of state. Here is an example:
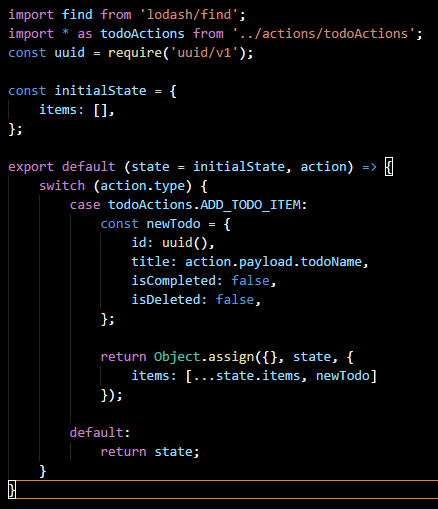
First, note the initialState constant. If you remember in our configureStore method we passed undefined in a the second parameter to createStore, this was the state to be given, initially, to the reducers. I dont personally like giving it there. By passing undefined I can do the above where the initial state for each reducer is defined in the same file.
You see, state = initialState will set state to initialState if undefined is passed for state. In this case, we are stating that the todoReducer only cares about an array called items. So, it is reasonable to expect that, throughout our reducer, the only part of state we will see modified is items; that is generally the smell test for a reducer.
Now, earlier I mentioned that Redux will fire ALL reducers when an action is raised. That is why we do not want to change state, only replace it (note the use of Object.assign above). When a reducer is given an action that it cares about, its changes need to be as minimal as possible. In the above, we are adding an item so, our new state is simply the existing items array plus the addition of the new item.
If an action was passed to this reducer that it did not care about it, it would simply hit the default section of the switch and return the state it was given.
So, you see how a reducer plays out, let’s talk about actions.
In Redux, actions play the crucial role of informing Redux that the user wishes to change something. For their part, actions are probably the simplest thing in Redux to understand. Here is an example of three actions:

An action for Redux (and Flux) has only one requirement: it must have a property called type. Additional recommendations include a property payload if more than one piece of data is to be transmitted with the action.
By wrapping these results in functions, the code for dispatching is much cleaner and easier to read. You do not have to have action methods as shown above, but it is the recommended approach.
Ok, so at this point we have gone through most of the core pieces of Redux, now lets fit the pieces together.
Earlier I mentioned the Container concept, or a connected React component. Let’s understand what this means.
When we use the <Provider> tag we are able to pass a reference to our store around in context. A connected component accesses this variable and exposes it. In React, this is done via the connect method.
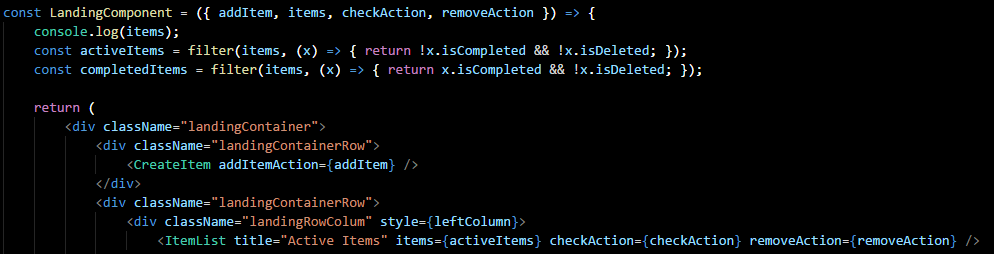
Notice the usage of LandingComponent in the above code, this export call effectively creates a the Landing Container. The container wraps the components and provides props to the component which allow access to the store and the Redux dispatcher.
Let’s walk through this code:
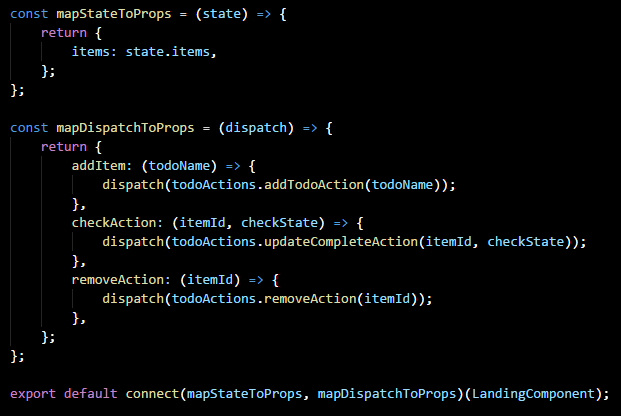
connect takes two parameters, both of which are callbacks. mapStateToProps provides us a reference to our state, via the store. Using this variable we can MAP data in state to our component. In the above code, LandingComponent will receive a prop called items which will contain the contents of state.items. Note here, however, that, if you use combineReducers you will need an additional qualifier after state since the various states will be partitioned.
mapDispatchToProps allows us to provide a set of functions as props to our component (LandiongComponent in this case) which we can invoke to dispatch actions. In this case, LandingComponent will receive a prop of type func, which, when invoked, will dispatch the removeAction.
The dispatch of removeAction will cause a reducer to change the state. Once that change is made, mapStateToProps will be called again and the Component will be given new props reflecting the state change. This will trigger a re-render. That render will affect the virtual-dom which will ensure that all state changes are properly and efficiently applied; see Part 1.
What connect() actually returns is another function which takes one parameter: the component to apply the props to, in this case LandingComponent. If we look at LandingComponent we can see that it does not look any different than any other React component, but the props are supplied from the Redux store.
A word of advice on the use of connect: be careful. It can be very easy to misuse and have connections everywhere; our teams strive to avoid this and thus only apply connect at the top most level. Your applications needs may vary, I have yet to find a hard and fast rule for this.
One other piece of advice when it comes to reducers. If you ever find yourself with a “selected*” type property in your state: stop. You are likely doing it wrong. The things being kept in state should be more permanent, not temporary. So if the user can cancel out of an action use component to hold it while its being edited; only use the store once you want to persist it.
On the topic of persistence, you will notice that Redux does not actually persist anything beyond the lifetime of your session. This is intentional. Redux is about state management, not state persistence. There are multiple ways to store state and Redux certainly makes it easier. In our next part, I intend to look at Redux Observables and how they can be used to make your data layer more flexible and resilient.

Super Article ! Vraiment très instructif… 🙂
LikeLike