Over the last few weeks Jeff Fritz and I have been slowly rolling out (darkly) support in KlipTok for tracking the live status of tracked channels. This feature leverages Twitch’s EventSub system that enables a sort of event driven programming for client applications. The integration of EventSub into KlipTok will enable the site to take the next step in terms of functionality and offerings.
Tracking stream status involves receiving callbacks for two different events which can occur: stream.online and stream.offline. Following this, I implemented support for this using Azure Service Bus with SQLFilters. The filters were organized as such:
EventType = ‘stream.online’ and EventVersion = ‘1’ => Stream is online
EventType = ‘stream.offline’ and EventVersion = ‘1’ => Stream is offline
Initial testing of this logic showed it worked as the events were received. Following the success small tests I worked with Jeff to subscribe all channels that had opted into tracking. Once successful, I began monitoring the channels during control times (when @csharpfritz stream was active) as well as random points throughout the day. For the most part I had confirmed the functionality working properly.
But then I started seeing some irregularities. @wintergaming is a popular StarCraft 2 Twitch channel but I noticed that the entry never seemed to go offline. Digging deeper into Twitch’s documentation I realized that, in fact, there is a difference between a channel being online and a channel being live; @wintergaming for example is NEVER offline rather, he plays reruns when he is not live. According to the documentation, this is still a valid online status, a status which i was not accounting for. As our requirement for KlipTok was to note LIVE channels, a change needed to be made.
Many Options
As I sat down to address this I was faced with a few ways to go about it. A couple approaches which I considered were:
I could update the StreamOnlineUpdate subscription such that, if the type was NOT ‘live’ I should treat it as an offline event and delete the entry from the LiveChannel tracking table
I could update the StreamOnlineUpdate subscription such that, if the not ‘live’ type was detected the event would be redirected to the Offline subscription
Both of these were, in my mind, bad choices. For starters, taking Option 1 would create duplicative code between the Online and Offline subscriptions. Further, it would obscure the purpose of the OnlineUpdate whose intent is to handle the case of the channel being ‘online’. I decided to not pursue this.
Option 2 is a bit better since it avoids duplicating logic but, when creating event handlers, the intent should be as straightforward and clear as possible. Event redirection like this is foolish and only adds extra processing logic to the handler. It would be different if I was creating a new event to “advance the flow”. But, in this case, I am effectively using the subscriptions as a mechanism of logic checking.
So, I thought about it more deeply and I realized that I was restricting myself based on the naming I had chosen. Recall what I said earlier “there is a difference between a channel being online and a channel being live”. The solution lie in honoring this distinction Twitch was making in our system as well.
Thus, the solution I arrived at is to alter the names of the subscriptions as such:
StreamOnlineUpdate => StreamLiveUpdate
StreamOfflineUpdate => StreamNotLiveUpdate
By creating this distinction, it meant that I could not adjust the Service Bus SQL Filter to only send the message to StreamLiveUpdate if the channel is, in fact, live. In other cases, the channel is NOT live and thus we should send to the StreamNotLiveUpdate.
In effect, this enables the sort of Single Purpose Events which are ideal in complex system which depend on low amounts of coupling to ensure the sanity of the maintainers.
Making it Work
The SQL Filter syntax of Service Bus works quite well (though I am still partial to what is offered through EventGrid) and enables clear definition of criteria. Unlike EventGrid however, the message itself cannot be analyzed (or if it can I have not found out how). Thus, we rely on the use of the Message class (from Microsoft.Azure.ServiceBus NuGet package) to apply custom UserProperties that we can use for filtering.
We end up defining the following for StreamLiveUpdate
EventVersion = ‘1’ and EventType = ‘stream.online’ and StreamType = ‘live’
EventVersion comes from Twitch so we can distinguish between different formats of the Event (this approach is also highly advised for testing and development to ensure discreteness with events already in play).
The EventType is the Twitch event being received. Our code also, upon knowing its receiving a stream type event offers the StreamType value as well, which will contain live, rerun, and other values indicating what the online stream type corresponds to.
For StreamNotLiveUpdate we define the following SQL Filter:
EventVersion = ‘1’ and (EventType = ‘stream.offline’ or (EventType = ‘stream.online’ and StreamType <> ‘live’))
You can see this combines our criteria for the normal case (EventType = ‘stream.offline’) and the exceptional case around an online event that is NOT of type live.
Conclusion
Through this approach we ensure our event handlers have but a single purpose, an application of the Single Responsibility Principle from SOLID design. The only time we should have to modify the Live event handler is if the meaning of a live channel changes. We are not redirecting or overloading this handler and obscuring its meaning. Instead we adjusted our understanding to better match the reality of the data we would be receiving. Thus, we are able to maintain a single purpose event pattern and control the complexity of the feature.
Perspectives on duplication are as varied and wide-ranging as any topic in software development. Newer programmers are often fed acronyms such as DRY (Dont Repeat Yourself) and constantly bombarded with warnings from senior programmers about the dangers of duplication. I can even recall getting these lessons when I was still in academia.
So is duplication actually bad? The simpler answer ‘Yes’, but the real answer is much more nuanced and boils down to one of the most common phrases in software engineering: ‘it depends’. But what does it depend on? How can teams prevent themselves from going over the deep end and introducing leaky abstractions or over complexity all in the name of adhering to DRY?
It is about the Lifecycle
Whenever a block of code is authored it immediately transitions to something which must be maintained. I once heard a senior engineer remark “there is no such thing as new code. There is only legacy code and code which is not yet written”. So, once code is written we must immediately begin discussing its lifecycle.
Code evolves over time and this evolution should be encouraged – something that is actively pursued through attempts to decouple code and promote cohesion. Too often the reason something is “shared” is because we created a Person class in one system and felt that creating a second Person class in another system would be duplicative. However, in making this assumption, developers will unknowingly increase system coupling resulting in a far greater problem. A problem they could avoid if they considered the “lifecycle” of each Person class.
More prominently, this notion gets applied to business logic and, in that case, it is correct. Certain business logic absolutely has a standard lifecycle. In fact, each line of code you write will have a lifecycle, and this what you need to use to decide whether duplicating something makes sense.
An example
When I was working as a Principal at West Monroe Partners some years ago I was assigned to a project in which through a combination of misgivings a multitude of mistakes had been made which hampered team progress and efficiency. One of these was a rather insane plan to share database entities through a NuGet package.
Database entities, in theory, do not change that often once established, but that is theory. More often, and especially as a system is being actively developed, they change constantly – this is especially true in the case of this project which had three active development teams all using the same database. The result was near constant updates across every project whenever a change was made – and failure to do so would often manifest as an error in a deployed environment since Entity Framework would complain the schema expected did not match.
While the team may have had a decent sense to reduce duplication by sharing entities it is a high risk move in complex systems. In the best case, you end up with bloated class definitions and API calls where returned objects may or may not have all fields populated. This becomes even more true if you are approach system design with a microservice based mindset – as each service should contain its own entities (unless you are sharing the DB which is a different problem altogether).
Should all code be segregated then?
The short answer is “No”. Again, we return to point on lifecycle. In fact, this relates to the core principle in Microservice design where services and their lifecycles are independent of each other. Spelt out “no service should be reliant on another service in deployment” – if this rule is broken then the advantages of microservices is effectively lost. The lifecycle of each service must be respected.
It is the same with code. Code lifecycles must be understood and respected. Just because you define two Person class definitions does not mean you have created duplication, even if the definitions are the same. You are giving yourself the ability to change each over time according to system needs.
Some code, logging code or perhaps a common set of POCO classes may need to be shared – this is where I tend to lean on custom NuGet feeds. But, generally this is a last resort as it is easy to go overboard with things like NuGet and fall into the “pad left” problem – where you decompose everything so much that you wind up with an extensive chain of dependencies which need to be revved for a release. Link.
As with most things, there is a necessary balance to strike here and you should not expect to get it right immediately – frankly the same lesson is applied in Microservice where, you never start with Microservices, you create new services as needed.
Why is it a misconception?
I find that the concept of DRY is overused and, more often, taken way too literally. I think we can all agree that what is often meant by DRY is to ensure we dont need to update the same logic in multiple places. DRY is not telling us that have two Person classes is bad. It can be bad but whether that is so is determined by circumstances and is not a hard and fast rule.
The misconception is dangerous because strict adherence to DRY can actually make our code LESS maintainable and sacrifice clarity for reduced keystrokes. As developers, we need to constantly be thinking and evaluating whether centralization and abstraction make sense or if we are doing it because we may be overthinking the problem or taking DRY too literally.
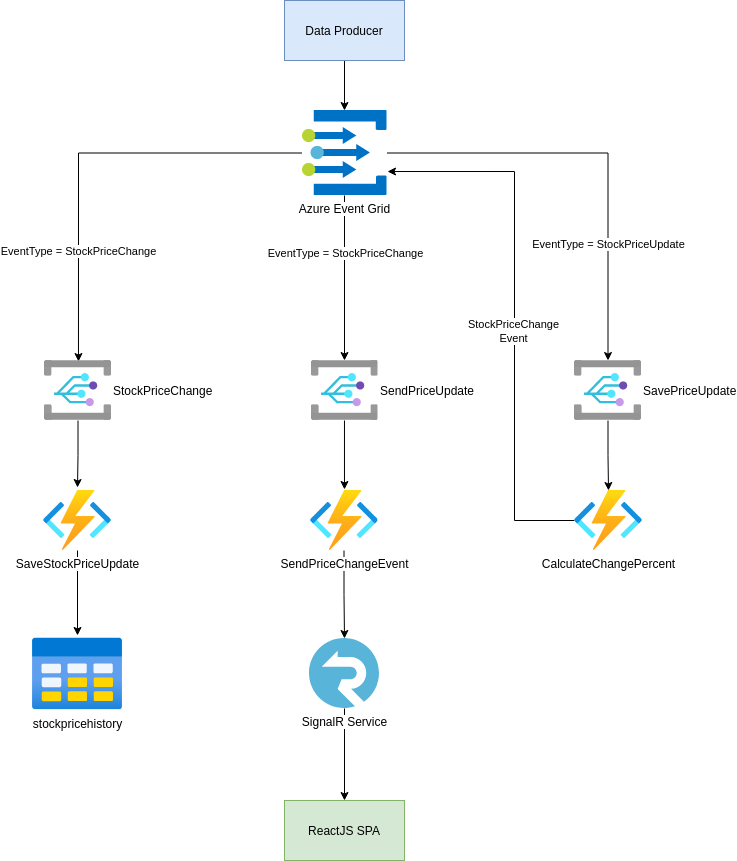
I decided to build a Event Driven Stock Price Application using Event Grid, SignalR, and ReactJS. Just a little something to play with as I prepare to join Microsoft Consulting Services. I thought I would recount my experience here. First, here is what the flow looks like:
Figure 1 – Diagram of Stock App
While the diagram may look overbearing it really is quite simple:
Producer console app starts with some seed data of stock prices I gathered
It adjusts these values using some random numbers
The change in price is sent to an Event Grid topic with an EventType declared
The EventGrid subscriptions look for events with a matching EventType
Those that match will fire their respective Azure function
The Azure Function will then carry out its given task
I really prefer Event Grid for my event driven applications. Its fast, cost effective, and has a better interaction experience than Service Bus topics, in my opinion. The subscription filters can get down to analyzing the raw JSON coming through and it supports the up and coming Cloud Events (cloudevents.io) standard. It also can tie into the tenant providers and respond to native Azure events, such as blob creation/deletion. All in all, it is one of my favorite Azure services.
So regarding the application, I choose to approach this from a purely event driven fashion. All price changes are seen as events. The CalculateChangePercent receives all events and, using the symbol as the partition key, looks up the most recent price stored in the database.
Based on this and the incoming data it determines the change percent and creates a new event. Here is the code for that:
This file contains hidden or bidirectional Unicode text that may be interpreted or compiled differently than what appears below. To review, open the file in an editor that reveals hidden Unicode characters.
Learn more about bidirectional Unicode characters
This is basically “event redirection”, that is taking one event and create one or more events from it. Its a very common approach to handle sophisticated event driven workflows. In this case, once the change percent is calculated the information is ready for transmission and persistence.
This sort of “multi-casting” is at the heart of what makes event driven so powerful and, so risky. Here two subscribers will receive the exact same event and take very different operations:
Flow 1 – this flow takes the incoming event and saves it to a persistence store. Usually, this needs to be something high availability, consistency is usually not something we care about.
Flow 2 – this flow takes the incoming event and sends it to the Azure SignalR service so we can have a real time feed of the stock data. This approach in turn allows connecting clients to also be event driven since we will “push” data to them.
Let’s focus on Flow 1 as it is the most typical flow. Generally, you will always want a record of the events the system received either for analysis or potential playback (in the event of state loss or debugging). This is what is being accomplished here with the persistence store.
The reason you will often see this as a Data Warehouse or some sort of NoSQL database is, consistency is not a huge worry and NoSQL database emphasize the AP portion of the CAP theorem (link) and are well suited to handling high write volumes – this is typical in event heavy systems, especially as you get closer to patterns such as Event Sourcing (link). There needs to be a record of the events the system processed.
This is not to say you should rely on a NoSQL database over an RDBMS (Relational Database Management System), each has their place and there are many other patterns which can be used. I like NoSQL for things like ledgers because they dont enforce a standard schema so all events can be stored together which allows for easier re-sequencing.
That said, there are also patterns which periodically read from NoSQL stores and create data into RDBMS – this is often done if data ingestion needs are such that a high volume is expected but the data itself can be trusted to be consistent. This may create data into a system where we need consistency checks for other operations.
Build the Front End
Next on my list was to build a frontend reader to see the data as it came across. I choose to use ReactJS for a few reasons:
Most examples seem to use JQuery and I am not particularly fond of JQuery these days
ReactJS is, to me, the best front end JavaScript framework and I hadnt worked with it in some time
I wanted to ensure I still understood how to implement the Redux pattern and ReactJS has better support than Angular; not sure about Vue.js
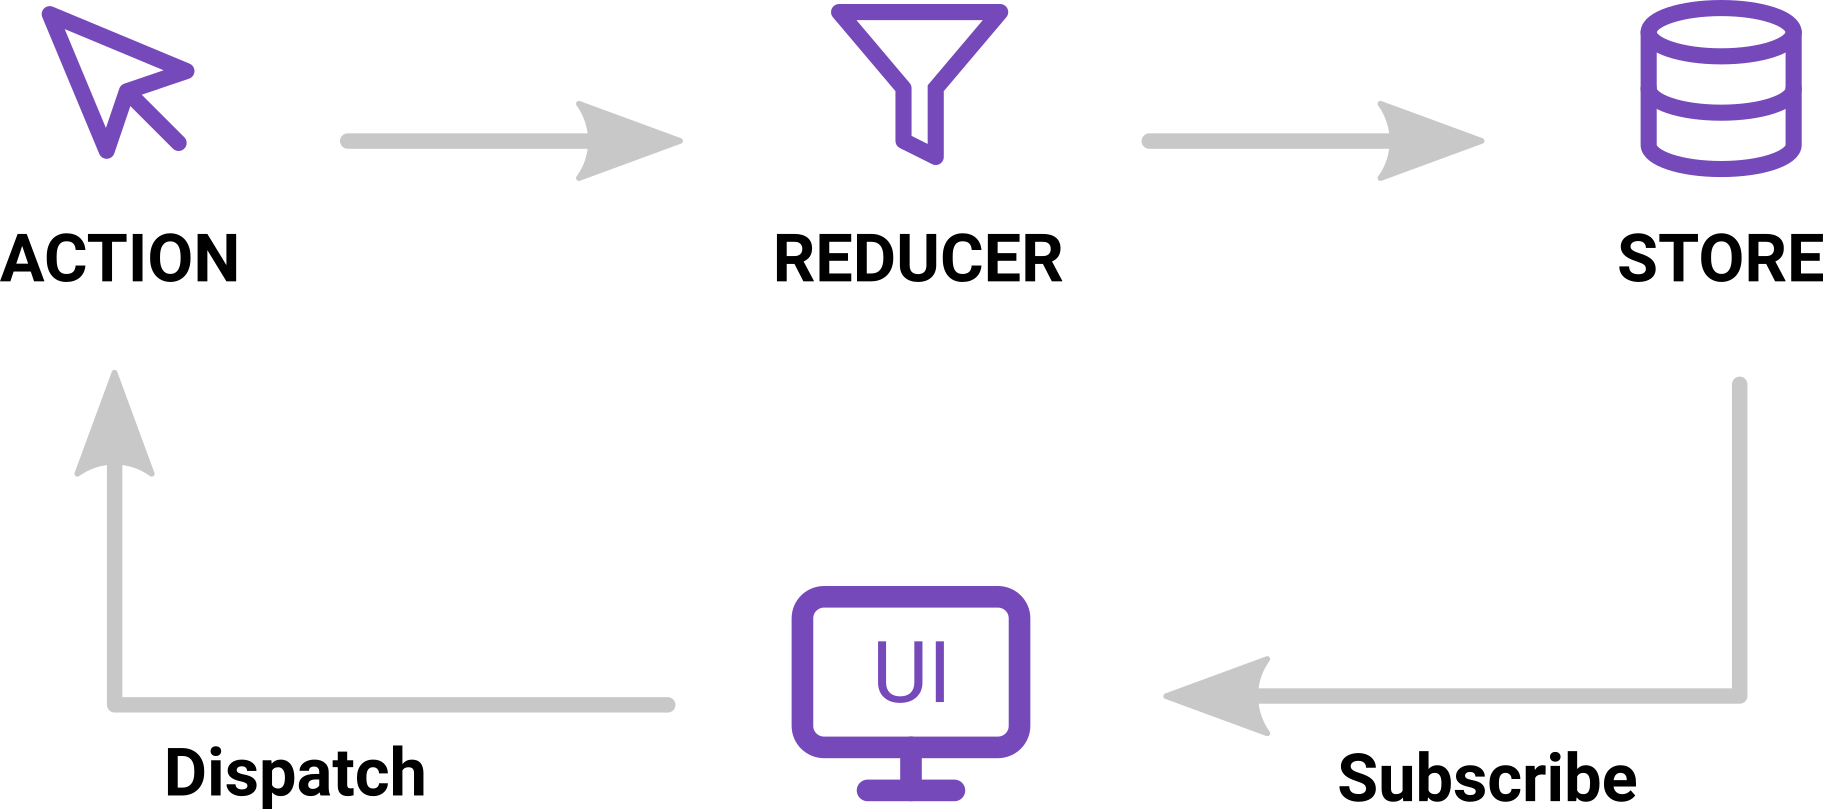
If you have never used the Redux pattern, I highly recommend it for front end applications. It emphasizes a mono-directional flow of data built on deterministic operations. Here is a visual:
I first used this pattern several years ago when leading a team at West Monroe, we built a task completion engine for restaurants, we got pretty deep into the pattern. I was quite impressed.
Put simply, the goal of Redux is that all actions are handled the same and state is recreated each time a change is made, as opposed to updating state. By taking this mentality, operations are deterministic meaning the same result will occur no matter how many times the same action is executed. This bakes very nicely with the event driven model from the backend which SignalR carries to the frontend.
Central to this is the Store which facilitates subscribing and dispatching events. I wont go much deeper into Redux here, much better sources out there such as https://redux.js.org/. Simply put, when SignalR sends out a messages it sends an event to listeners – in my case its the UpdateStockPrice event. I can use a reference to the store to dispatch the event, which allows my reducers to see it and change their state.
Once a reducer changes state, a state updated event is raised and any component which is connected will update, if needed (ReactJS uses shadow DOM to ensure components only change if they were actually changed). Here is the code which is used (simplified):
This file contains hidden or bidirectional Unicode text that may be interpreted or compiled differently than what appears below. To review, open the file in an editor that reveals hidden Unicode characters.
Learn more about bidirectional Unicode characters
This code makes use of the redux and react-redux helper libraries. ReactJS, as I said before, supports Redux extremely well, far better than Angular last I checked. It makes the pattern very easy to implement.
So what happens is:
SignalR sends a host of price change events to our client
Our client dispatches events for each one through our store
The events (actions) are received by our reducer which changes its state
This state change causes ReactJS to fire render for all components, updating Shadow DOM
Shadow DOM is compared against action DOM and components update where Shadowm DOM differs
This whole process is very quick and is, at its heart, deterministic. In the code above, you notice the array is recreated each time rather than pushing the new price or trying to find the existing index an updating. This may seems strange but, it very efficiently PREVENTS side effects – which often manifest as some of the more nastier bugs.
As with our backend, the same action could be received by multiple reducers – there is no 1:1 rule.
Closing
I wrote this application more to experiment with Event Driven programming on the backend and frontend. I do believe this sort of pattern can work well for most applications; in terms of Redux I think any application of even moderate complexity can benefit.
DevOps is a topic very near and dear to me. Its something that I helped organizations with a lot as an App Modernization Consultant in the Cognizant Microsoft Business Group. However, I find it ubiquitous that DevOps is misunderstood or misrepresented to organizations.
What is DevOps?
In the most simplest sense, DevOps is a culture that is focused on collaboration that aims to maximize team affinity and organizational productivity. While part of its adherence is the adoption of tools that allow team to effectively scale, at its core its a cultural shift to remove team silos and emphasize free and clear communication. One could argue, as Gene Kim does in his book The Phoenix Project, that the full realization of DevOps is the abolishment of IT departments; instead IT is seen as a resource embedded in each department.
From a more complex perspective, the tenants of DevOps mirror the tenants of Agile and focus on small iterations allowing organizations (and the teams within) to adjust more easily to changing circumstances. These tenants (like with Agile) are rooted in Lean Management which was borne out of the Toyota Production System (TPS) (link) which revolutionized manufacturing and allowed Toyota to keep pace with GM and Ford, despite the later two being much larger.
The Three Ways
DevOps culture carries forth from TPS the three ways which govern how work flows through the system, how it is evaluated for quality, and how observations upon that work inform future decisions and planning. For those familiar with Agile, this should, again, sound familiar – DevOps and Agile share many similarities in terms of doctrine. A great book for understanding The Three Ways (also authored by Gene Kim) is The DevOps Handbook.
The First Way
The First Way focuses on maximizing the left to right flow of work. For engineers this would be the flow of a chance from conception to production. The critical idea to this Way is the notion of small batches. We want teams to consistently and quickly sending work through flows and to production (or some higher environment as quickly as possible). Perhaps contrary to established thought, the First Way stresses that the faster a team moves the higher their quality.
Consider, if a team works on a large amount of changes (100), does testing, and then ultimately deploys the change the testing and validation is spread out across these 100 changes. Not only are teams at the mercy of a quality process which must be impossibly strict, if a problem does occur, the team must sort out WHICH of the 100 changes caused the problem. Further, the sheer size of the deployment would likely make rollback very difficult, if not impossible. Thus, the team may also be contending with downtime or limited options to ensure the problem does not introduce bad data.
Now consider, if that same team deployed 2 changes. The QA team can focus on a very narrow set of testing and if something goes wrong, diagnosing is much easier given the smaller size. Further, the changes could likely be backed out (or turned off) to prevent the introduction of bad data into the system.
There is a non-linear relationship between the size of the change and the potential risk of integrating the change – when you go from a ten-line code change to a one-hundred-line code change, the risk of something going wrong is more than 10x higher, and so forth
Randy Shoup, DevOps Manager, Google
Smaller batch sizes can help your teams move faster and get their work in front of stakeholders more efficiently and quickly, doing so induces better communication between the team and their users, which ultimately help each side get what they want out of the process. There is nothing worse than going off in a corner for 4 months, building something, and having it fall short of the needs of the business.
The Second Way
Moving fast is great but is only part of the equation. Like so much in DevOps (and Agile) the core learnings are defined in a way that is supplementary to each other. The Second Way emphasizes the need for fast feedback cycles or more directly, is aimed at ensuring that the speed is supported by automated and frequent quality checks.
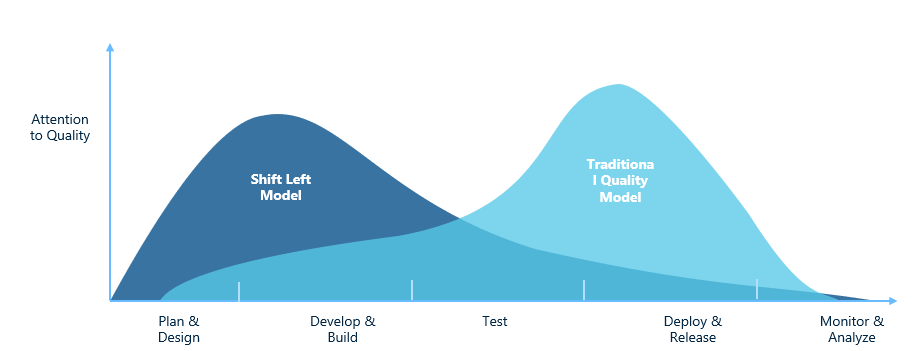
The Second Way is often tied to a concept in DevOps called shift-left, shown by the graph visual below:
Shift Left in action
It is not uncommon for organizations embracing a siloed approach to Quality Assurance to start QA near the end of a cycle, generally to ensure they can validate the complete picture. While this makes sense, it value is misplaced. I would ask anyone who has built or tested software how often this process ends up being a bottleneck (reasons be damned) in delivery? If you are like most clients I have worked with, the answer is Yes and Always.
The truth is, such a model does not work if we want teams to move with speed and quality. Shift Left therefore emphasizes that it is the people at the LEFT who need to do the testing (in the case of engineering that would be the developers). The goal is to discovered a problem as quickly as possible so that it can be corrected building on the ubiquitous understanding that the earlier a problem is found the cheaper it is to fix.
To but it bluntly, teams cannot make changes to systems, teams, or anything is there is not a sense of validation to know what they did worked. For engineering, we can only know something is working if we can test that is working, hence the common rule for high-performing teams that no problem should ever occur twice.
I cannot overstate how important these feedback cycles are, especially in terms of automation. Especially in engineering, giving developers confidence that IF they make a mistake (and they will) it will get caught before it gets to production is HUGE. Without this confidence, the value provided by The First Way will be limited.
And equally critical to creating the cycles is UNDERSTANDING the means of testing and what use case is best tested by what. Here is an image of the Testing Pyramid which I commonly use with clients when explaining feedback cycles for Engineering.
For those wondering where manual testing goes – it is at the very top and has the fewest number. Manual tests should be transitioned to an automated tool.
A final point I want to share here, DevOps considers QA as a strategic resource NOT a tactical one. That is, high functioning teams do NOT expect QA persons to do the testing, these individual are expected to ORGANIZE the testing. From this standpoint, they would plan out what tests are needed and ensure the testing is happening. In some cases, they may be called on to educate developers on what tests fit certain use cases. Too often, I have seen teams view QA as the person who must do the testing – this is false and only encourages bottlenecking. Shift-left is very clear that DEVELOPERS need to do the majority of testing since they are closer to a given change than QA.
The Third Way
No methodology is without fault and it would be folly to believe there is a prescriptive approach to anything that fits any team. Thus, The Third Way stresses that we should use metrics to learn about and modify our process. This includes how we work as well as how our systems work. The aim is to create a generative culture that is constantly accepting of new ideas and seeks to improve itself. Teams embracing this Way apply the scientific method to any change in process and work to build high-trust. Any failure is seen, not as a time to blame or extort, but rather to learn and evolve.
“The only sustainable competitive advantage is an organization’s ability to learn faster than the competition”
Peter Senge – Founder of the Society for Organizational Learning
For any organization the most valuable asset is the knowledge of their employees for only through this knowledge can improvements be made that enable their products to continue to produce value for customers. Put another way:
Agility is not free. It’s cost is the continual investment to ensure teams can maintain velocity. I have seen software engineering department leads ask, over and over, why is the team not hitting their pre-determined velocity. Putting aside the fallacy of telling a team what speed they should work at, velocity is not free. If I own a sports car, but I perform not maintenance on it, soon it will drive the same as a typical consumer sedan. Why?
“.. in the absence of improvements, processes do NOT stay the same. Due to chaos and entropy, processes actually degrade over time”
Mike Rother – Toyota Kata
No organization, least of all engineering, can hope to achieve its goals if it does not continually invest in the process of reaching those goals. Teams which do not perform maintenance on themselves are destined to fail and, depending on the gravity of the failure, the organization could lose more than just money.
In Scrum, teams will use the Sprint Retrospective to call to attention things which should be stopped, started, and continued as a way to ensure they are continually enhancing their process. However, too often, I have seen these same teams shy away from ensuring, in each sprint, there is time taken to remove technical debt or add some automation, usually because they must hit a target velocity or a certain feature. This completely gets away from the spirit of Agile and DevOps.
Its about culture
Hopefully, despite my occasional references to engineering, you can understand that The Three Ways are about culture and about embracing many lessons learned from manufacturing about how to effectively move work through flows. DevOps is an extremely deep topic that, regrettably, often gets boiled down to a somewhat simplistic question of “Do you have automated builds?”. And yes, automation is a key to embracing DevOps but less important than establishing the cultural norms to support it. Simply having an automated build is indifferent if all work must be pass through central figures or certain work is given into silos where the timeline is no longer the teams.
Further Reading
The topic of DevOps is well covered, especially if you are a fan of Gene Kim. I recommend these books to help understand DevOps culture better – I list them in order of quality:
The next entry in this series is something that hits very close to home for me: Serverless for APIs. Let me first start off by saying, I am not stating this as an unequivocal rule. As with anything in technology there are cases where this makes sense. And, in fact, much of my consternation could be alleviated by using Containers. Nevertheless, I still believe the following to be true:
For any non-simple API, a serverless approach is going to be more harmful and limiting, and in some cases more costly, than using a traditional server.
Background
When AWS announced Lambda back in 2014 it marked the first time a major cloud platform had added support for what would be come known as FaaS (Function as a Service). The catchphrase was serverless which, did not make a lot of sense to people since there was obviously still a server involved – but marketing people gotta market.
The concept was simple enough, using Lambda I could deploy just the code I wanted to run and pay per invocation (and the cost was insanely cheap). One of the things Lambda enabled was the ability to listen for internal events from things like S3 or DynanmoDB and create small bits of code which responded to those events. This enabled a whole new class of event driven applications as Lambda could serve as the glue between services – EventBridge came along later (a copy of Azure’s EventGrid service) and further elevated this paradigm.
One of the Events is a web request
One of the most common types of applications people write are APIs and so, Lambda ensured to include support for supporting web calls – effectively by listening for a request event coming from outside the cloud. Using serverless and S3 static web content, a company could effectively run a super sophisticated website for a fraction of the cost of traditional serving models.
This ultimately led developers to use Lambda and Azure Functions as a replacement for Elastic Beanstalk or Azure App Service. And this is where the misconception lies. While Lambda is useful to glue services together and provide for simple webhooks it is often ill-suited for complex APIs.
The rest of this will be in the context of Azure Functions but, conceptually the same problems existing with Google Cloud Functions and AWS Lambdas.
You are responding to an Event
In traditional web server applications, a request is received by the ISAPI (Internet Server Application Program Interface) where it is analyzed to determine its final destination. And this destination can be affected by code, filters, and other mechanisms.
Serverless, however, is purely event driven which means, once an event enters the system it cannot be cancelled or redirected, it must invoke its handler. Consider the following problem that was encountered with Azure Function Filters while developing KlipTok.
On KlipTok there was a need to ensure that each request contained a valid header. In traditional ASP .NET Core, we would write a simple piece of middleware to intercept the request and, if necessary, short-circuit it should it be deemed invalid. While technically possible in Azure Functions it requires a fairly robust and in-depth knowledge and customization to achieve.
In the end, we leveraged IFunctionsInvocationFilter (a preview feature) which allowed code to run ahead of the functions execution (no short-circuit allowed) and mark the request. Each function then had to check for this mark. It did allow us to reduce the code but certainly was not as clean as a traditional API framework.
The above example is one of many examples of elements which are planned and allotted for in full-fledged API frameworks (being able to plug into the ISAPI being another) but are otherwise lacking in serverless framework, Azure Functions in this case. While there does exist the ability to supplement some of these features with containerization or third party libraries, I still believe such a play detracts from the intended purpose of serverless: to be the glue in complex distributed systems.
It is not to say you never should
The old saying “never say never” certainly holds true in Software Engineering as much as anywhere. I am not trying to say you should NEVER do this, there are cases where Serverless makes sense. This is usually because the API is simple or the Serverless piece is leverage by a proxy API or represents specific routes within the API. But I have, too often, seen teams leverage serverless as if it was a replacement for Azure App Service or Elastic Beanstalk – it is not.
As with most things teams need to be aware and make informed decisions with an eye on the likely road of evolution a software product will take. While tempting, Azure Functions have a laundry list of drawbacks you need to be aware of including:
Pricing which will vary with load taken by the server (if using Consumption style plans)
Long initial request time as the Cloud provider must standup the infrastructure to support the serverless code – often times our methods will go to sleep
Difficulties with organization and code reuse. This is certainly much easier in Azure than AWS but, still something teams need to consider as the size of the API grows
Diminished support for common and expected API features. Ex: JWT authentication and authorization processing, dependency injection in filters, lack of ability to short circuit.
There are quite a few more but, you get the idea. In general, the aim for a serverless method is to be simple and short.
There are simply better options
In the end, the main point here is, while you can write APIs in Serverless often times you simply shouldnt – there are simply better options available. A great example is the wealth of features web programmers will be used to and expect when building APIs that are simply not available or not easy to implement with serverless programming. Further, as project sizes grow the ability to properly maintain and manage the codebase because more difficult with serverless than with traditional programming.
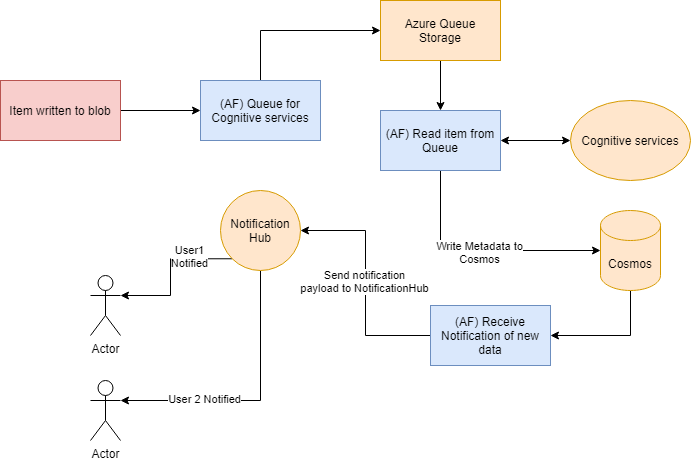
In the end, serverless main purpose should be to glue your services together, enabling you to easily build a chain like this:
The items in blue represent the Azure Functions this sequence would require (at a minimum). The code here is fairly straightforward thanks to the use of bindings.These elements hold the flow together and support automated retry and fairly robust failure handling right out of the box.
Bindings are the key to using Serverless correctly
I BELIEVE EventBridge in AWS enables something like this but, as is typical, Microsoft has a much more thoughtout experience for developers in Azure than AWS has – especially here.
Bindings in Azure allow Functions to connect to services like ServiceBus, EventGrid, Storage, SignalR, SendGrid, and a whole lot more. Developers can even author their own bindings. By using them, the need to write the boilerplate connect and listen code is removed so the functions can contain code which is directed at their intended purpose. One of these bindings is an input trigger called HttpTrigger, and if you have ever written a Azure Function you are familiar with it. Given what we have discussed, its existence should make more sense to you.
A function is always triggered by an event. And the one that everyone loves to listen for in the HttpTrigger that is an event to your function app which matches certain criteria defined in the HttpTrigger attribute.
So returning to the main point, everything in serverless is the result of an event so, we want to view the methods created as event handler not full fledged endpoints. While serverless CAN support an API, it lacks many of the core features which are built into API frameworks and therefore should be avoided for all but simple APIs.
This is the first post in what I hope to be a long running series on common misconceptions I come across in my day to day as a developer and architect in the .NET space though, some of the entries will be language agnostic. The goal is to clear up some of the more common problems I find teams get themselves into when building applications.
A little about me, I am a former Microsoft MVP and have been working as a consultant in the .NET space for close to 15yrs at this point. One of the common tasks I find myself doing is helping teams develop maintainable and robust systems. This can be from the standpoint of embracing more modern architecture such as Event Driven systems or using containers or it can be a modernization of the process to support more efficient workflows that enable teams to deliver more consistent and reliable outcomes while balancing the effort with sustainability.
The first misconception is one which I run across A LOT. And that is the way in which I find teams leveraging Entity Framework.
Entity Framework is a Repository
One of the most common data access patterns right now is the Repository pattern – Link. The main benefit is that it enables developers to embrace the Unit of Work technique which results in simpler more straightforward code. However, too often I see teams build their repository and simple create data access methods on the classes – effectively creating a variant of the Active Record or Provider pattern with the name Repository.
This is incorrect and diminishes much of the value the Repository pattern is design to bring mainly, that operations can work with data in memory as if they were talking to the database and save their changes at the end. Something like this:
Repository patterns works VERY well with web applications and frameworks like ASP .NET because we can SCOPE the database connection (called Context in Entity Framework) to the request allowing our application to maximize the connection pool.
In the above flow, we only talk to the database TWO times despite the operations, everything is done in memory and the underlying framework will handle the details for us. Too often I see code like such:
This file contains hidden or bidirectional Unicode text that may be interpreted or compiled differently than what appears below. To review, open the file in an editor that reveals hidden Unicode characters.
Learn more about bidirectional Unicode characters
This looks fairly benign but it is actually quite bad as it machine guns the database with each Id. In a small, low traffic application this wont be a problem but, in a larger site with high volume this is likely to cause bottlenecks, record locking, and other problems. How could this be written better?
This file contains hidden or bidirectional Unicode text that may be interpreted or compiled differently than what appears below. To review, open the file in an editor that reveals hidden Unicode characters.
Learn more about bidirectional Unicode characters
In general, reads are less a problem for locking and throughout that write operations (create, update, delete) so, reading the database as in Variant 1 is not going to be a huge problem right away. Variant 2 leans on EF for SQL Generation to create a query which gets our items in one shot.
But the key thing to notice in this example is the direct use of the context. Indeed, what I have been finding is I dont create a data layer at all and instead allow Entity Framework to be the data layer itself. This opens a tremendous amount of possibilities as we can then take a building block approach to our service layer.
Services facilitate the Operation
The term “service” is horrendously overused in software engineering as it applies to so many things. In my case, I am using it to describe the classes which do the thing. Taking a typical example application here is how I prefer to organize things:
Controller – the controller is the traffic cop determining if the provided data meets acceptable criteria such that we can accept that request. There is absolutely no business logic here HOWEVER, for simple reads we may choose to inject our Context to perform those reads
Service – the guts of the application, this contains a variety of services varying in size and types. I try to stick with the Single Responsibility Principle in defining these classes. At a minimum we have a set of facilitators which facilitate a business process (we will cover this next) and other smaller services which are reusable blocks.
Data Layer – this is the EF context. Any custom mapping or definitions are written here
The key feature of a facilitator is the call to SaveChanges as this will mark the end of the Unit of Work. By taking this approach we get a transaction for free since the code can validate the data as it places it into the context, instead of waiting for a SQL Exception to indicate a problem.
By taking this approach, code is broken into reusable modules which can be reinjected and reused, plus it is VERY testable. This is an example flow I wrote up for a client:
Here the Process Payment Service is the facilitator and calls on the sub-services (shaded in blue). Each of these gets a context injection but, since the context is scoped each gets the same one. This means everyone gets to work with what is essentially their own copy of the database during their execution run.
The other benefit this approach has is avoid what I refer to as service wastelands. These are generic service files in our code (PersonService, TransactionService, PaymentService, etc) which becoming dumping grounds for methods – I have seen some of these files have upwards of 100 methods. Teams need to avoid doing this because the file becomes so long that ensuring uniqueness and efficiency among the methods becomes an untenable task.
Instead, teams should focus on creating purpose driven services which either facilitate a process or contain core business logic that may be reused in the code base. Combined with using Entity Framework as the data layer, code becomes cleaner and more straightforward.
What are Exceptions?
So, am I saying you should have NO Data Layer ever? No. As with anything this not black and white and there are cases for a data layer of sorts. For example, some queries to the database are too complex to put into a LINQ statement and developers will need to resort to SQL. For these cases, you will want to have a wrapper around the call for both reuse and maintenance.
But, do not take that to mean you need a method to ensure you do not rewrite FirstOrDefault in two or more spots. Of course, if you have a particularly complex LINQ query you might chose to hide it. However, keep in mind the MAIN REASON to hide code is to avoid requiring another person to have certain intimate knowledge of a process to carry out the operation. It is NOT, despite popular opinion, to avoid duplication (that is an entirely separate issue I will discuss later).
Indeed, the reason you should be hiding something is because it is complex in nature and error prone in its implementation such that problems could arise later. A simple Id look up does not fall into this category.
Conclusion
The main point I made here is Entity Framework IS an implementation of the Repository pattern and so, placing a repository pattern around it is superfluous. ASP .NET Core contains methods to ensure the context is scoped appropriately and disposed of with the end of a request. Leverage this and use the context directly in your services and lean on the Unite of Work pattern while treating the Context as your in-memory database. Let Entity Framework take responsibility for updating the database when you are complete.
Recently, I have been working with Jeff Fritz over at https://www.twitch.tv/csharpfritz as part of his effort to build a TikTok like site for Twitch, uniquely called KlipTok (https://www.kliptok.com). Mainly my efforts have been on shoring up the backend code in the BackOffice using Azure Functions.
This was one of my first major exposures with the Twitch API. Its fine overall but, it oddly does not use JWT tokens to communication states back and forth, rather an issues string is required for authenticated requests. I wanted to try a different approach to handling token auth and refresh so, I devised the following POC: https://github.com/jfarrell-examples/TwitchTokenPoc.
One of the aspects of the Twitch API is that tokens can expire and calls should be ready to refresh an access token which enters this state. The trouble is, these are two tokens and I didnt want the clients required to send both tokens, nor did I want the client to have to resubmit a request. I decided, I would create my own token and store within it, as claims, the access token and refresh token.
Taking this approach would allow the POC to, in effect, make it seem like Twitch is issues JWT tokens while still allowing the backend to perform the refresh. I decided, for additional security, I would encrypt the token claims in my JWT using Azure Key Vault Keys.
Part 1: Creating the Token
This approach hinges on what I refer to as token interception. As part of any OAuth/OIDC flow, there is a callback after the third party site (Twitch in this case) has completed the login. Tokens are sent to this callback for the sole purpose of allowing the caller to store them.
In order to achieve this, I created a method which a client would call at the very start. This contacts Twitch and reissues the active tokens, if they exist, or requests the user to login in again:
This file contains hidden or bidirectional Unicode text that may be interpreted or compiled differently than what appears below. To review, open the file in an editor that reveals hidden Unicode characters.
Learn more about bidirectional Unicode characters
The key here is the redirectUri which redirects the provided response code back to the application. Here we can create the token and send it to the client. You can find this method in the provided GitHub repository, HomeController.
Here is my code which creates the token string with the access token and refresh token as claims:
This file contains hidden or bidirectional Unicode text that may be interpreted or compiled differently than what appears below. To review, open the file in an editor that reveals hidden Unicode characters.
Learn more about bidirectional Unicode characters
The actual signing key is stored as a secret in Azure Key Vault with access controlled using ClientSecretCredentials, those values are stored in environment variables and not located in source code. You can find more information on this approach here: https://jfarrell.net/2020/07/14/controlling-azure-key-vault-access/ The one critical point I will make is ClientSecretCredential is only appropriate for local development – when deploying into Azure be sure code is using a Managed Identity driven approach.
I defined a simple method which grabs the Encryption key from Azure Key Vault and encrypts (or decrypts the data).
This file contains hidden or bidirectional Unicode text that may be interpreted or compiled differently than what appears below. To review, open the file in an editor that reveals hidden Unicode characters.
Learn more about bidirectional Unicode characters
The beauty of using Azure Key Vault is NO ONE but Azure is aware of the key. Using this, even if our JWT token is somehow leaked, the data within is not easy to decipher.
Once generated, this token can be passed back to the client either as data or in some header, allowing the client to store it. We can then use the built-in validation to require the token with each call.
Part 2: Validating the Token
Traditionally, tokens are signed by an authority and the underlying system will contact that authority to validate the token. However, in our case, we have no such authority so, we will want to MANUALLY validate the token, mainly its signature.
It turns out this is rather tricky to perform in ASP .NET Core due to the way the validation middleware is implemented. The best way I found to get it work and be clean is to adjust the way you register certain dependencies in ConfigureServices, as such:
This file contains hidden or bidirectional Unicode text that may be interpreted or compiled differently than what appears below. To review, open the file in an editor that reveals hidden Unicode characters.
Learn more about bidirectional Unicode characters
You can see the keyVaultService and tokenSecurityValidator are defined as concrete dependencies and we use the provider override syntax for AddSingleton to pass the instance directly. This is done so we can pass the direct instance of tokenSecurityValidator to our the options for validating our Bearer token.
The result of adding this (and the appropriate Use methods in the Configure method) is we can fully leverage [Authorize] on our actions and controllers. Users who pass no token or a token that we cannot validate will receive a 401 Unauthorized.
Part 3: Performing the Refresh
First step with any call is the ability to GET the token for the request so it can be used. There are MANY ways to do this. As I wanted to keep this simple I elected to use the IHttpContextAccessor. This is a special dependency you can have ASP .NET Core inject that lets you access the HttpContext anywhere in the call chain. I wrapped this in a service: https://github.com/jfarrell-examples/TwitchTokenPoc/blob/master/Services/GetTokensFromHttpRequestService.cs
This class very simply yanks the token from the incoming request and return the specific claim that represents the token. It also calls the decryption method so the fetched token is ready for immediate use.
This is by no means a perfect approach, in fact were I to see this in Production code I would comment that its a violation of the separation of concerns since a web concerns is being accessed in the services layer. More ideally, you would want to use middleware or similar to hydrate a scoped dependency which can be injected into your layers.
This file contains hidden or bidirectional Unicode text that may be interpreted or compiled differently than what appears below. To review, open the file in an editor that reveals hidden Unicode characters.
Learn more about bidirectional Unicode characters
I wrote this in a very heavy fashion, it simple makes the call, check if it failed with a 401 Unauthorized and, if so, refreshes the token using the TwitchAuthService () and then makes the same call again.
The result is a return to the caller with the appropriate data (or an error if the request still failed).
Part 4: Notify of new Token
Something you may have noticed in the previous code, the use of a generic ApiResult<T>. This is necessary because JWT tokens are designed to be immutable. This means they cannot be changed once created, its this aspect which makes them secure. However, in this case, we are creating a token with data that will change (on a refresh) and thus necessitate a regeneration of the token.
The purpose of this ApiResult<T> class it to hold NOT JUST the result but to tell us if the token needs to change. If it does change, that new version must be passed to the client so it can be saved. This may seem like a drawback to the approach but, in actuality this is a typical part of any application interacting with an OAuth flow where token refresh is being used.
However, what we DO NOT want to do is require logic in every action to check the result, rebuild the token, and pass it to the caller. Instead, we want to intercept the return result and, in a central spot, strip away the extra data and ensure our new token, if appropriate, is in the response headers.
To that end I created the following ActionFilter:
This file contains hidden or bidirectional Unicode text that may be interpreted or compiled differently than what appears below. To review, open the file in an editor that reveals hidden Unicode characters.
Learn more about bidirectional Unicode characters
Our ApiResult<T> inherits from ApiResult which gives it the non-generic read only Result property, which is used in the code sample above. The ApiResult<T> includes a setter whose accepted type is T. This allows the application to interact with it in a type-safe way.
Above you can see the Result being sent to the user is altered so its the inner result. Meanwhile, if the token changes we regenerate that token using our JwtTokenService and its stored in the X-NewToken header in the response. Client can now check for this header when receiving the response and update their stores as needed.
And that is it. Let’s walk through the example again.
Understanding what happens
A given client will make its initial page the response to /Login which will return the Twitch Login screen OR, if a token is already present, the callback will be called instantly. This callback will generate a token and send it down to the caller (right now its printed to the screen), generally this would be a page in your client app that will store the token and show the initial page.
When the client makes a request, they MUST pass the custom JWT Token given to them, the application will be checking for it as an Authorization Bearer token – failure to pass it will result in a 401 Unauthorized being sent back.
The application, after validating the token, will proceed with its usual call to the Twitch API. Part of this will access whatever the Access Token was passed. If Twitch responds with a 401 Unauthorized, the code will extract the refresh token from the JWT Token and refresh the access token. Upon successfully doing this, the call to Twitch will be executed again.
The result is sent back to the caller in a wrapper, ApiResult<T> which, along with carrying the call result, also contains information on whether the token changed. The caller will simply return this result as it would any normal Action call.
We use a special ActionFilter to intercept the response, and rewrite it so the caller returns the expected result in the response body. If the token did change, the new token is written into the response behind the X-NewToken header.
Throughout the process, we never reveal the tokens and all of the values involved in signing, encryption, and decryption are stored in Azure Key Vault outside of our application. For local dev, we are using an App Registration to govern access to the Key Vault, if we were deployed in Azure we would want to associate our Azure service to a managed identity.
Conclusion
Hopefully, this example has been instructive and helpful. I know I learned quite a bit going through this process. So, if it helps you, drop me a comment and let me know. If something does not make sense feel free to also drop me a comment. Cheers.
One of the limitations inside Kubernetes was the metrics that were supported to allow for scaling within the cluster for a deployment. The HorizontalPodAutoScaler or HPA for short, could only monitor CPU Utilization to determine if more Pods needed to be added to support a given workload. As you can imagine, in a queue based or event system, CPU usage wont tell, accurately, whether or not more pods are needed.
Noticing this, Microsoft engineers began work on a project to address this, called KEDA (Kubernetes Event-Driven Autoscaling) comprised of custom resources which were capable of triggering scaling events based on external cluster criteria: queue tail length, message availability, etc. Now in 2.1 the team has added support for MANY popular external products which would dictate scaling needs in unique ways.
For this post, I wanted to walk through how to set up a configuration whereby I could use KEDA to create jobs in Kubernetes based on the tail length of an Azure Storage Queue. As is expected with a newer project, KEDA’s documentation still needs work and certain things are not entirely clear. So I view this as an opportunity to supplement the teams work. That being said, this is still very much an alpha product and, as such, I expect future iterations to not work with the steps I lay out here. But as of right now, Feb 2020, they work.
First step, Create a cluster an Azure Queue Storage
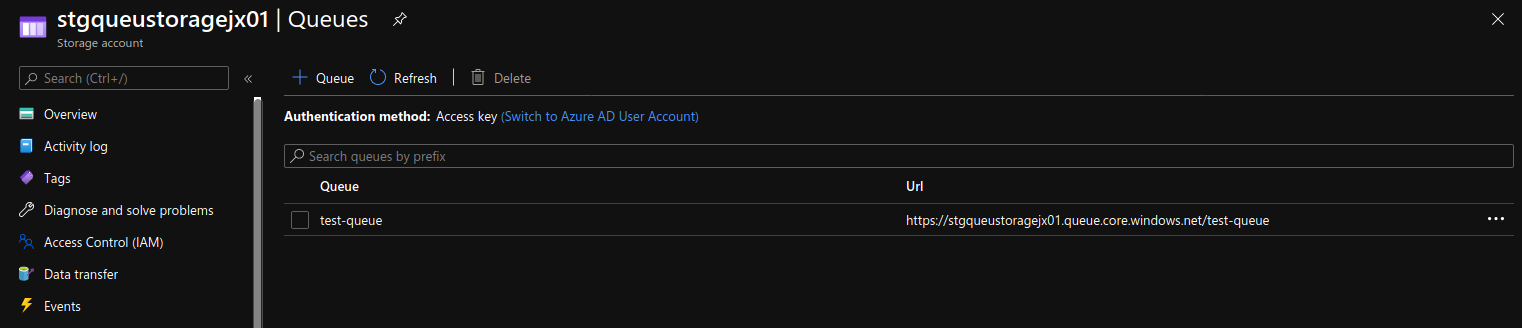
Head out to the portal and be sure to create an AKS cluster (or a Kubernetes cluster in general, doesnt matter who the provider is) and an Azure Storage account (this one you will need in Azure). Once the storage account is created, create a Queue (shown below) and saved the connection string off somewhere you can copy from later.
As indicated, you could use GKE (Google Kubernetes Engine) or something else if you wanted. KEDA also supports other storage and events outside of Azure but, I am using Azure Queue Storage for this demo hence why I will assume the Queue Storage is in Azure.
Now, let’s install KEDA
As with anything involving custom resources in Kubernetes, KEDA must be installed for those resources to exist. KEDA has a variety of ways it can be installed, laid out here: https://keda.sh/docs/2.1/deploy/
A quick note on this, BE CAREFUL of the version!! I am using v2.1 for this and that is important since the specification for ScaledJob changes between 2.0 and 2.1. If you read through the third approach to deployment, where you run kubectl apply against a remote file, be sure to replace the version of the file to v2.1.0. I noted with Helm at least I did NOT get v2.1 from the given charts repo.
If you run the third approach, creation of the keda namespace will happen for you, this is where the internal of KEDA will be installed and run from, your code does NOT need to go in here and I wont be doing that just to put you at ease.
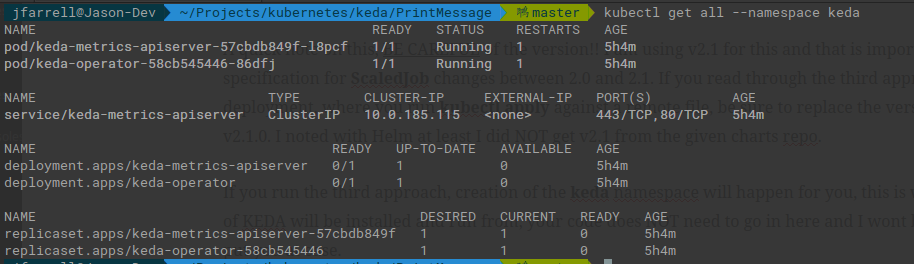
Once the installation completes I recommend running the following command to make sure everything is up and running:
kubectl get all -n keda
Note that I used the shorthand -n because I have had it happen where the –namespace doesnt copy correctly and you end up with command syntax errors. If you see something like this, KEDA is up and running:
Let’s setup the KEDA Scaler
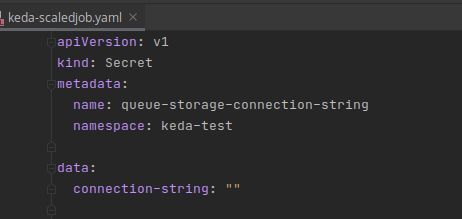
For starters, we need a secret to hold that connection string for our Queue Storage from earlier. Here is a simple secret definition to create a secret that KEDA can use to monitor the queue tail length. REMEMBER when you provide the value to the secret it MUST be base64 encoded. I wont show my value as I do not wish to dox myself.
Linux users you can use the built-in base64 command to generate the value for the secret file. Everyone else, you can quickly Google a Base64 encoder and convert your string.
echo “your connection string” | base64
Use kubectl apply -f to create the secret. Since the namespace is provided in file, it will be placed in that namespace for you.
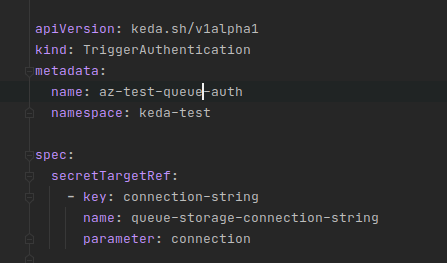
Next, we are going to get into KEDA specific components TriggerAuthentication and ScaledJob. These two resources will be critical to supporting our intended functionality.
As you can see, there are a number of ways to provide authentication, we will be using secretTargetRef. The purpose is to give our trigger a way to authentication to our Queue Storage such that it can determine the various property values it needs to find out if a scaling action needs to be taken (up or down).
Building on what we did with the creation of our Secret we add the following definition and apply it via kubectl apply -f
Comparing the Secret with this file you can see where things start to match up. We are simply telling the trigger it can find the connection string at the appropriate key in a certain secret. Many of the examples on the KEDA website will use podIdentity which as I have come to understand refers back to MSI. This is a better approach, albeit more complicated, than what I am showing here. We should always avoid storing sensitive information in our cluster (like connection strings) due to the less than stellar security around Secrets in general – base64 is not in anyway secure.
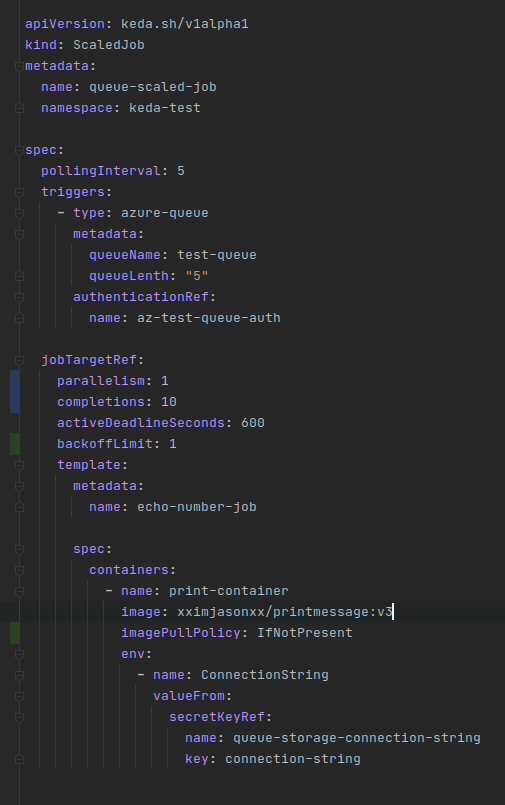
The final piece is the creation of the ScaledJob. KEDA mostly focuses around scaling deployments, which makes a lot of sense but, it can also serve to scale up Kubernetes Jobs as needed to fulfill deferred processing. Effectively, KEDA creates a psuedo deployment around the job and scales the number up as needed based on the scaling strategy specified.
This looks like quite a bit but, when you break it down it has a very straightforward purpose and a structure that is consistent with other Kubernetes objects. Let’s break it down in four parts:
The first part is identification, what we are naming the ScaledJob and where it is going to be stored within the cluster. Notice the apiVersion value keda.sh/v1alpha1 this is a clear indication of the Spec being in ALPHA meaning, I fully expect this to change.
The second part is the details for the actual ScaledJob, that is things which are specific to this instance of the resource. Here we tell the resource to check the length of our queue every 5 seconds and that it should trigger based on an azure-queue with authentication stored in our trigger auth that we defined previously.
The third and fourth part are actually all relating to the same thing which is the configuration of the created Kubernetes Job instances that will perform the work – I broke this apart based on my own personal style when constructing YAML files for Kubernetes. To keep things simple we are not going to have the job leverage parallelism, so we leave this at 1, which is also the default.
The last section lays out the template for the Pods that will carry out the work. You notice the custom image xximjasonxx/printmessage which will grab the message from the queue and print out its contents. We are also reusing the Secret here to provide the container with the connection string of the Queue so it can take items off.
All of this is available for reference in the GitHub repo I linked above.
Let’s test it
In the provided source code, I included a command line program that can send messages to our queue in the form of random numbers – SendMessage. To run this, open a Command Line window up to the directory holding the .csproj file and run the following command:
dotnet run “<connection string>” 150
The above command will send 100 messages to the queue – I should note that the queue name in the container is HARD CODED as test-queue. Feel free to download the code and make the appropriate change for your own queue name if need be – you will need to do it for both Print and Send message programs.
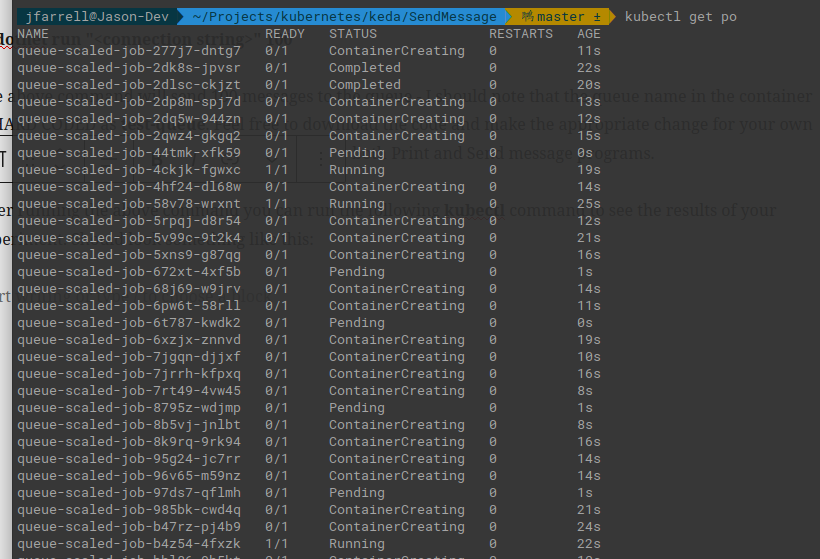
After running the above command you can run the following kubectl command to see the results of your experiment. Should look something like this:
This shows that it is working and, in fact, we can do a kubectl logs on one of the pods and we can see the output message sent to the queue. Or so it appears, let’s take a closer look.
Execute the following command to COUNT how many pods were actually created:
kubectl get po | wc -l
Remember to subtract one as the wc program will also count the header line. If you get similar to what I got it will be around 300. But that does not make any sense, we only sent 150 items to our queue. The answer is, the way printmessage:v3 is written, it contains logic to print that no data was found as the queue becomes empty. While valid, with the 10 completion rule being enforced this will spin up unnecessary pods. Let’s change the image used for the job to a special image: printmessage:v3-error. This image will throw an uncaught exception when the queue is empty. The updated definition for ScaledJob is below:
Before running things again I recommend executing these two commands, they assume the ONLY thing in the current space are jobs and pods related to KEDA. If you are sharing the namespace with other resources you will have to modify these commands.
kubectl delete po –all
kubectl delete job –all
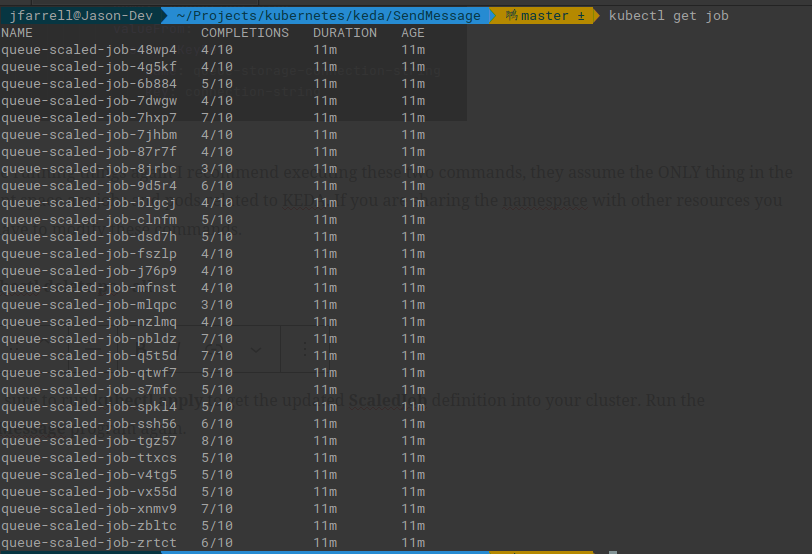
Make sure to run kubectl apply to get the updated ScaledJob definition into your cluster. Run the SendMessage program again. This is what I got:
Notice how, even though we specified the job needs to complete 10 times, none of these did. Your results are likely going to vary depending on when items were pulled from the queue. But as the queue gets shorter more jobs will start to fail as the Pods attempt to grab data that does not exist.
The other thing to notice is that the Pods, if they fail, will self terminate. So, if I run my wc -l check again on the Pods I get a number that makes more sense:
kubectl get po | wc -l
Result should be 151 which, subtracting the header row gives us the 150 items we sent to the queue
Why is this happening?
The key value for controlling this behavior is the backoffLimit specified as part of the job spec. It tells a job how many times it should try to restart failing pods under its control. I have set it to 1 which effectively means it will not retry and only accept one failure.
The reason this is so important is control over resources that are scaling to match processing workloads is crucial from the standpoint of maintaining healthy resource consumption. We do not want our pods to go crazy and overwhelm the system and starve other processes.
One of the things I have been focusing on lately is Kubernetes, its always been an interest to me but, I recently decided to pursue the Certified Kubernetes Application Developer (CKAD) and so diving into topics that I was not totally familiar with has been a great deal of fun.
One topic that is of particular interest is storage. In Kubernetes, though really in Containerized applications, state storage is an important topic since the entire design of these systems is aimed at being transient in nature. With this in mind, it is paramount that storage happen in a centralized and highly available way.
A common approach to this is to simply leverage the raw cloud APIs for things like Azure Storage, S3, etc as the providers will do a better job ensuring the data is stored securely and in a way that makes it hard for data loss to occur. However, Kubernetes enables the mounting of the cloud systems directly into Pods through Persistent Volumes and Storage Classes. In this post, I want to show how to use Storage Class with Azure so I wont be going to detail about the ins and out of Storage Classes or their use cases over Persistent Volumes, frankly I dont understand that super well myself, yet.
Creating the Storage Class
The advantage to Storage Class (SC) over something like Persistent Volume (PV) is the former can automatically create the later. That is, a Storage Class can received Claims for volume and will, under the hood, createPVs. This is why SC’s have become very popular with developers, less maintenance.
Here is a sample Storage Class I created for this demo:
This file contains hidden or bidirectional Unicode text that may be interpreted or compiled differently than what appears below. To review, open the file in an editor that reveals hidden Unicode characters.
Learn more about bidirectional Unicode characters
This step is actually optional – I only did it for practice. AKS will automatically create 4 default storage classes (they are useless without a Persistent Volume Claim (PVC)). You can see them by running the follow command:
kubectl get storageclass
Use kubectl create -f to create the storage class based on the above, or use one of the built in ones. Remember, by itself, the storage class wont do anything. We need to create a Volume Claim for the magic to actually start.
Create the Persistent Volume Claim
A persistent volume claim (PVC) is used to “claim” a storage mechanism. The PVC can be, depending on its access mode, attached to multiple nodes where its pods reside. Here is a sample PVC claim that I made to go with the SC above:
This file contains hidden or bidirectional Unicode text that may be interpreted or compiled differently than what appears below. To review, open the file in an editor that reveals hidden Unicode characters.
Learn more about bidirectional Unicode characters
The way PVCs work (simplistically) is they seek out a Persistent Volume (PV) that can support the claim request (see access mode and resource requests). If nothing is found, the claim is not fulfulled. However, when used with a Storage Class its fulfillment is based on the specifications of the Storage Class provisioner field.
One of the barriers I ran into, for example, was that my original provisioner (azure-disk) does NOT support multi-node (that is it does not support ReadWriteMany used above). This means, the storage medium is ONLY ever attached to a single node which limits where pods using the PVC can be scheduled.
Run a kubectl create -f to create this PVC in your cluster. Then run kubectl get pvc – if all things are working your new PVC should have a state of Bound.
Let’s dig a bit deeper into this – run a kubectl describe pvc <pvc name>. If you look at the details there is a value with the name Volume. This is actually the name of the PV that the Storage Class carved out based on the PVC request.
Run kubectl describe pv <pv name>. This gives you some juicy details and you can find the share in Azure now under a common Storage Account that Kubernetes has created for you (look under Source).
This is important to understand, the claim creates the actual storage and Pods just use the claim. Speaking of Pods, let’s now deploy an application to use this volume to store data.
Using a Volume with a Deployment
Right now, AKS has created a storage account for us based on the request from the given PVC that we created. To use this, we have to tell each Pod about this volume.
I have created the following application as Docker image xximjasonxx/fileupload:2.1. Its a basic C# Web API with a single endpoint to support a file upload. Here is the deployment that is associated with this:
This file contains hidden or bidirectional Unicode text that may be interpreted or compiled differently than what appears below. To review, open the file in an editor that reveals hidden Unicode characters.
Learn more about bidirectional Unicode characters
The key piece of this the ENV and Volume Mounting specification. The web app looks to a hard coded path for storage if not overridden by the Environment Variable SAVE_PATH. In this spec, we specify a custom path within the container via this environment variable and then mount that directory externally using the Volume created by our PVC.
Run a kubectl create -f on this deployment spec and you will have the web app running in your cluster. To enable external access, create a Load Balancer Service (or Ingress), here is an example:
This file contains hidden or bidirectional Unicode text that may be interpreted or compiled differently than what appears below. To review, open the file in an editor that reveals hidden Unicode characters.
Learn more about bidirectional Unicode characters
Run kubectl create -f on this spec file and then run kubectl get svc until you see an External IP for this service indicating it can be addressed from outside the cluster.
I ran the following via Postman to test the endpoint:
If all goes well, the response should be a Guid which indicates the name of the image as stored in our volume.
To see it, simply navigate to the Storage Account from before and select the newly created share under the Files service. If you see the file, congrats, you just used a PVC through a Storage Class to create a place to store data.
What about Blob Storage?
Unfortunately, near as I can tell so far, there is no support for saving these items to object storage, only file storage. To use the former, at least with Azure, you would still need to use the REST APIs.
This also means you wont get notifications when new files are created in the file share as you would with blob storage. Still, its useful and a good way to ensure that data provided and stored is securely and properly preserved as needed.
I was recently asked by a client how I would go about injecting user information into a service that could be accessed anywhere in the call chain. They did not want have to capture the value at the web layer and pass it to what could be a rather lengthy call stack.
The solution to this is to leverage scoped dependencies in ASP .NET Core which will hold an object for the duration of the request (default). In doing this, we can gather information related to the request and expose it. I also wanted to add an additional twist. I wanted to have two interfaces for the same object, one that enable writing and the other that would enable reading, like so:
The reason for doing this is aimed at being deterministic. What I dont want to support is the ability for common code to accidentally “change” values, for whatever reason. When the injection is made, I want the value to be read only. But, to get the value in there I need to be able to write it, so I segregate the operations into different interfaces.
This may be overkill for your solution but, I want the code to be as obvious in its intent and capabilities – this helps instruct users of this code how it should be used.
Configuring Injection
Our ContextService, as described above, contains only a single property: Username. For this exercise, we will pull the value for this out of the incoming query string (over simplistic I grant you, but it works well enough to show how I am using this).
I am going to define two interfaces which this class implements: IContextReaderService and IConextWriterService, code below:
This file contains hidden or bidirectional Unicode text that may be interpreted or compiled differently than what appears below. To review, open the file in an editor that reveals hidden Unicode characters.
Learn more about bidirectional Unicode characters
The tricky part now is, we want the instance of ContextService created with and scoped to the incoming request to be shared between IContextReaderService and IContextWriterService, that is I want the same instance to comeback when I inject a dependency marked with either of these interfaces.
In Startup.cs I need to do the following to achieve this:
This file contains hidden or bidirectional Unicode text that may be interpreted or compiled differently than what appears below. To review, open the file in an editor that reveals hidden Unicode characters.
Learn more about bidirectional Unicode characters
The secret here is the request scoped ContextServiceFactory which is given as the parameter to AddScoped that allows us to tell .NET Core how to resolve the dependency. This factory is defined very simply as such:
This file contains hidden or bidirectional Unicode text that may be interpreted or compiled differently than what appears below. To review, open the file in an editor that reveals hidden Unicode characters.
Learn more about bidirectional Unicode characters
Remember, by default, something added as a scoped dependency is shared throughout the lifetime of the request. So here, we maintain state within the factory to know if it has created an instance of ContextService or not, and if it has, we will return that one. This factory object will get destroyed when the request completed and recreated when a new request is processed.
Hydrating the Context
Now that we have our context split off, we need to hydrate the values, thus we need to inject our IContextWriterService dependency into a section of code that will get hit on each request. You might be tempted to use a global filter, which will work but, the better approach here is custom middleware. Here is what I used:
This file contains hidden or bidirectional Unicode text that may be interpreted or compiled differently than what appears below. To review, open the file in an editor that reveals hidden Unicode characters.
Learn more about bidirectional Unicode characters
Because of the way they are used, you can only use constructor injection for singleton scoped dependencies, if you attempt to use a Scoped or Transient scoped dependency in the middleware constructor, it will fail to run.
Fear not, we can use method injection here to inject our dependency as a parameter to the Invoke method which is what ASP .NET Core will look for and execute with each request. Here you can see we have defined a parameter of type IContextWriterService.
Within Invoke perform the steps you wish to take (here we are extracting the username from the name parameter in the Query String, for this example). Once you complete your steps be sure to call the next bit of middleware in sequence (or return a Completed Task to stop the chain).
Using the Reader dependency
Now that we have configured the dependency and hydrated it using middleware we can no reference the IContextReaderService to read the value out. This works in the standard way as you would expect:
This file contains hidden or bidirectional Unicode text that may be interpreted or compiled differently than what appears below. To review, open the file in an editor that reveals hidden Unicode characters.
Learn more about bidirectional Unicode characters
We can inject this dependency wherever we need (though more specifically, wherever we can access the IContextReaderService).
Mutability vs Immutability
The main goal I was trying to illustrate here is to leverage immutability to prevent side effects in code. Because of the interface segregation, a user would be unable to change the given value of the context. This is desirable since it lends to better code.
In general, we want to achieve immutability with objects in our code, this is a core learning from functional programming. By doing this, operations become deterministic and less prone to sporadic and unexplainable failures. While the example presented above is simplistic in nature, in a more complex systems, having assurances that users can only read or write depending on which interface is used allows for better segregation and can yield cleaner and more discernable code.
Hope you enjoyed. More Testing posts to come, I promise.