Adding DevOps for GiftList

One of my aims with my GiftList project is to build sensible CI/CD support processes to enable easy deployments as I continue to develop the API. In addition, one of my aims is to move away from pure mobile dev and return to my roots as a backend developer while maintaining my strong focus on solid development techniques and processes.

Setting up the build

The first step was to setup the build such that I could confirm that I didnt miss a build error with a given checkin. VSO makes this incredibly easy using the Build Solution task; just remember to have it follow a Nuget Restore task.

I always recommend using individual build configurations for each build type, it just makes it easier to be more selective as you move through the process. I use to recommend this as a way to change your connection string at each stage but, this is falling out of practice as Cloud can hold your credentials and do the replacement for you. Such an approach maintains the “wall” between development and production so the credentials for Production are known only by the cloud and select individuals.

Adding the Unit Tests

So apart from adding the unit tests (128 as of this writing) which took me a month after I had completed a majority of the API code. But honestly, this worked out well as going back and adding the unit tests found a few bugs that I would have otherwise missed.

In terms of organization I have always been a big fan of the “give an instance … verify …” pattern where you attempt to construct logical sentences describing what is being tested with the class name and method name. Example:

given an instance of itemcontroller call getitems verify bad request is returned if id is empty guid

This allows the first portion of this to describe the general action being tested which is calls to getitems on the itemcontroller. The second portion indicates what test case we are exploring, bad request is returned if id guid is empty in this case. This approach enables good organization when you have hundreds and hundreds of tests. It also helps prevent accidental duplication.

Now, once I added the tests I needed to instruct VSO to actually run those tests as part of the build. To do this, you need to tell the task WHERE tests are located. Tests CAN be added as part of your projects but this means this code will get added to all versions of the assembly (you could remove it with a PreProcessor directive) which would inflate the overall size of the application. My preference here is to add new assemblies with a .Test suffix. I then instruct my other build profiles to NOT build these beyond development.

Once you do this, configuring the VSO tasks is rather easy. Here is a screenshot of mine:

test_task

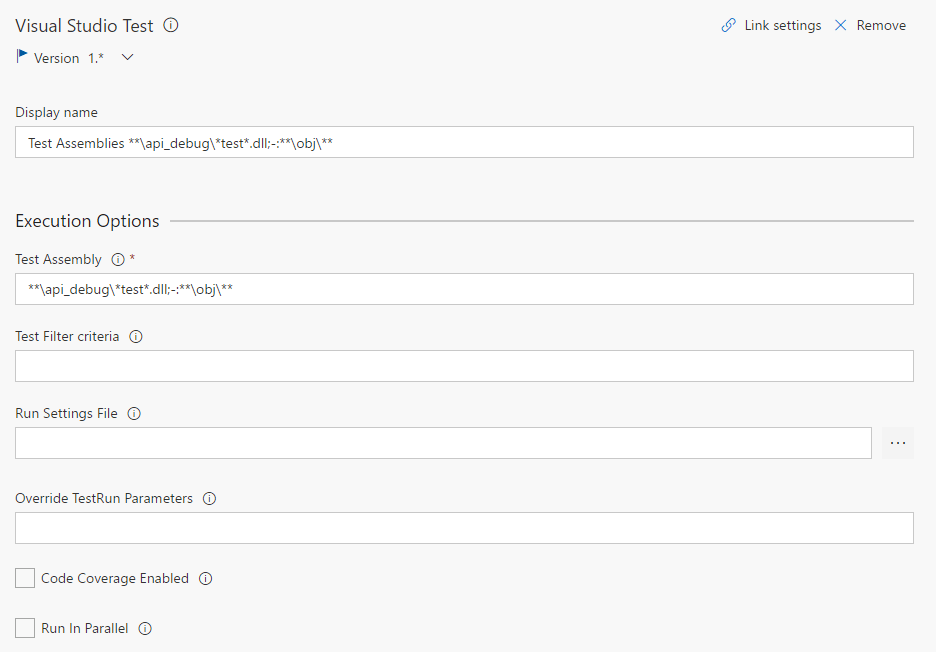
Remember, the default setting in Visual Studio is that the DLL name matches the project name, so this works here. The ** means recursive.

Truth is, even with this your tests will not run if you are not using MSTest. In my case, I was using NUnit and I needed to ensure I had the TestAdapter Nuget package referenced (there are two versions, one for 2.x and one for 3.x – use the one correct one for your version).

Now I have 128/128 tests passing.

Let’s deploy it

So this proved to be the most difficult part for me, but it gets to be easy for you now. First, make sure you are publishing your artifacts using the Publish Artifacts task. Documentation here is kind of sparse but what you want to do is publish your output directory (mine is /bin) to a staging directory which we can use for a release.

publish_task

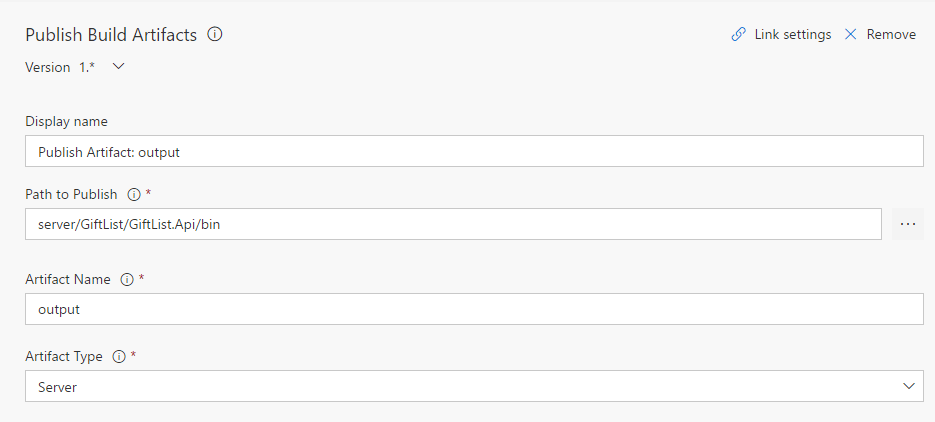
Here is what my task looks like. The key here is the Artifact Type which I have set to Server which indicates the artifact is stored on the build server. The artifact name will represent the directory, remember it for the next step.

Ok, so it used to be that when you ran your builds if you also wanted to deploy you would code that as part of the steps. While it works, it is actually not a good strategy since it made built processes less reusable. In seeing that Microsoft has now added a second section called Releases. Releases contain you release workflows, they are independant of your Build workflows.

I am still exploring this environment but, it appears to be full featured and allows signoff for builds. For my example, I just want to deploy to my Dev environment whenever the build changes. All this takes is the Deploy Azure App Service task. Here is my configuration:

azure_task

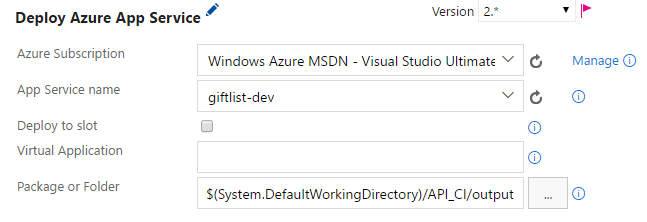
Most of this is simply selectable, very easy. Once you authorize the task it can pull your subscriptions and from that it can get your App Service instances. Really the hardest part was the Package or Folder bit, which once I got the Publish working worked great. Here is an example of what the … brings up if your Publish is working properly.

package

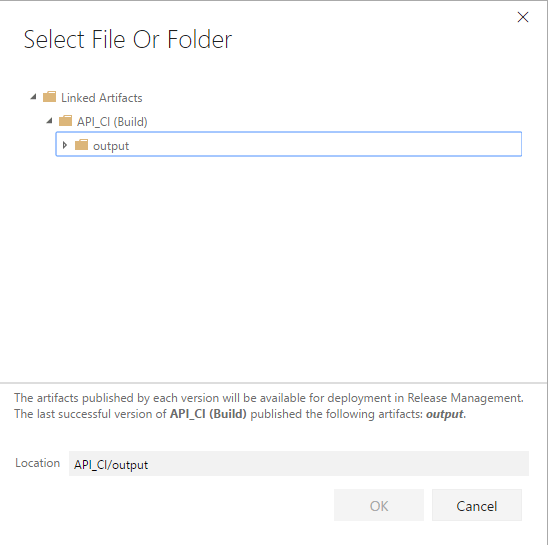
Very easy. You notice the lowest folder matches the Artifact Name from the Publish.

All in all, very easy to set this up. WIthout the time to add all of my unit tests, probably took me 2hrs tops to create this process end to end while doing other things. Hat’s off to Microsoft, cant wait to see what is coming next.

Indy.Code()

I had the chance this year to be a speaker at the inaugural Indy.Code() event in Indianapolis, Indiana. I was accepted to present two talks with a mobile focus: Intro to iOS (with Xamarin) and Intro to Android (with Xamarin). My goal with each talk was to talk less about Xamarin and focus more on the foundational concepts of the individual mobile platforms: iOS and Android.

For iOS I spent a lot of time focusing on the use Xcode as the means to build the UI for iOS apps and also how Xamarin registers its types with iOS so they can be used. I tend to stay away from the Xamarin iOS Designer due to the performance differences between it and Xcode, I also do not like how certain design aspects of iOS are represented there (Auto Layout in particular).

Beyond this, I covered how Storyboards have changed the game when designing iOS applications and how they integrate with TableViews, Navigation, and overall design. I then dipped the audiences toes in the vast topic that is AutoLayout.

I will be presenting this topic again at CodeStock in May.

For Android, which is a topic that, relative to iOS, I have much more experience with I had a much harder time breaking things down just to sheer volume and the changes that have taken place in the platform since its inception. I started off talking about Activities and how we can use annotation in Xamarin instead of registering them directly in the Manifest file.

I spent much of the time helping the audience understand the various features Android offers to deal with the fragmentation of the platform, in particular the density classification and relative pixel definitions that enable you to get 90% of the way there; I even had an example where I showed how a different layout can be defined for various traits of the platform: layout, density, sdk. Beyond, I showed an example where we used the RecylerView and Fragments to construct and Album information lookup app.

Both presentations were well received and the event was done very well. I am hoping to submit next year if they have it again. However, as I have previously noted, I am starting to move away from my mobile focus and returning to my focus as a backend developer so I can leverage my Azure knowledge and AWS certifications moving forward.

Indy.Code() too place March 29 – 31. Apologies for the delay.

Codemash and Xamarin.Forms

Codemash is one of the largest tech conferences in North America and an event that I had always wanted to speak at. I was finally successful as they accepted my Intro to Xamarin.Forms talk which I got to give on Thursday (1/12). It went very well and generated a lot of interest. I thought it would be good to summarize the finer points here:

The mobile market has a lot of interesting situations that make it different from past platform races, such as the browser wars or the OS wars. The reason is that, while Android hold an 80% (or higher depending on who you ask) marketshare, iOS controls roughly 60% of the profits. So its a situation where there is not one clear favorite and you end up needing to support both.

Xamarin is good for this because its code sharing model means its easy to share business logic between the two platforms in a unified language. This is actually something many in the community are working on but, in my view, Xamarin has the best option at the present time. However, Xamarin is not a silver bullet and does suffer from many issues:

  • Because the bindings are written using Mono and Mono is sitting on top of iOS/Dalvik we have to recognize that we have duplicate memory management systems at work. To be clear, objects are not duplicated, but rather the disposal of the objects held in iOS (using ARC – Automatic Reference Counting) is initiated by the Generational Garbage Collector in Mono. Synchronization is therefore key and developers need to be aware of this so as to avoid strong reference cycles.
  • While Xamarin does offer the ability to bind Objective-C (no Swift yet) and Java libraries into Xamarin so they can be used, this is an extra step. And, we have seen that such bindings can be cumbersome and difficult to maintain. That being said, when using Xamarin developers get access to the wealth of packages available via NuGet. And with Microsoft progressively moving towards the idea of a standard for .NET we will likely see more projects become cross platform compliant in the future.
  • In any application the UI always seems to take the most work, it was true with Desktop apps, it is true with web apps and it is especially true with mobile apps. Even if you use Xamarin, you still have to create unique UIs for each platform.

With respect to the last bullet, this is the reason Xamarin created the Forms framework. It enables us to write a single UI Definition and then the framework renders this definition appropriately giving us a nice native look. This is where it differs from tools such as Cony  and Cordova/PhoneGap which employ a one UI for all. Effectively using Forms enables the creation of multiple UIs at the same time.

It is important to understand that Forms is not intended to replace general development for mobile and should generally be used for apps that can be generalized: POCs, Enterprise data apps, Data Entry apps for example. If your app will require a lot of UI customization it might be better to adopt traditional Xamarin instead of Forms. My rule of thumb tends to be:

If you are spending most of your time in traditional Xamarin, you should be using traditional Xamarin

What this means is, we often utilize things like Custom Renderers to take over the UI customizations with Forms. These renderers are often written within out platform specific projects because they are invoked when the parser wants to know to render a control on the current platform. If you find yourself in these a lot, I advise that you weigh whether you are getting true benefit from Forms.

At the end of the day, Forms is a tool and it is incumbent on us as developers to determine the appropriate utility of that tool. But, we are seeing people using the tool in interesting ways, one of the most impressive of which is the Hybrid App.

Because Forms enables us to quickly create a page for all platforms supported some have started to use it for only certain pages in their application, such as a settings screen. Usually for screens that maybe complicated due to the volume on the page, but not necessarily feature any customized UI that developing separate interfaces for each platform would yield a positive gain.

I plan to give the full talk again at the .NET Mobile User Group in Chicago in the near future. If you are interested please dont hesitate to ask me about it or Forms in general.

Injecting all the WebAPI Things

Dependency Injection is all the rage and has become a must for just about any application, in particular if you are using Entity Framework as it allows for each Request level DbContext instance management. Let me explain.

Think of the DbContext as a pipe into the database. I often see code like this in applications I review for West Monroe:

using (var context = new SomeContext())
{
    // some data access code here
}

This is bad because each time you use this you create another pipe into your database. And if your code is complex it may contain multiple calls to service which open a context each time. This can quickly overwhelm the database as it can drain the connection pool and create performance problems.

The reason Dependency Injection helps with this is it allows us to inject instances at varying levels of scope. And in the case of the web the most ideal scope level is the Request.

The present gold standard for DI (Dependency Injection) is the AutoFac library. It is easily downloadable from Nuget and integrates with most everything including WebAPI; it even comes with prebuilt classes to perform the injection.

You will need the Nuget package: Autofac.WebApi2

GlobalConfiguration.Configure(WebApiConfig.Register);
var config = GlobalConfiguration.Configuration;

var builder = new ContainerBuilder();
builder.RegisterApiControllers(Assembly.GetExecutingAssembly());
builder.RegisterModule(new ModelsModule());
builder.RegisterModule(new ServiceModule());

var container = builder.Build();
config.DependencyResolver = new AutofacWebApiDependencyResolver(container);

This is my Global.asax in the Application_Start. A few things to point out.

  1. The RegisterApiControllers tables the executing assembly (our Api project) and performs conventions based injection (basically it maps anything ending with Controller).
  2. Web API operates off the DependencyResolver pattern. Rather than overloading the Controller factory (what we do in MVC) this enables us to more properly contain our type resolution logic. In this case AutofacWebApiDependencyResolver is provided by the Integration namespace.
  3. My general approach to DI is to use an Autofac Module for each project. These modules specify the injection mappings for types defined in those assemblys. It just keeps things separated in a very nice way.

Once you this in place you can receive injections through the constructor of each controller.  Here is an example of my UserController constructor.

public UserController(IUserService userService, PasswordService passwordService, IAuthorizationService authorizationService)
{
    UserService = userService;
    PasswordService = passwordService;
    AuthorizationService = authorizationService;
}

In the past, I would normally use Property Injection to fulfill my dependency properties. However, recently I have begun to shift to using the constructor as it makes unit testing easier.

This code should just work with your dependency mappings and the code above in the Global.asax.

One of the points of emphasis I have made here is the fact that DI can help with scoping our DbContext to the request level. I do this in my ModelsModule since the context is defined in my Models project and not the web project. Here is the code:

public class ModelsModule : Module
{
    protected override void Load(ContainerBuilder builder)
    {
        base.Load(builder);

        builder.RegisterType<GiftListContext>()
            .As<IContext>()
            .InstancePerRequest();
    }
}

That is it. The key here is the built in method InstancePerRequest. I also chose to use IContext to define the public pieces of my DbContext but you can omit this and it will still work. I cannot express how nice it is to have this type of flexibility and letting a reliable third party mechanism control this part of the process.

The final bit I want to talk about is authorization. I generally tend to use ActionFilterAttribute types to authorize the user and establish the CurrentUser property so that my calls can reliably run knowing what user is making the request. I wont be going into how to set this up as it varies project to project.

Here is an updated version of the Global.asax to support injecting dependencies into filters.

GlobalConfiguration.Configure(WebApiConfig.Register);
var config = GlobalConfiguration.Configuration;

var builder = new ContainerBuilder();
builder.RegisterApiControllers(Assembly.GetExecutingAssembly());
builder.RegisterWebApiFilterProvider(config);
builder.RegisterType<UserAuthenticateFilter>().PropertiesAutowired();
builder.RegisterModule(new ModelsModule());
builder.RegisterModule(new ServiceModule());

var container = builder.Build();
config.DependencyResolver = new AutofacWebApiDependencyResolver(container);

One critical note is that Web API (due to the way it is designed) creates Filters as singletons. So, ANY dependency that is not in Singleton scope will cause a scope resolution failure so, the workaround is to utilize a SeviceLocator pattern to resolve the type.  Here is an example:

var authorizationService = (IAuthorizationService)message.GetDependencyScope().GetService(typeof(IAuthorizationService));

This is the the big advantage to the DependencyResolver approach that Web API uses. It allows us to resolve types without have to create something custom.

Hopefully this clears some of this up re: Dependency Injection.

Thank you DevUp

I have had the great fortune to be selected to speak at St. Louis Days of .NET (now called DevUp) 4x in a row. I am always impressed by the organization of the event and the staff; plus who doesnt love getting a few days at a casino.

This year I gave one normal talk, my UI Testing with Xamarin talk and a new workshop which focused on Xamarin.Android. For the most part, the UI Testing talk went as expected. I feel like its beginning to lose its luster and I always feel like I come off as preachy during it; its hard not to when talking about testing. Nevertheless I do get positive comments and it does engage the audience, so thats good. However, I think this will be the last event I use it at, I am moving more towards development and DevOp centric topics, especially as my experience with Bitrise and HockeyApp grows.

As for the Xamarin.Android workshop, it was a classic case of being too greedy. I am very grateful the audience hung in there and a few even got it working. But, in the end, I was upset that I didnt take into account actually running the code on Windows as well as there being people who were unfamiliar with mobile programming in general. Overall, I made it work and it seemed well receive. Next time I give it, I will try for something smaller then a Spotify preview player.

As I prepare to head back to Chicago tomorrow, I reflect that it was one of my best conference experiences in some time and a great way to close out the year. I look forward to unveiling the updated version of my Xamarin.Forms Intro talk at Codemash in January.

An Amazing Month

Normally I do not like to use this blog to talk about my personal life but I wanted to talk about the month of September because of its significance. The month was very trying and stressful at work, our team took on a mobile project that involved us rewriting a mobile application in 1.5 months that a previous team took 1yr to write. I am happy to report that we did succeed thanks to the heroic efforts of ever member of the team. We have now entered a period of hardening the application.

In addition to this, I am proud to say that on September 7, 2016 I proposed to my girlfriend of 3yrs at the same User Group we had our first “date”. Yes, you heard that right, I proposed to my girlfriend at a User Group (the WMP office specifically). She laughed and cried and said yes, and it was the unique proposal she always dreamed of; definitely found a good one.

Later in the month, I received another surprise, I was selected to present on Xamarin.Forms at Codemash. Codemash, for those who do not know, has become one of the largest conferences in the US and being selected is extremely difficult; this was my 5th attempt. I am very honored by this charge and am going to be spending the time ahead of the event making sure I prepare fully for this experience.

I also, learned that I was promoted to the elite PAM level at West Monroe. PAM stands for Principal, Architect, and Manager; essentially the three paths the general consultant path divides into; you pick based on your preferences. For me, I am going to he Principal route, basically a Tech Lead and Tech expert. After my experiences at Centare which made me wonder if I had lost a step to have the success at West Monroe was gratifying and inspiring. I really cant thank WMP enough for the chance to be successful. I would also be amiss if I didn’t thank the great people I have gotten to work with; this promotion is a much a reflection of them as it is of me.

Then on the final day in September (ok Oct 1) I was informed I had become a Microsoft MVP, fulfilling a lifelong dream that, honestly, I never thought I would attain. I know that I am very active in local communities, but I know people who are much more active so I always thought the bar was out of reach. I am very humbled to be counted among the many other outstanding individuals who hold this honor. I promise to do my very best to uphold the sterling reputation MVPs have; also I am looking forward to the Summit.

Frankly, it would be hard to ever have a month like that again and I am still getting used to many of the changes (being engaged, being an MVP, and being a Principal) but I will get there. It really was an amazing month and I look forward to the next month.

Using Android Studio with Xamarin Studio

Let me be clear: I do not have much respect for the visual design tools that Xamarin creates. There is not anything particularly wrong with them but they just lack refinement, most likely because Xamarin is too busy keeping their bindings updated to stay with changes. This is something I have come to accept on the iOS side and so, when I do create visual layouts for Storyboards or Xib files I use Xcode exclusively, despite the existence of an editor in Xamarin Studio.

Recently, West Monroe engaged in a rare Android project and I got a chance to see how Xamarin Studio worked with Android. Regrettably I found the tooling to be even further behind Android Studio than the iOS side is behind Xcode. Forget even hoping for a sane layout if you used any tools from the support libraries. The few times I got something to render it was so far off that I ended up just running on the device. While this gave me accuracy is slowed my dev time down considerably. I happened to complain about this in one of the Xamarin Support Slack channels I frequent when a fellow dev offered some advice that showed me how to use Android Studio to do the design work. I knew I had to share this.

1) Assuming you have a pre-existing Xamarin Studio solution create an empty Android Studio project somewhere away from the Xamarin project.  I am using a directory called Test while my main code resides in my Projects directory.

2) Once you have setup the Android Studio project open the build.gradle file under your Gradle Script section. Hint: you want the one Module: app.

Within this file, under the android section, add the following block:

sourceSets {
    main {
        res.srcDirs = ['/path/to/Xamarin/Resources/Directory']
    }
}

.csharpcode, .csharpcode pre
{
font-size: small;
color: black;
font-family: consolas, “Courier New”, courier, monospace;
background-color: #ffffff;
/*white-space: pre;*/
}
.csharpcode pre { margin: 0em; }
.csharpcode .rem { color: #008000; }
.csharpcode .kwrd { color: #0000ff; }
.csharpcode .str { color: #006080; }
.csharpcode .op { color: #0000c0; }
.csharpcode .preproc { color: #cc6633; }
.csharpcode .asp { background-color: #ffff00; }
.csharpcode .html { color: #800000; }
.csharpcode .attr { color: #ff0000; }
.csharpcode .alt
{
background-color: #f4f4f4;
width: 100%;
margin: 0em;
}
.csharpcode .lnum { color: #606060; }

3) The directory may reload on its own (may have to use Sync Now), if it doesn’t restart Android Studio.

4) Open a layout file. Notice you WILL have to use the .xml extension as Android Studio will not recognize .axml (not sure why Xamarin uses this extension).  You know have full access to the designer. You can freely change themes and use the AS designer to layout and preview your layouts.

Note: you may experience rendering problems or controls missing. I did so I added the following to my dependencies/compile section

compile  'com.android.support:appcompat-v7:23.4.0',
         'com.android.support:design:24.2.0',
         'com.android.support:cardview-22.2.0',
         'com.android.support:recyclerview-v7:22.2.0'

.csharpcode, .csharpcode pre
{
font-size: small;
color: black;
font-family: consolas, “Courier New”, courier, monospace;
background-color: #ffffff;
/*white-space: pre;*/
}
.csharpcode pre { margin: 0em; }
.csharpcode .rem { color: #008000; }
.csharpcode .kwrd { color: #0000ff; }
.csharpcode .str { color: #006080; }
.csharpcode .op { color: #0000c0; }
.csharpcode .preproc { color: #cc6633; }
.csharpcode .asp { background-color: #ffff00; }
.csharpcode .html { color: #800000; }
.csharpcode .attr { color: #ff0000; }
.csharpcode .alt
{
background-color: #f4f4f4;
width: 100%;
margin: 0em;
}
.csharpcode .lnum { color: #606060; }

Hopefully in the future, Xamarin releases a better Android Designer, I would count on it though. I am still having some problems getting this to work fully but the designer has already saved me about an hour with my design work.

Testing with Xamarin

On Monday, June 6, 2016 I will be debuting a new talk at Chicago Coder Conference 2016. The talk focuses on much of my research into UI Testing using Xamarin’s UI Testing framework. In addition, I will also talk about my experiences with unit testing both as a means to test application code and to validate UI functionality using the Moq library. UI Testing is a crucial step in the mobile application development process because of the disparity between devices, especially on Android. This talk will not just talk about it but will also show them working and tips for setting them up. I also hope to have a solid discussion around the various levels of testing and what goals are to be achieved.

Current slide deck and code are on my GitHub: https://github.com/xximjasonxx/ChicagoCoderConference2016

I look forward to seeing you at the talk. I also plan to give this talk again at a future session of the Chicago .NET Mobile User Group.

Integrating IoC with Xamarin.iOS

At West Monroe we use Xamarin almost exclusively for our mobile application development.  There are a variety of reasons for this but a few of the notable ones are:

  • Code Uniformity – Other teams within the West Monroe technology practice utilize C# for software development. That Xamarin also employs C# for its platform makes the transition to and from the mobile team easier. Newcomers must still work to understand the specific platform, but they can rely on the fact that the language being used will be familiar to them
  • Code Sharing – This is a big advantage to any project using Xamarin. If a client wishes to build a native application using standard tools they must at least run two teams using different tools and languages.  Each team will need to create the same feature using a different language.  Xamarin alleviates this risk by enabling code uniformity and code sharing between platforms. Indeed, a major selling point for our clients is the flexibility to know that if they want an Android version the effort will be less than the effort to create the iOS version.

These reasons, as well as others have led our team to great success with many of the projects that have come our way. In addition, we consistently leverage MVVMCross (https://github.com/MvvmCross/MvvmCross) for our development as MVVM is a solid pattern and works well with Xamarin since you will have different views for each platform supported.

Recently, however, the teams have begun to notice problems with implementing MVVM on larger projects where the UX is of a considerably higher effort than apps in the past.  We are beginning to see a ceiling with what MVVM can do when forced upon a platform (iOS and Android) which are not built for the pattern.  Due to this we have begun exploring options for what to do in those cases where MVVM and MVVMCross simply do not make sense.

One of the things we really like about MVVMCross is the dependency resolution aspect which happens within view models. Having our services and their dependencies handled this way cleans up the code dramatically.  The following is my initial attempt at building AutoFac into a Xamarin.iOS project.

The AppDelegate

In every iOS application the AppDelegate class is the starting point, responsible for handling global lifecycle events, launching is no exception.  This makes it the best place to start our dependency mapping registration.  For this, I created the AutoFacUIApplicationDelegate class which takes care of the critical parts of registration; it inherits from UIApplicationDelegate which is what the AppDelegate normally inherits from.

Just to make it easy and eliminate the potential for conflict I have chosen to build the registration process at the “Will Finish Launching” point in the process.  Here is the code for the method:

        public override bool WillFinishLaunching(UIApplication application, NSDictionary launchOptions)
        {
            // create our container builder
            var builder = new ContainerBuilder();

            // access the assembly and register ALL classes which implement our custom base class
            var types = GetType().Assembly.DefinedTypes;
            foreach (var theType in types)
            {
                if (theType.BaseType == typeof(AutoFacUIController))
                    builder.RegisterType(theType).PropertiesAutowired();
            }

            // ask the user to register their dependencies
            RegisterDependencies(builder);

            // establish our static container
            _autoFacContainer = builder.Build();

            // return true
            return true;
        }

.csharpcode, .csharpcode pre
{
font-size: small;
color: black;
font-family: consolas, “Courier New”, courier, monospace;
background-color: #ffffff;
/*white-space: pre;*/
}
.csharpcode pre { margin: 0em; }
.csharpcode .rem { color: #008000; }
.csharpcode .kwrd { color: #0000ff; }
.csharpcode .str { color: #006080; }
.csharpcode .op { color: #0000c0; }
.csharpcode .preproc { color: #cc6633; }
.csharpcode .asp { background-color: #ffff00; }
.csharpcode .html { color: #800000; }
.csharpcode .attr { color: #ff0000; }
.csharpcode .alt
{
background-color: #f4f4f4;
width: 100%;
margin: 0em;
}
.csharpcode .lnum { color: #606060; }

The code here is still pretty rough, but it communicates the general idea.  The first goal is to register the types of all View Controllers which are going to use Dependency Injection, that is those that inherit from AutoFacUIController. By doing this, we can ensure that when injection occurs the ViewController type is registered with the IoC container.

Once this is complete, we pass the IContainerBuilder reference to RegisterDependencies which is a user method allowing for the definition of their dependencies.  Once this complete we build and assign the container to a static variable to enable it to be used elsewhere in the application.  Here is a look at the RegisterDependencies in my test app:

        protected override void RegisterDependencies(Autofac.ContainerBuilder builder)
        {
            builder.RegisterType<WorkplaceNameService>().As<INameService>();
        }

.csharpcode, .csharpcode pre
{
font-size: small;
color: black;
font-family: consolas, “Courier New”, courier, monospace;
background-color: #ffffff;
/*white-space: pre;*/
}
.csharpcode pre { margin: 0em; }
.csharpcode .rem { color: #008000; }
.csharpcode .kwrd { color: #0000ff; }
.csharpcode .str { color: #006080; }
.csharpcode .op { color: #0000c0; }
.csharpcode .preproc { color: #cc6633; }
.csharpcode .asp { background-color: #ffff00; }
.csharpcode .html { color: #800000; }
.csharpcode .attr { color: #ff0000; }
.csharpcode .alt
{
background-color: #f4f4f4;
width: 100%;
margin: 0em;
}
.csharpcode .lnum { color: #606060; }

This is a rather contrived example but this is where you could leverage AutoFac and register your types and modules as needed.

Our next goal is to be able to inject these dependencies into our view controllers.  The pattern we are going for is similar to what we see used in ASP .NET MVC and since iOS is built on an MVC approach (more MVP in my opinion) the pattern fits quite well.  We want to define properties on the View Controller that represent our dependencies.  We then want AutoFac to fulfill those properties as the page is loading up.

The first piece to understand here is the lifecycle of ViewController when they are displayed in iOS. Based on my analysis there are two lifecycle events that I can hook into for this process: LoadView (storyboards) and AwakeFromNib (Xib based development).  For the purpose of this test, we will ONLY focus on LoadView since we should all be using Storyboards for the majority of our UI development in iOS, Xamarin or otherwise.

The second thing to understand is how this will need to work.  We want to grab our static IoC container reference and the use it to fulfill our dependencies.  Here is the base LoadView method.

    public class AutoFacUIController : UIViewController
    {
        private IContainer _container;

        public AutoFacUIController(IntPtr ptr) : base(ptr)
        {
            _container = AutoFacUIApplicationDelegate.GetAutoFacContainer();
        }

        public AutoFacUIController()
        {
            
        }

        public override void LoadView()
        {
            // resolve all properties
            _container.InjectProperties(this);

            base.LoadView();
        }
    }

.csharpcode, .csharpcode pre
{
font-size: small;
color: black;
font-family: consolas, “Courier New”, courier, monospace;
background-color: #ffffff;
/*white-space: pre;*/
}
.csharpcode pre { margin: 0em; }
.csharpcode .rem { color: #008000; }
.csharpcode .kwrd { color: #0000ff; }
.csharpcode .str { color: #006080; }
.csharpcode .op { color: #0000c0; }
.csharpcode .preproc { color: #cc6633; }
.csharpcode .asp { background-color: #ffff00; }
.csharpcode .html { color: #800000; }
.csharpcode .attr { color: #ff0000; }
.csharpcode .alt
{
background-color: #f4f4f4;
width: 100%;
margin: 0em;
}
.csharpcode .lnum { color: #606060; }

The InjectProperties method call reflects on the current instance and finds properties whose declared type match a type registered with the IoC container.  The result is, as long as a class inherits from this class it will, when ViewDidLoad fires have all of its relevant dependency properties fulfilled.

Beyond

Obviously this is incredibly rough and relies on quite a bit of ceremony and it completely tied to AutoFac. Ideally, there is more automation and the IoC container is a personal choice rather than a forced one. Nevertheless it’s a good start and I hope to incorporate it into an API library that we can use at West Monroe for more complex projects where the MVVM gains are outweighed by the losses.

For now, I want to continue testing this approach under different situations.  If you are interested I have posted by code to GitHub and it will update as I move through this research process.

https://github.com/xximjasonxx/iOS_AutoFac

Xamarin and El Capitan

So recently I upgraded my development Mac from Yosemite to El Capitan and all of Xamarin projects stopped compiling a produced a NuGet related message with code 127. After some research I found out that this was directly related to the upgrade as a result Apple strips away third party binaries in /usr which is where Xamarin stores its mono link, this results in Xamarin Studio being unable to build.

Reading through various blogs on this the solution was to create a link back to the mono binary located in /Library/Frameworks/Mono.framework/Commands/mono in /usr/bin. If you do this on El Capitan you will likely receive an “Operation Not Permitted” message even if you use an sudo.

The reason for this is Apple, in El Capitan, has revoked the root user and runs El Capitan in “rootless” mode which disallow any user, event with sudo rights to modify certain directories, including /usr

Most of what I read indicating the need to log into the Mac in recovery mode and use the System Configuration utility to disable the “rootless”. However, try as I might, I could not find this utility in the recovery screen. In the end, this forum must pertaining to Xamarin.Mac (https://forums.xamarin.com/discussion/45683/xamarin-mac-10-11-fix-preview) held the fix for me.

Once you boot into the recovery code access the terminal (under Utilities) and issue the following command: csrutil disable – this will disable the “rootless” mode. Boot back into normal Mac and you should be able to perform the linking action from earlier which resulted in the Operation Not Permitted message.

Once you recreate the missing mono command restart Xamarin Studio and things should be working. Not sure when a fix from Xamarin is coming since I get why Apple went to “rootless” mode and I don’t like circumventing it. From what I have found this was known since early September and still not fixed after a month.