RAG (Retrieval Augmentation Generation) refers to the process of using a custom data with GPT queries. The goal being to “augment” existing results with custom data to make GPT responses more appropriate for specific scenarios, ex. “How much was our EBITA in the last quarter?”
SDKs like Semantic Kernel aim to make doing this easier as they can enable a GPT-like chat experience against data sources which may present data in a way that is not consistent with what GPT typically wants.
Checking my Spending
For this example, I wanted to take a data dump from Monarch Money of all 6,000 transactions that I have logged to the platform and “chat” to ask about certain spending habits. The structure of this data is relatively simple:
Merchant: The merchant which processed the transaction Date: The date the transaction occurred Amount: The amount of the transaction Category: The category of the transaction
As you can see, this is highly structured data. Originally I thought about putting it into Azure AI Search but, shortly thereafter it became clear that unless we can do keyword extraction or semantic meaning, AI Search is not good for this sort of data. So what to do?
Storing it in Cosmos
I decided to create a simple Azure Data Factory project to move the data from the CSV file into Cosmos. I created a collection called byCategory under a database called Transactions. This is part of another experiment I am doing with highly read data whereby the data is duplicated so I can specify different partition keys for the data, more on that, hopefully, in the future.
Now the issue here is, there is no way for OpenAI to query this data directly. And while REST calls do allow a file to be passed that can be referenced in the SYSTEM message, I would quickly overrun my token allowance. So, I needed a way to allow a natural chat format that would then translate to a Cosmos Query. Semantic Kernel Planner to the rescue.
Planner’s are just amazing
As I detailed here, Semantic Kernel contains a construct known as Planner. Planner can reference a given kernel and, using the associated ChatCompletion model from OpenAI deduce what to call and in what order to carry out the request by understanding code through the Description attribute. It really is wild watching the AI construct itself from modules to carry out an operation.
So in this case, we want to allow the user to say something like this:
How much did I spend on Groceries in June 2024?
And have that translate to a Cosmos query to bring back the data.
To begin, I created the CosmosPlugin as a code based plugin in the project. I gave it one initial method which, as shown, perform a queries to gather the sum of transactions for a category over a time range.
This file contains hidden or bidirectional Unicode text that may be interpreted or compiled differently than what appears below. To review, open the file in an editor that reveals hidden Unicode characters.
Learn more about bidirectional Unicode characters
The data makes all expense transactions negative. I used Absolute Value to ensure all numbers are positive
Now the insane thing here is, going back to our sample request:
How much did I spend on Groceries in June 2024?
The Planner is going to use the LLM model to determine that Groceries is a category and that the start date 2024-06-01 and end date 2024-06-30 is needed, which blows my mind. It knows this because it is reading all of the Description attributes of the parameters and method.
Once this is done, the rest is simple – we execute our query, and the result is returned. Now the issue I have is, by itself I would just back a number, saying 142.31. Which, while correct, is not user friendly. I wanted to format the output.
Chaining Plugins
I created a Prompt Plugin called FormatterPlugin and gave it a method FormatCategoryRequestOutput. Prompt plugins do NOT have any C# code, instead they specify various data values to send to the LLM model, including the prompt.
This file contains hidden or bidirectional Unicode text that may be interpreted or compiled differently than what appears below. To review, open the file in an editor that reveals hidden Unicode characters.
Learn more about bidirectional Unicode characters
"description": "Given a by category request for a time range, format the resulting monetary value",
"execution_settings": {
"default": {
"max_tokens": 70,
"temperature": 0.9,
"top_p": 0.0,
"presence_penalty": 0.0,
"frequency_penalty": 0.0
}
},
"input_variables": [
{
"name": "number",
"description": "The value returned from to format",
"default": "",
"is_required": true
},
{
"name": "category",
"description": "The category for which the monetary value was requested",
"default": "",
"is_required": true
},
{
"name": "time_period",
"description": "The time period for which the monetary value was requested",
"default": "",
"is_required": true
}
]
}
— skprompt.txt
THE NUMBER {{ $number }} REPRESENTS THE SUM TOTAL FOR ALL TRANSACTIONS SPENT IN THE {{ $category}} CATEGORY
RETURN A STATEMENT THAT INCLUDES THE NUMBER {{ $number }} AND THE CATEGORY {{ $category }} AND TIME PERIOND {{ $time_period }} IN A FORMAT LIKE THIS EXAMPLE:
You can see the use of the Handlebars syntax to pass values from previous agents into the plugin. These need to match the values specified in config.json. Notice again, the use of a description field to allow SK to figure out “what” something does or represents.
Using this, our previous query would return something like this:
You spent $143.01 on Groceries in June 2024
That is pretty cool you have to admit. With relatively little effort I can now support a chat experience against custom data. This type of functionality is huge for clients as it now allows them to ask for certain bits of data.
To finish this sample off, I want to introduce a prompt plugin that runs against the request to convert natural idioms into functional bits. For example, saying something like:
How much did I spend last month?
Would result in an error because the LLM cannot decipher what is meant by “last month”. You would need something to return a result contains the start and end date for the “last month” or “last year”.
I am also concerned about the number of requests you would have to write to support a complex case. I always understood the promise of GPT to not need that code as it can “figure it out”. More research and testing is needed here.
While Microsoft, and others, have an assortment of Azure AI services, anyone who has gotten down and tried to build complex application flows with them will attest it is a challenge. Building these flows takes time and high degree of understanding of the services and their parameters but, what if there was a better way?
The way I like to think of Semantic Kernel is “use AI to do AI work” – that is, much like how we can leverage AI to explore ideas or more efficiently learn a new aspect of programming, let us have AI figure how to call AI. And that is what Semantic Kernel purports to achieve – and does so.
Semantic Kernel is an Open-Source AI orchestration SDK from Microsoft – Github. The main documentation page can be found here. The community is highly active and even has its own Discord channel.
Creating a Simple Example
The link above features a great example of wiring up Azure OpenAI service in a GPT style interface to have a history-based chat with a deployed OpenAI model.
On the surface, this looks like nothing more than a fancier way of calling OpenAI services and, at the most basic level, that is what it is. But the power of Semantic Kernel goes much deeper when we start talking about other features: Plugins and Planners.
Let’s Add a Plugin
Plugins are extra pieces of code that we can create to handle processing a result from a service call (or create input to a service call). For our case, I am going to create a plugin called MathPlugin using the code-based approach:
This file contains hidden or bidirectional Unicode text that may be interpreted or compiled differently than what appears below. To review, open the file in an editor that reveals hidden Unicode characters.
Learn more about bidirectional Unicode characters
This is all standard C# code with the exception of the attributes used on the methods and the arguments. While not relevant right now, these play a vital role when we start talking about planners.
Our function here will calculate the factorial of a given number and return it. To call this block, we need to load it into our kernel. Here is a quick code snippet of doing this:
This file contains hidden or bidirectional Unicode text that may be interpreted or compiled differently than what appears below. To review, open the file in an editor that reveals hidden Unicode characters.
Learn more about bidirectional Unicode characters
Here we create our Kernel and use the AddFromType method to load our Plugin. We can then use the InvokeAsync method to call our code. In my case, I passed the number 5 here received 120, correctly, as the response.
What is the use case?
Our main goal here is to support writing code that may be more accurate at doing something, like calculation, than an LLM would be – note, factorial works fine in most LLMs, this was done as an example.
Cool example, but it seems weird
So, if you are like me, the first time you saw this you thought, “so, thats cool but what is the point? How is this preferable to writing the function straight up?”. Well, this is where Planner’s come into play.
Description is everything
I wont lie, Planners are really neat, almost like witchcraft. Note in our MathPlugin example above, I used the Description attribute. I did NOT do this just for documentation; using this attribute (and the name of the function) Planners can figure out what a method does and decide when to call it. Seem’s crazy right, let’s expand the example.
First, we need a deployed LLM model to make this work – I am going to use GPT 4o deployed through Azure OpenAI – instructions.
Once you have this deployment, and the relevant information you can use the extension method AddAzureOpenAIChatCompletion you can update your code to add this functionality into your kernel:
This file contains hidden or bidirectional Unicode text that may be interpreted or compiled differently than what appears below. To review, open the file in an editor that reveals hidden Unicode characters.
Learn more about bidirectional Unicode characters
This is one of the main strengths of Semantic Kernel, it features a pluggable model which can support ANY LLM. Here is the current list, and I am told support for Google Gemini is forthcoming.
Let the machine plan for itself
Let’s expand our MathPlugin with a new action called Subtract10 that, you guessed it, subtracts 10 from whatever number is passed.
This file contains hidden or bidirectional Unicode text that may be interpreted or compiled differently than what appears below. To review, open the file in an editor that reveals hidden Unicode characters.
Learn more about bidirectional Unicode characters
Here we have added two new methods: Subtract10 (as mentioned) and Add which adds two numbers together. Ok, cool we have our methods. Now, we are going to create a Planner and have the AI figure out what to call to achieve a stated goal.
Semantic Kernel comes with the HandlebarsPlanner in a prerelease NuGet package:
Once you have this, we can use this code to call it:
This file contains hidden or bidirectional Unicode text that may be interpreted or compiled differently than what appears below. To review, open the file in an editor that reveals hidden Unicode characters.
Learn more about bidirectional Unicode characters
The call to CreatePlanAsync this creates a set of steps for the Planner to follow, it will pass the steps to your registered LLM model to deduce what is being requested. For debugging (or reporting) you can print these steps out by outputting the plan variable. Here is what mine looks like:
Reading through this is pretty insane. You can clearly see the AI figuring out what is being asked and THEN figuring out which plugin method to call. This is what is meant by AI Automatically calling AI. By how?
Recall the Description attributes in MathPlugin on both the method and parameter. The AI is reading this and through this information knowing what to call. And this goes even further beyond what you think, watch this.
Change the goal to indicating you want to subtract 20. Again, no code changes. Here is the outputted plan.
If you look closely at Step 6 you can see what is happening. The Planner AI was smart enough to realize that it was asked to subtract 20 BUT only had a plugin that can subtract 10 so… it did it twice. That is INSANE!!
Anyway, if we modify the code to actually invoke the plan (we will change the request back to subtract 10) we can see below we get the correct response (134).
What if I want to use an AI Service with a Planner?
So far we have looked at creating a plugin and calling it directly. While interesting, its not super useful as we have other ways. Then we looked at calling these plugins using a Planner. This was more useful as we saw that we can use a connect LLM model to allow the Planner to figure out how to call things. But, this is not what Semantic Kernel is trying to solve. Let’s take the next step.
To this point, our code has NOT directly leveraged the LLM; the Planner made use of it to figure out what to call but, our code never directly called into LLM – in my case GPT 4o, lets change that and really leverage Semantic Kernel.
Prompt vs Functional Plugin
While not officially coined in Semantic Kernel, plugins can do different things. To this point, we have written functional plugins, that is we have written plugins which are responsible for executing a segment of coding. Now, we could use these plugins to call into the deployed OpenAI model but, this is where a prompt plugin comes into play.
Prompt plugins are directory based, that is, they are loaded as a directory with two key files: config.json and skprompt.txt.
config.json contains the configuration used to call the connected LLM service. Here is an example of the one we will use in our next plugin.
This file contains hidden or bidirectional Unicode text that may be interpreted or compiled differently than what appears below. To review, open the file in an editor that reveals hidden Unicode characters.
Learn more about bidirectional Unicode characters
This plugin is going to generate a random statement from the LLM (OpenAI GPT) in this case that uses the number that is generated using the MathPlugin functions. Again, the descriptions of these values are CRUCIAL as they allow the LLM to deduce what a function does and thus how to use it.
The skpromot.txt contains the prompt that will be sent to the LLM to get the output. This is why this is referred to as a Prompt Plugin – you can think of this as encapsulating a prompt. Here is the prompt we will use:
This file contains hidden or bidirectional Unicode text that may be interpreted or compiled differently than what appears below. To review, open the file in an editor that reveals hidden Unicode characters.
Learn more about bidirectional Unicode characters
Notice the use of the {{$number}} which is defined in the config.json above. This prompt will be passed to OpenAI GPT to generate our result.
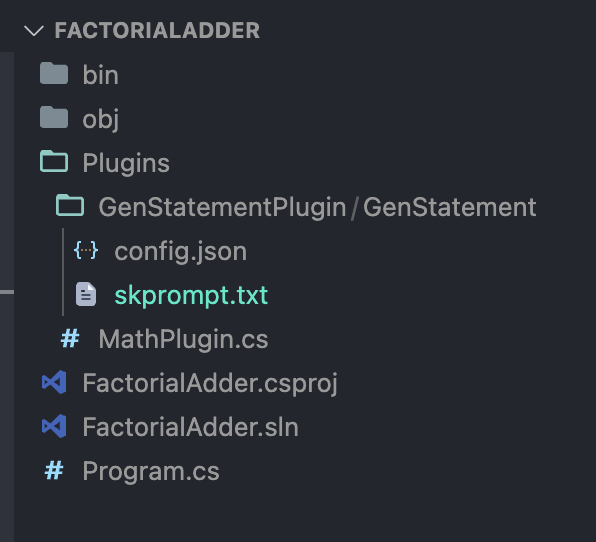
Both of these files MUST be sored under a directory that bears the name of the action, which is under a directory bearing the name of the plugin. Here is my structure:
In case you were wondering, the name of the plugin here is GenStatement thus it is under the GenStatementPlugin folder.
Last, we need to add this plugin to the kernel so it can be used:
This file contains hidden or bidirectional Unicode text that may be interpreted or compiled differently than what appears below. To review, open the file in an editor that reveals hidden Unicode characters.
Learn more about bidirectional Unicode characters
Word of advice – make sure you set both skprompt.txt and config.json as CopyToOutputDirectory
We are now ready to see our full example in action. Here is the output from my script with the updated goal:
As you can see, we are getting a (somewhat) different response each time. This is caused by having our temperature value in the config.json used to call OpenAI set to near 1, which makes the result more random.
Closing Thoughts
AI using AI to build code is crazy stuff but, it makes a ton of sense as we get into more sophisticated uses of the AI services that each platform offers. While I could construct a pipeline myself to handle this, it is pretty insane to be able to tell the code what I want and have it figure it out on its own. That said, using AI to make AI related calls is a stroke of genius. This tool clearly has massive upside, and I cannot wait to dive deeper into it and ultimately use it to bring value to customers.
Microsoft has been very serious about AI and its incorporation into many common (and uncommon) workflows. I dont see AI as necessarily replacing humans in most things wholesale, at least not yet. But what I do see is it having the ability to make people more productive and, hopefully, allow people more time to spend with families or pursuing passion.
For myself, for example, CoPilot has become integral to the way I search for answers to problems and even generate code. Gone are the days that I needed to search out sample code for learning, now I can just ask for it and, most of the time, be given code that, if it not wholly accurate, is accurate enough to point me in the right direction.
Recently, I went on paternity leave with the arrival of Iris (our second child). As it was the first time, I decided to pick an area to study during my off time (last time I spent the time learning Kubernetes, a skill which has paid off tremendously for me). This time, I choose to dive headlong into our AI services hosted on Azure. What a trip it has been. Its very exciting and has a ton of potential. One of the more obvious ones is how AI could improve customer service by allowing for fleets of agents handling calls. The language generation and comprehension is already sufficient for many use cases. To that end, I thought I would demonstrate how to use a custom voice with Azure Communication Services, our platform for handling texting and telephony features in Azure.
Setting up for the Solution
Within Azure the various AI services can be deployed as standalone services or as a “multi-service” account. I learned the hard way that for integration with ACS to be supported you MUST leverage “multi-service”. The docs do not, right now, do a good job calling this out.
Create AI Services Account
The first thing you need is a Multi-service AI Account. Notice this is DIFFERENT than a single service (such as an instance of Speech Service), which will not work for this.
Custom Neural Voice is NOT something that is turned by default. Like many aspects of AI, while fascinating, it has a lot of negative use cases. Synthesized voices are a large part of deepfaking and at Microsoft we do our best to ensure this technology is used for good, sadly there is a limit to what can be done.
For the sake of us all, being truthful and forthright about the intentions for CNV is crucial. Deepfaking and fake media is a very real danger in today’s world. To best use it, we must appreciate its capabilities, both good and bad.
Creating the Neural Voice
Custom Neural voice comes in two flavors. Use the appropriate one depending on your use case and available resources:
Lite – this is the most common and preferred option for hobby and simple cases. The portal will feed you a set of phrases that must be repeated; each utterance is measured for precision. A minimum of 20 utterances is required and, obviously the more given the more accurate the voice is. This is what our sample will use
Pro – this is for the serious cases. For example, if a large customer wanted to create an AI agent that sounds like one of their agents, this would be the option to use. The assumption is that the utterances are recording using professional equipment in a sound studio. This option requires a MINIMIUM of 300 utterances in a variety of styles and phrasing. Pro will also support different speaking styles (gentle, hard, soft, etc)
Once you complete the training you can deploy the model. Once deployed, note its deploymentId for later.
With this model deployed we can now begin to use the model. For a quick win, the Studio will provide some code that will produce a console app that you can use to speak some text. Try it, its really surreal hearing yourself speaking something you never spoke.
Create the Azure Communication Service instance
I will spare you walking you through this process. Here is the official Microsoft documentation for creating an ACS instance.
Assign the RBAC permissions
Once ACS is created, enable its System Assigned Managed Identity. Once it is created, go to the appropriate AI Account, the one which is hosting the custom voice model. Ensure the ACS identity has the Cognitive Services Speech Contributor RBAC role assigned. Note: There is a chance that Cognitive Services Speech User will also work but, as of this writing, I have not tested it.
Get a Telephone Number
As with instance creation, this is pretty standard so here is the link to the official Microsoft documentation for creating phone numbers.
Building the Solution
To this point, we have our resources and configurations now, we need code to link things together. For this, I will focus on the code and what it is doing rather than explaining the solution and a wider level. This is because, solutions like this get complicated fast with the number of services involved and the interactions which are orchestrated.
The important thing to understand is that interactions within ACS flows happen via a callback mechanism. When you start a call, you provide a callback which receives events related to your call. I recommend using ngrok if you want to run all of your stuff locally; ngrok will great a tunnel URL to allows ACS to call your local machine.
Finally, I will NOT be talking through how to receive calls and only briefly touch on making them. The reason, again, is focus. Expanding beyond this point would add more information to this post, I hope to cover it at a later date.
Let’s make a phone call
ACS works in an entirely event driven fashion. So, when a call is made, actions for that call are handled by an event handler. Here is my code for calling a specific phone number.
This file contains hidden or bidirectional Unicode text that may be interpreted or compiled differently than what appears below. To review, open the file in an editor that reveals hidden Unicode characters.
Learn more about bidirectional Unicode characters
Let’s talk through this starting with requirements. This code was written using the Azure.Communication.CallAutomation v1.2.0 NuGet package. This package makes available the various Call Automation and related Call types that the code uses.
Phone numbers here MUST be expressed in international format, that means including a leading ‘+’ sign, followed by the country code (1 for the United States).
The CreateCallOptions specifies the CognitiveService (now call AI Account [created above]) instance that will handle analysis and call features, such a speech-to-text using Custom Neural Voice. You CANNOT span multiple AI accounts with this, hence why creating a multi-service is required.
The CreateCallOptions also specifies the callback for events relating to the call. These are merely POST events. This is where you start to lay out the flow of the call, here is my code:
This file contains hidden or bidirectional Unicode text that may be interpreted or compiled differently than what appears below. To review, open the file in an editor that reveals hidden Unicode characters.
Learn more about bidirectional Unicode characters
The ACS service will, by default, send events using the CloudEvent schema (link). Because these follow a specific format, the CloudEventParseMany is able to quickly translate the incoming JSON string data into the Cloud Event format.
Once this is complete, CloudAutomationEventParser is able to parse the event into an event it expects. When a user answers the call, the CallConnected event is received.
After a reference to the call is established, using data in the event, we can take action on that specific call. In this case, we are playing audio to the caller based on provided Text, using TextSource.
This file contains hidden or bidirectional Unicode text that may be interpreted or compiled differently than what appears below. To review, open the file in an editor that reveals hidden Unicode characters.
Learn more about bidirectional Unicode characters
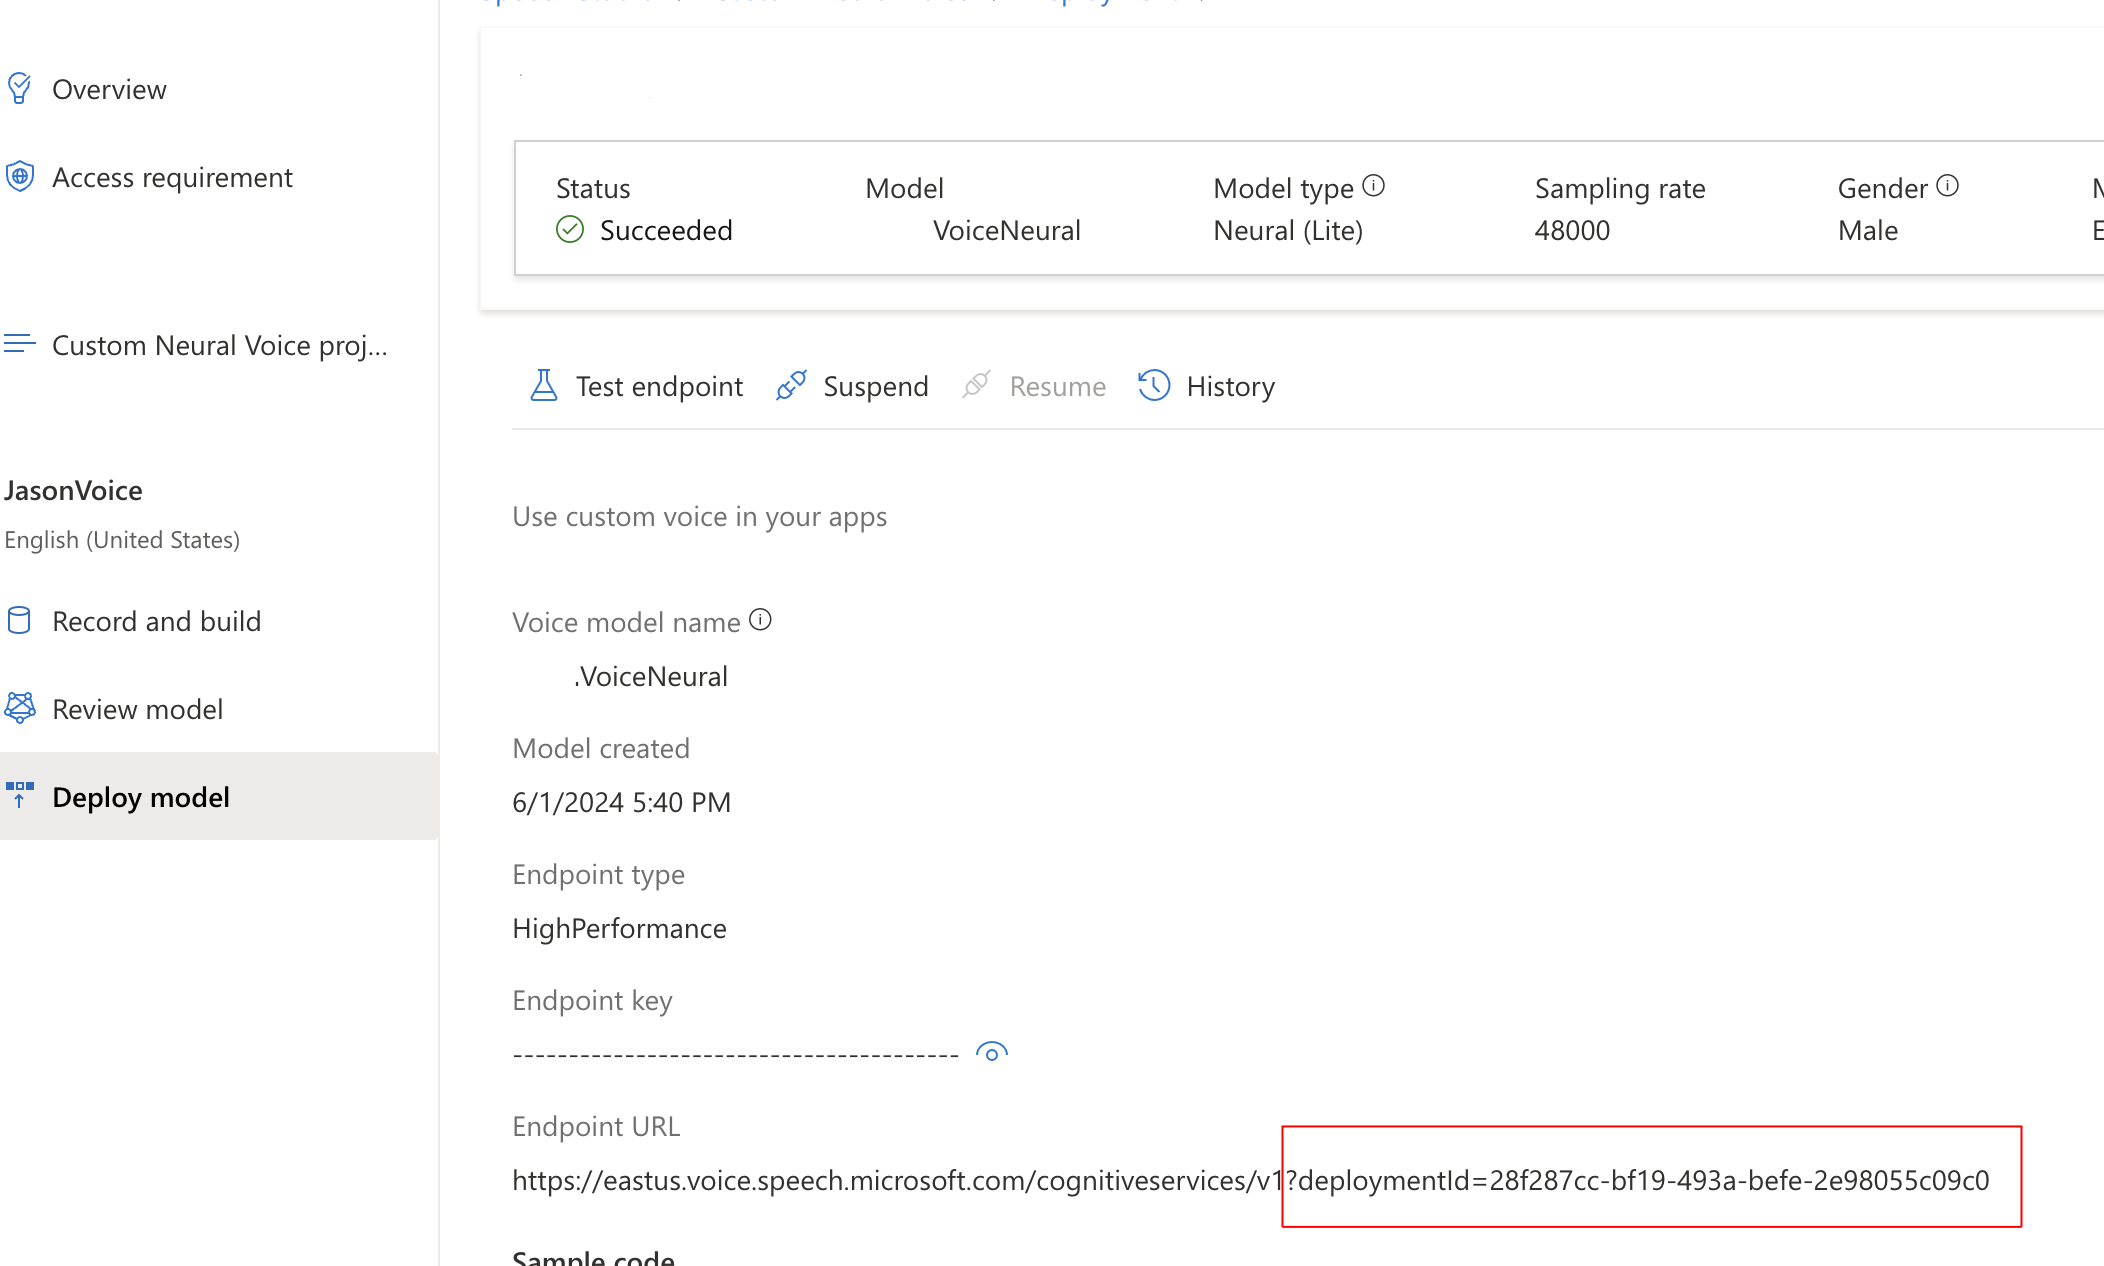
Among the three properties shown here only VoiceName and CustomVoiceEndpointId are required. You can get both of these values from you Deploy Model information page in Speech Studio (screenshot repeated from above).
Because the Azure Functions are running in isolated mode the Output Bindings can no longer be declared as function parameters, they can only be returned. In the above, I was tinkering with outputting call connection information to Cosmos. You can see the use of the HandleEventResponseModel type to support returning a Http result AND a Cosmos DB result – this will be the norm moving forward.
More information on this approach is available in the Microsoft documentation (link). Pay careful attention to the NuGet package requirements.
Testing it
I used Azure Functions running locally with ngrok to allow ACS to route callbacks to my locally running code. Once I had the functions running, I used Postman to contact my make/call endpoint. Once I executed the endpoint, my phone would ring and, upon answering, I would hear the message I indicated above.
For added effect, I ensured my logger displayed the CallConnectionId and then executed this endpoint using Postman to have my voice say whatever I wanted to the caller:
This file contains hidden or bidirectional Unicode text that may be interpreted or compiled differently than what appears below. To review, open the file in an editor that reveals hidden Unicode characters.
Learn more about bidirectional Unicode characters
This sample is part of a larger effort for me to understand the use of AI for customer service scenarios. To that end, I am building a simple example of this to help a relative’s small business. Up next is providing options for the caller and then responding with either pre-authored text or OpenAI responses generated from AI search results for trained data.
Prior to the rise of OAuth, or delegated authentication really, authorization systems usually involved database calls based on a user Id which was passed as part of a request. Teams might even leverage caching to speed things up but, in the world of monoliths this was heavily used, realistically for most teams there was no alternative.
Fast forward to the rise in distributed programming and infrastructure patterns like Microservices or general approaches using SOA (Service Oriented Architecture) and this pattern falls on its face, and hard. Today, the very idea of supporting a network call for EVERY SINGLE request like this is outlandish and desperately avoided.
Instead, teams leverage an identity server concept (B2C here, or Okta, Auth0 [owned by Okta] or Ping] whereby a central authority issues the token and embeds the role information into the token’s contents; the names of roles should never constitute sensitive information. Here is a visual:
The critical element to understand here is that tokens are hashed and signed. Any mutation of the token will render it invalid and unable to pass any authoritative check. Thus, we just need to ensure no sensitive data is exposed in the token, as they can be easily decoded by sites like https://jwt.ms and https://jwt.io
Once the Access Token is received by the service and it is verified, the service can then strip claims off the token and use it for its own processing. I wont be showing you in this article BUT dotnet (and many other web frameworks) natively support constructs to make this parsing easy and enable easy implementation of Auth systems driven by claims.
How do I do this with B2C?
B2C supports API Connectors per the article above. These connectors allow B2C to reach out at various stages and contact an API to perform additional work; including enrichment.
The first step in this process is the creation of a custom attribute to be sent with the Access Token to hold the custom information, I called mine Roles.
Create the Custom Attribute for ALL Users
From your Azure B2C Tenant select User Attributes
Create a new Attribute called extension_Roles of type string
Click Save
The naming of the attribute here is crucial. It MUST be preceded be extension_ for B2C to return the value.
This attribute is created ONLY to hold the value coming from token enrichment via the API, it is not stored in B2C, only returned as part of the token.
Configure your sign-in flow to send back our custom attribute
Select User Flows from the main menu in Azure B2C
Select your sign-in flow
Select Application claims
Find the custom claim extension_Roles in the list
Click Save
This is a verification step. We want to ensure our new attribute is the Application Claims for the flow and NOT, the user attributes. If it is in the user attributes, it will appear in the sign-up pages.
Deploy your API to support the API Connector
The link at the top shows what the payload to the API connector looks like as well as the response. I created a very simple response in an Azure Function, shown below:
This file contains hidden or bidirectional Unicode text that may be interpreted or compiled differently than what appears below. To review, open the file in an editor that reveals hidden Unicode characters.
Learn more about bidirectional Unicode characters
We can deploy this the same way we deploy anything in Azure; in my testing I used right-click publishing to make this work.
Setting the API Connector
We need to configure B2C to call this new endpoint to enrich the provided token.
Select API Connectors from the B2C menu
Click New API Connector
Choose any Display name (I used Enrich Token)
For the Endpoint URL input the web page to your API
Enter whatever you want for the Username and Password
Click Save
The username and password can provide an additional layer of security by sending a base64 encoded string to the API endpoint which the endpoint can decode and validate the caller is legitimate. In the code above, I choose not to do this, though I would recommend it for a real scenario.
Configure the Signup Flow to call the Enrich Token API endpoint
The last step of the setup is to tell the User Flow for Signup/Sign-in to call our Enrich Token endpoint.
Select User Flows
Select the User Flow that represents the Signup/Signin operation
Select API Connectors
For the Before including application claims in token (preview) select the Enrich Token API Connector (or whatever name you used)
Click Save
This completes the configuration for calling the API Connector as part of the user flow.
Testing the Flow
Now let’s test our flow. We can do this using the built-in flow tester in B2C. Before that though, we need to create an Application Registration and set the a reply URL so the flow has some place to dump the user when validation is successful.
Once you have created the registration return to the B2C page and select User Flows. Select your flow, and then click Run User Flow. B2C will ask under what identity do you want to run the flow as. Make sure you select the identity you created and validate that the Reply URL is what you expect.
Click Run user flow and login (or create a user) and you should get dumped to the reply URL and see your custom claims. Here is a sample of what I get (using the code above).
This file contains hidden or bidirectional Unicode text that may be interpreted or compiled differently than what appears below. To review, open the file in an editor that reveals hidden Unicode characters.
Learn more about bidirectional Unicode characters
Above you can see extension_Roles with the value Admin,User. This token can then be parsed in your services to check what roles are given to the user represented by this token.
Recently, we had a client that wanted to use an Azure Function app to listen to a Service Bus. Easy enough with ServiceBusTrigger but I wanted to ensure that the queue name to listen to came from Azure App Configuration service. But this proved to be more challenging.
What are we trying to do?
Here is what our function looks like:
This file contains hidden or bidirectional Unicode text that may be interpreted or compiled differently than what appears below. To review, open the file in an editor that reveals hidden Unicode characters.
Learn more about bidirectional Unicode characters
As you can see, we are using the %% syntax to indicate to the Function that it should pull the queue name from configuration. Our next step would be to connect to Azure App Configuration and get our configuration, including the queue name.
If you were to follow the Microsoft Learn tutorials, you would end up with something like this for the Startup.cs file:
This file contains hidden or bidirectional Unicode text that may be interpreted or compiled differently than what appears below. To review, open the file in an editor that reveals hidden Unicode characters.
Learn more about bidirectional Unicode characters
If you use this code the Function App will not start. The reason is because the way the loading process happens is the configuration will now bind to the parameters in a Trigger. This all works fine for code that the functions execute, but if you are trying to bind trigger parameters to configuration values you have to do something different.
This appears to be a known issue that does not have an official solution, but the above workaround does work. So, if we use this implementation, we remove the error which prevents the Function Host from starting.
This file contains hidden or bidirectional Unicode text that may be interpreted or compiled differently than what appears below. To review, open the file in an editor that reveals hidden Unicode characters.
Learn more about bidirectional Unicode characters
Now this is interesting. If you are not aware, Function Apps are, for better or worse, built on much of the same compute infrastructure as App Service. App Service has a feature called WebJobs which allowed them to perform actions in the background – much of this underlying code seems to be in use for Azure Functions. FunctionsStartup, which is what is recommended for the Function App startup process, abstracts much of this into a more suitable format for Function Apps.
Here we are actually leveraging the old WebHost routines and replacing the configuration loaded by the Function Host as part of Function startup. This lets us build the Configuration as we want, thereby ensuring the Function Host is aware of the value coming in from App Configuration and supporting the binding to the Trigger parameter.
As a side note, you will notice that I am building configuration twice. The first time is so I can bring in Environment variables (values from the Function Configuration blade in Azure) which contains the endpoint for the App Configuration service.
The second time is when I build by IConfiguration type variable and then run replace to ensure the values from App Configuration are available.
Something to keep in mind
The %% syntax is a one-time bind. Thus, even though App Configuration SDK does support the concept of polling, if you change a value in Configuration service and it gets loaded via the poller the trigger bindings will not be affected – only the executing code.
Now, I dont think this is a huge issue because I dont think most use cases call for a real time value change on that binding and you would need the Function Host to rebind anyway. Typically, I think a change like this is going to be accompanied by a change to the code and a deployment which will force a restart anyway. If not, you can always indicate a restart action to the Function App itself which will accomplish the same goal.
I felt compelled to write this post for a few reasons, most centrally that, while I do applaud the team for putting out a nice modern library I must also confess that it has more than a few idiosyncrasies and the documentation is very lacking. To the effect of the former, I feel the need to talk through an experience I had recently involving a client project.
In Azure there are many different kinds of users, each relating back to a principal: User, Group, Service, Application, and perhaps others. Of these all but Application can be assigned RBAC (Role Based Access Control) roles in Azure, the foundational way security is handled.
The Azure.ResourceManager (link) and its related subprojects are the newest release aimed at helping developers code against the various Azure APIs to enable code based execution of common operations – this all replaces the previous package Microsoft.Azure.Management (link) which has been deprecated.
A full tutorial on this would be helpful and while the team has put together some documentation, more is needed. For this post I would like to focus on one particular aspect.
Assigning a Role
I recently authored the following code aimed at assigning a Service Principal to an Azure RBAC role. Attempting this code frequently led to an error stating I was trying to change Tenant Id, Application Id, Principal Id, or Scope. Yet as you can see, none of those should be changing.
This file contains hidden or bidirectional Unicode text that may be interpreted or compiled differently than what appears below. To review, open the file in an editor that reveals hidden Unicode characters.
Learn more about bidirectional Unicode characters
I have some poor variable naming in here but here is a description of the parameters to this method:
objectId – the unique identifier for the object within Azure AD (Entra). It is using this Id that we assign roles and take actions involving this Service Prinicipal
roleName – in Azure parlance, this is the name of the role which is a Guid, it can also be thought of as the role Id. There is another property called RoleName which returns the human readable name, ie Reader or Contributor.
scopePath – this is the path of assignment, that is where in the Azure resource hierarchy we want to make the assignment. This could reference a Subscription, a Resource Group, or a Resource itself
As you can see, there is no mutating of the values listed. While RoleAssignmentCreateOrUpdateContent does have a Scope property, it is read-only. The error was sporadic and annoying. Eventually I realized the issue, it is simple but does require a deeper understanding of how role assignments work in Azure.
The Key is the Id
Frankly, knowing what I know now I am not sure how the above code ever worked. See, when you create a role assignment that action, in and of itself, has to have a unique identifier. A sort of entry that represents this role definition with this scoping. In the above I am missing that, I am trying to use the Role Definition Id instead. After much analysis I finally realized this and modified the code as such:
This file contains hidden or bidirectional Unicode text that may be interpreted or compiled differently than what appears below. To review, open the file in an editor that reveals hidden Unicode characters.
Learn more about bidirectional Unicode characters
As you can see, this code expands things. Most notably is the first section where I build the full Role Definition Resource Id this is the unique Id for a Role Definition, which can later be assigned.
Using this library, the content object indicates what I want to do – assign objectId the role definition provided. However, what I was missing was the second part: I had to tell it WHERE to make this assignment. It seems obvious now but, it was not at the time.
The obvious solution here, since it has to be unique, is to just use Guid.NewGuid().ToString(). When I call Update it will get the point of assignment from roleAssignmentResource.
And that was it, just like that, the error went away (a horribly misleading error mind you). Now the system works and I learned something about how this library works.
Secret values in Kubernetes has always been a challenge. Simply put, the notion of putting sensitive values into a Secret with nothing more than Base64 encoding, and hopefully RBAC roles has seemed like a good idea. Thus the goal was always find a better way to bring secrets into AKS (and Kubernetes) from HSM type services like Azure Key Vault.
When we build applications in Azure which access services like Key Vault we do so using Managed Service Identities. These can either be generated for the service proper or assigned as a User Assigned Managed Identity. In either case, the identity represents a managed principal, one that Azure controls and is only usable from within Azure itself, creating an effective means of securing access to services.
With a typical service, this type of access is straightforward and sensible:
The service determines which managed identity it will use and contacts the Azure Identity Provider (and internal service to Azure) and receives a token. It then uses this token to contact the necessary service. Upon receiving the request with the token, the API determines the identity (principal) and looks for relevant permissions assigned to the principal. It then uses this to determine whether the action should be allowed.
In this scenario, we can be certain that a request originating from Service A did in fact come from Service A. However, when we get into Kubernetes this is not as clear.
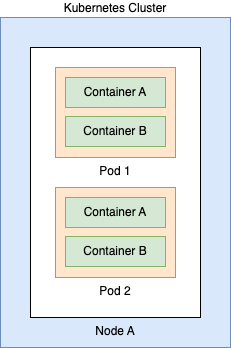
Kubernetes is comprised of a variety of components that are used to run workloads. For example:
Here we can see the identity can exist at 4 different levels:
Cluster – the cluster itself can be given a Managed Identity in Azure
Node – the underlying VMs which comprise the data layer can be assigned a Managed Identity
Pod – the Pod can be granted an identity
Workload/Container – The container itself can be granted an identity
This distinction is very important because depending on your scenario you will need to decide what level of access makes the most sense. For most workloads, you will want the identity at the workload level to ensure minimal blast radius in the event of compromise.
Using Container Storage Interface (CSI)?
Container Storage Interface (CSI) is a standard for exposing storage mounts from different providers into Container Orchestration platforms like Kubernetes. Using it we can take a service like Key Vault and mount it into a Pod and use the values securely.
That is it, now we shift our focus back to the cluster.
Enable OIDC for the AKS Cluster
OIDC (OpenID Connect) is a standard for creating federation between services. It enables the identity to register with the service and the token exchange occurring as part of the communication is entirely transparent. By default AKS will NOT enable this feature, you must enable it via the Azure Command line (or PowerShell).
Make sure to record this value as it comes back, you will need it later
Create a Service Account
Returning to your cluster, we need to create a Service Account resource. For this demo, I will be creating the account relative to a specific namespace. Here is the YAML:
This file contains hidden or bidirectional Unicode text that may be interpreted or compiled differently than what appears below. To review, open the file in an editor that reveals hidden Unicode characters.
Learn more about bidirectional Unicode characters
Make sure to record these values, you will need them later.
Federate the User Assigned Identity with the Cluster
Our next step will involve creating a federation between the User assigned identity we created and the OIDC provider we enabled within our cluster. The following command can be used WITH User Assigned Identities – I linked the documentation for an unmanaged identities below:
This file contains hidden or bidirectional Unicode text that may be interpreted or compiled differently than what appears below. To review, open the file in an editor that reveals hidden Unicode characters.
Learn more about bidirectional Unicode characters
As a quick note, the $RESOURCE_GROUP value here refers to the RG where the User Identity you created above is located. This will create a trusted relationship between AKS and the Identity, allow workloads (among others) to assume this identity and carry out operations on external services.
One of the resource kinds that is added to Kubernetes when you enable CSI is the SecretProviderClass. We need this class to map our secrets into the volume we are going to mount into the Pod. Here is an example, an explanation follows:
This file contains hidden or bidirectional Unicode text that may be interpreted or compiled differently than what appears below. To review, open the file in an editor that reveals hidden Unicode characters.
Learn more about bidirectional Unicode characters
This file contains hidden or bidirectional Unicode text that may be interpreted or compiled differently than what appears below. To review, open the file in an editor that reveals hidden Unicode characters.
Learn more about bidirectional Unicode characters
This example uses a derivative of the busybox image that is provided via the example. The one change that I made was adding serviceAccountName. Recall that we created a Service Account above and defined it as part of the Federated Identity creation payload.
You do not actually have to do this. You can instead use default which is the default Service Account all pods run under within a namespace. However, I like to define the user more specifically to be 100% sure of what is running and what has access to what.
To verify things are working. Create this Pod and run the following command:
If everything is working, you will see your secret value printed out in plaintext. Congrats, the mounting is working.
Using Secrets
At this point, we could run our application in a Pod and read the secret value as if it were a file. While this works, Kubernetes offers a way that is, in my view, much better. We can create Environment variables for the Pod from secrets (among other things). To do this, we need to add an additional section to our SecretProviderClass that will automatically create a Secret resource whenever the CSI volume is mounted. Below is the updated SecretProviderClass:
This file contains hidden or bidirectional Unicode text that may be interpreted or compiled differently than what appears below. To review, open the file in an editor that reveals hidden Unicode characters.
Learn more about bidirectional Unicode characters
Notice the new section we added. This will, at the time of the CSI being mounted create a secret in the blog-post namespace called secret-blog-post with a key in the data called Password.
Now, if you apply this definition and then attempt to get secret from the namespace, you will NOT get a secret. Again, its only created when we mount it. Here is the updated Pod definition with the Environment variable from the secret.
This file contains hidden or bidirectional Unicode text that may be interpreted or compiled differently than what appears below. To review, open the file in an editor that reveals hidden Unicode characters.
Learn more about bidirectional Unicode characters
After you apply this Pod spec, you can run a describe on the pod. Assuming it is run and running successfully you can then run a get secret command and you should see the secret-blog-post. To fully verify our change, using this container, run the following command:
This command will print out a list of the environment variables present in the container, among them should be Password with a value matching the value in the Key Vault. Congrats, you can now access this value from application code the same way you could access any environment value.
This conclude the demo.
Closing Remarks
Over the course of this post, we focused on how to bring sensitive values into Kubernetes (AKS specifically) using the CSI driver. We covered why workload identity really makes the most sense in terms of securing actions from within Kubernetes, since Pods can have many containers/workloads, nodes can have many disparate pods, and clusters can have applications running over many nodes.
One thing that should be clear: security with Kubernetes is not easy. It matters little for such a demonstration however, we can see a distinct problem with the exec strategy if we dont have the proper RBAC in place to prevent certain operations.
Nonetheless, I hope this post has given you some insight into a way to bring secure content into Kubernetes and. Ihope you will try CSI in your cuture projects.
Writing this as a matter of record, this process was much harder than it should have been so remembering the steps is crucial.
Register the Extensions
Note, the quickest way to do most of this step is the activate the GitOps blade after AKS has been created. This does not activate everything however, as you still need to run
az provider register –namespace Microsoft.Kubernetes.Configuration
This command honestly took around an hour to complete, I think – I actually went to bed.
Install the Flux CLI
While AKS does offer an interface through which you can configure these operations, I have found it out of date and not a good option for getting the Private Repo case to work, at least not for me. Installation instructions are here: https://fluxcd.io/flux/installation/
On Mac I just ran: brew install fluxcd/tap/flux
You will need this command to create the necessary resources that support the flux process, keep in mind we will do everything from command line.
Install the Flux CRDs
Now you would think that activating the Flux extension through AKS would install the CRDs, and you would be correct. However, as of this writing (6/13/2023) the CRDs installed belong to the v1beta1 variant; the Flux CLI will output the v1 variant so, it will be a mismatch. Run this command to install the CRDs:
For this example, I used classic, though there should not be a problem if you want use fine-grained. Once you have the token we need to create a secret.
Before you do anything, create a target namespace – I called mine fastapi-flux. You can use this command:
kubectl create ns fastapi-flux
Next, you need to run the following command to create the Secret:
flux create secret git <Name of the Secret> \
–password=<Raw Personal Access Token> \
–username=<GitHub Username> \
–url=<GitHub Repo Url> \
–namespace=fastapi-flux
Be sure to use your own namespace and fill in the rest of the values
Create the Repository
Flux operates by monitoring a repository for changes and then running YAML in a specific directory when a change occurs. We need to create a resource in Kubernetes to represent the repository it should listen to. Use this command:
flux create source git <Name of the Repo Resource> \
–branch main \
–secret-ref <Name of the Secret created previously> \
–url <URL to the GitHub Repository> \
–namespace fastapi-flux
–export > repository.yaml
This command will create the GitRepository resource in Kubernetes to represent our source. Notice here, we use the –export to indicate we only want the YAML from this command and we are directing the output to the file repository.yaml. This can be run without –export and it will create the resource without providing the YAML.
I tend to prefer the YAML so I can run it over and over and make modifications. Many tutorials online make reference to this as your flux infrastructure and will have a Flux process to apply changes to them automatically as well.
Here, I am doing it manually. Once you have the YAML file you can use kubectl apply to create the resource.
Create the Kustomization
Flux referes to its configuration for what build when a change happens as a kustomization. All this is, is a path in a repo to look for, and execute, YAML files. Similar to the above, we can create this directly using the Flux CLI or us the same CLI to generate the YAML; I prefer the later.
flux create kustomization <Name of Kustomization> \
This will create a Kustomization resource that will immediately try to pull and create our resource.
Debugging
The simplest and most direct way to debug both resources (GitRepository and Kustomization) is to perform a get operation on the resources using kubectl. For both, the resource will list any relevant errors preventing it from working, The most common for me were errors were the authentication to GitHub failed.
If you see no errors, you can perform a get all against the fastapi-flux (or whatever namespace you used) to see if you items are present. Remember, in this example we placed everything in the fastapi-flux namespace – this may not be possible given you use case.
Use the reconcile command if you want to force a sync operation on a specific kustomization.
Final Thoughts
Having used this now I can see why ArgoCD (https://argoproj.github.io/cd/) has become so popular as. a means for implementing GitOps. I found Flux hard to understand due its less standard nomenclature and quirky design. Trying to do it using the provided interface from AKS did not help either as I did not find the flexibility that I needed. Not saying it isn’t there, just hard to access.
I would have to say if I was given the option, I would use ArgoCD over Flux every time.
Recently I finished “Team Topologies: Organizing Business and Technology Teams for Fast Flow” written by Matthrew Skelton and Manuel Pais – Amazon: https://a.co/d/1U8Gz56
I really enjoyed this book because it took a different tactic to talking about DevOps, one that is very often overlooked by organizations: Team Structure and Team Communication. A lot of organizations that I have worked with misunderstand DevOps as simply being automation or the use of a product like GitHub Actions, CircleCI, Azure DevOps, etc. But the truth is, DevOps is about so much more than this and the book really goes deep into this explore team topologies and emphasizing the need to organize communication.
In particular the book calls out four core team types:
Stream aligned – in the simplest sense these are feature teams but, really they are so much more. If you read The Phoenix Project by Gene Kim you start to understand that IT and engineering are not really its own “thing” but rather, a feature of a specific department, entity, or collab. Thus, what stream-aligned actually means is a set of individuals, working together to handle changes for that part of the organization
Enabling – this one I was aware of though, I had never given it a formal name. This team is designed to assist steam aligned teams enable something. A lot of orgs make the mistake of creating a DevOps team, which is a known anti-pattern. DevOps (or automation as it usually is) is something you enable teams with, with things like self-service and self-management. The goal of the enabling team is to improve the autonomy of the team.
Platform – platform teams can be stream-aligned teams but, their purpose is less about directly handling the changes for a part of the org than it is support other stream aligned teams. Where enabling teams may introduce new functionality, platform teams support various constructs to enable more streamlined operation. Examples might include a wiki with documentation for certain techniques to even a custom solution enabling the deployment of infrastructure to the cloud.
Complicated Sub-system – the author views this a specialized team that is aligned to a single, highly complex, part of a system or the organization (can even be a team managing regulatory compliance). The author uses the example of a trading platform, where individuals on the team manage a highly complex system performing market trades, where speed and accuracy must be perfect.
The essence of this grouping is to align teams to purpose and enable fast flow, what Gene Kim (in The DevOps Handbook) calls The First Way. Speed is crucial for an organization using DevOps, as speed to deploy also means speed to recover. And to enable that speed teams need focus (and to reduce change sizes). Too often organizations get into sticky situations and respond with still more process. While the general thought is it makes things better, really it is security theater (link) – in fact I observed this often leads to what I term TPS (Traumatic Process Syndrome) where processes become so bad, that teams do every thing they can to avoid the trauma of going through with them.
Team Topologies goes even deeper than just talking about these four team types, going even into office layouts and referencing the Spotify idea of squads. But, in the end, as the author indicates, this is all really a snapshot in time and it is important to constantly be evaluating your topology and make the appropriate shifts as priorities or realities shift – nothing should remain static.
To further make this point, the book introduces the three core communication types:
Collaboration – this is a short lived effort so two teams can perform discovery of new features, capabilities, and techniques in an effort to be better. The author stresses this MUST be short lived, since collaborating inherently brings about inefficiencies and blurs boundaries of responsibilities, and increased cognitive load for both teams.
X-as-a-Sevice – this is the natural evolution from collaboration, where one team provides functionality “as a service” to one or more teams. This is not necessarily a platform model but, instead, enforces the idea of separation of responsibilities. Contrasting with collaboration, cognitive load is minimal here as each knows their responsibilities
Facilitating – this is where one team is guiding another. Similar, in my view, to collaboration, it is likewise short-lived and designed to enable new capabilities. Therefore, this is the typical type of communication a stream-aligned and enabling team will experience.
One core essence of this is avoid anti-patterns like Architectural Review Boards, or another other ivory-tower planning committee. Trying to do this sort of planning up front is at best, asking for continuous stream of proposals as architectures morph, and at worst a blocking process that delays projects and diminishes trust and autonomy.
It made me recall an interaction I had with a client many years ago. I had asked “how do you ensure quality in your software?” to which they replied “we require a senior developer approve all PRs”. I looked at the person and then asked “about how many meetings per day is that person involved in?” I asked. They conferred for a moment and came back and said “8”. I then looked at them and said, “how much attention would you say he is actually exercising against the code?” It began to dawn on them. It came to light much later that that Senior Developer had not been actively in the code in months and was just approving what he was asked to approve. It was the Junior developers approving and validating their work with each other – further showing that “developers will do what it takes to get things done, even in the face of a bad process”.
And this brings me to the final point I was to discuss from this book, cognitive load. Being in the industry for 20yrs now I have come to understand that we must constantly monitor how much cognitive load an action takes, people have limits. For example, even if its straightforwad, opening a class file with 1000 lines will immediately overload cognitive load for most people. Taking a more complex approach, or trying to be fancy when it is not needed also affects cognitive load. And this makes it progressively harder for the team to operate efficiently.
In fact, Team Topologies talks about monitoring cognitive load as a way to determine when a system might need to be broken apart. And yes, that means giving time for the reduction of technical debt, even in the face of delaying features. If LinkedIn can do it (https://www.bloomberg.com/news/articles/2013-04-10/inside-operation-inversion-the-code-freeze-that-saved-linkedin#xj4y7vzkg) your organization can do it, and in doing so shift the culture to “team-first” and improve its overall health.
I highly recommend this book for all levels and roles, technologists will benefit as much as managers. Organizing teams is the key to actually getting value from DevOps. Anyone can write pipelines and automate things but, if such a shift is done without actually addressing organizational inefficiencies in operations and culture, you may do more harm than good.
Deploying to the Cloud makes a lot of sense as the large number of services in Azure (and other providers) can help accelerate teams and decrease time to market. However, while many services are, with their defaults, a great option for hosting applications on the public Internet, it can be a bit of a mystery for scenarios where applications should be private. Here I wanted to walk through the steps of privatizing a Function App and opening it to the Internet via an Application Gateway.
Before we start, a word on Private Endpoint
This post will heavily feature Private Endpoint as a means to make private connections. Private Endpoints and the associated service, Private Link, enable to very highest levels of control over the flow of network traffic by restricting it ONLY within the attached Virtual Network.
This, however, comes at a cost as it will typically require the usage of Premium plans for services to support the feature. What is important to understand is that service-service (even cross region) communication in Azure is ALL handled on the Microsoft backbone, it never touches the public internet. Therefore, your traffic is, by default, traveling in a controlled and secure environment.
I say this because I have a lot of clients whose security teams set Private Endpoint as the default. For the vast majority of use cases, this is overkill as the default Microsoft networking is going to be adequate for majority of data cases. The exceptions are the obvious ones: HIPPAA, CIJIS, IRS, and Financial (most specifically PCI), and perhaps others. But, in my view, using it for general data transfer, is overkill and leads to bloated cost.
Now, on with the show.
Create a Virtual Network
Assuming you already have a Resource Group (or set of Resource Groups) you will first want to deploy a Virtual Network with an address space, for this example I am taking the default of 10.0.0.0/16. Include the following subnets:
functionApp – CIDR: 10.0.0.0/24 – will host the private endpoint that is the Function App on the Virtual Network
privateEndpoints – CIDR: 10.01.0/24 – will host our private endpoints for related services, Storage Account in this case
appGw – CIDR: 10.0.2.0/24 – will host the Application Gateway which enables access to the Function App for external users
functionAppOutbound – CIDR: 10.0.3.0/24 – This will be the integration point where the function app will send outbound requests
The Region selected here is critical, as many network resources can either not cross a regional boundary OR can only cross into their paired region. I am sing East US 2 for my example.
Create the Storage Account
Function Apps rely on a storage account to support the runtime. So we will want to create one to support our function app. One thing to keep in mind, Private Endpoints are NOT supported on v1 of Storage Account, only v2. If you attempt to create the Storage Account through the Portal via the Function App process, it will create a v1 account and NOT support Private Endpoint.
When you create this Storage Account, be sure the network settings are wide-open; we will adjust it after the Function App is successfully setup.
Create the Function App
Now with the Function App we want to keep a few things in mind.
Use the same region that the Virtual Network is deployed into
You MUST use either a Premium or App Service plan type, Consumption does not support privatization
For hosting, select the storage account you created in the previous section.
For the time being do NOT disable public access – we will disable it later
For added benefit I recommend picking Windows for the Operating system as it will enable in-portal editing. This will let you quickly setup the Ping endpoint I am going to describe later. Note this post does NOT go into deploying – without public access additional configuration may be required to support automated deployments.
Allow the process to complete to create the Function App.
Enable VNet Integration
VNet integration is only available on Premium SKUs and above for both Function Apps and App Services. It enables a service to sit effectively on the boundary of the VNet and communicate with private IPs in the attached VNet as well as peered VNets.
For this step, access the Networking blade in your Function App and look for the VNet integration link on the right side of the screen.
Next, click “Add VNet” and select the Virtual Network and Subnet (functionAppOutbound) which receive the outbound traffic from the Function App.
Once complete, leave ROUTE ALL enabled. Note that for many production scenarios leaving this on can create issues, as I explain next. But for this simple example, having it enabled will be fine.
What is ROUTE ALL?
I like to view an App Service, or Function App, as having two sides, inbound and outbound. VNet integration allows the traffic coming out of the service to enter a Virtual Network. Two different modes are supported: ROUTE ALL and default. With ROUTE ALL enabled ALL traffic enters the VNet, including traffic perhaps bound for an external host (https://www.google.com for example). Thus, to support this YOU must add the various control to support egress. With ROUTE ALL disabled, routing will simply follow rules within RFC1918 (link) and send 10.x and a few others into the Virtual Network and the rest will follow Azure Routing rules.
Function Apps utilize two sub-services within Storage Account for operation: blob and file. We need to create private endpoints for these two sub-services so that, using the VNet Integration we just enabled, the connection to the runtime is handled via private connection.
Access the Storage Account and select the Networking blade. Immediately select Disabled for Public network access. This will force the use of Private Endpoint as the sole means to access the storage account. Hit Save before continuing to the next step.
Select the Private endpoint connections tab from the top. Here is a screen shot of the two Private Endpoints I created to support my case:
We will create a Private Endpoint for file share and blob services, as these are being used by the Function App to support the runtime. By doing this through the portal, other networking elements, such as setup of the Private DNS Zone can be handled for us. Note, in an effort to stay on point, I wont be discussing how Private Endpoint/Link routing actually works.
Click the + Private endpoint button and follow the steps for both file and blob subresource types. Pay special attention to the values the defaults select, if you have other networking in the subscription, it can select these components and cause communication issues.
Each private endpoint should link into the privateEndpoints subnet that was created with the Virtual Network.
Remember, it is imperative that the Private Endpoint MUST be deployed in the same region and same subscription as the Virtual Network to which it is being attached to.
More information on Private Endpoint and the reason for the Private DNS Zone here
Update the Function App
Your Function App needs to be updated to ensure it understands that it must get its content over a VNet. Specifically this involves updating Configuration values.
The one to key on is the WEBSITE_CONTENTOVERVNET setting and ensuring it is set to 1. Note the documentation deploys a Service Bus, we are not doing so here so you can skip related fields.
Be sure to check that each values matches expectation. I skipped over this the first time and ran into problems because of it.
Click Save to apply and before moving on.
Go into General Settings and disable HTTPS Only. We are doing this to avoid dealing with certificate in the soon to be created Application Gateway. In a Production setting you would not want this turned off.
Click Save again to apply the changes.
Next, create a new HttpTrigger Function called HttpPing. Use the source code below:
This file contains hidden or bidirectional Unicode text that may be interpreted or compiled differently than what appears below. To review, open the file in an editor that reveals hidden Unicode characters.
Learn more about bidirectional Unicode characters
Again, I am assuming you used Windows for your Plan OS otherwise, you will need to figure out how to get custom code to this function app so you can validate functionality, beyond seeing the loading page.
Once you complete this, break out Postman or whatever and hit the endpoint to make sure it’s working.
Coincidentally, this will also validate that the Storage Account connection is working. Check for common errors like DLL not found or Runtime unreachable or the darn thing just not loading.
Create Private Endpoint for Function App
With the networking features in place to secure the outbound communications from the Function App we need to lock down the incoming traffic. To do this we need disable private access and use Private Endpoint to get a routable private IP for the Function App.
Return to the Networking blade and this time, select Private Endpoints from the screen (shown below):
Using the Express option, create a private endpoint attached to the functionApp subnet in our Virtual Network – choose Yes for Integrate with private DNS zone (this will create the Private DNS zone and allow routing to work). Once complete, attempt to hit your Function App again, it should still work.
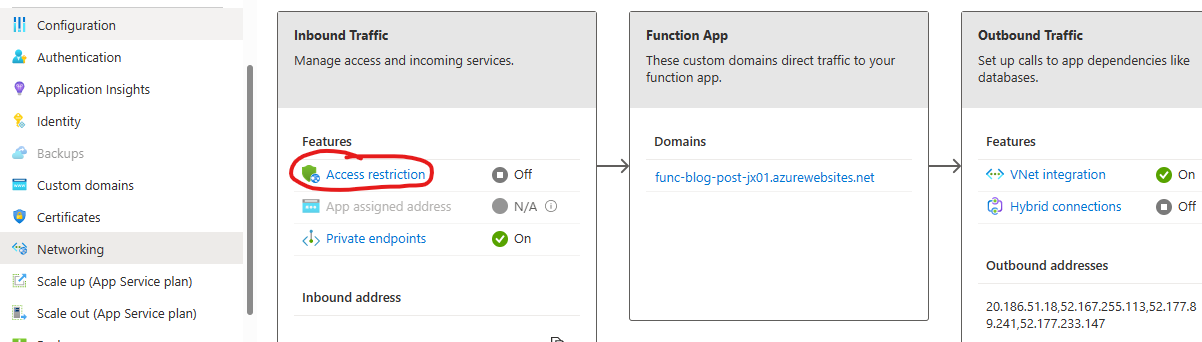
Now, we need to disable Public Access to the function app. Do this by returning to the Networking blade of the Function App, this time we will select Access restriction.
Declick the Allow public access checkbox at the top of the page. And click Save.
If you attempt to query the Function App now, you will be met with an error page indicating a 403 Forbidden.
Remember, for most PaaS services, unless an App Service Environment is used, it can never be fully private. Users who attempt to access this function app now will receive a 403 – as the only route left to the service is through our Virtual Network. Let’s add an Application Gateway and finish the job.
Create an Application Gateway
Application Gateway are popular networking routing controls that operate at Layer-7, the HTTP layer. This means they can route based on pathing, protocol, hostname, verb, really any feature of the HTTP payload. In this case, we are going to assign the Application Gateway a Public IP and then call that Public IP and see our Function App respond.
Start by selecting Application Gateway for the list of available services:
On the first page set the following values:
Region should be the SAME as the Virtual Network
Disable auto-scaling (not recommended for Production scenarios)
Virtual Network should be the Virtual Network created previously
Select the appGw subnet (App Gateway MUST have a dedicated subnet)
On the second page:
Create a Public IP Address so as to make the Application Gateway addressable on the public internet, that is it will allow external clients to call the Function App.
On the third page:
Add a backend pool
Select App Service and pick you Function App from the list
Click Add
On the fourth page:
Add a Routing Rule
For Priority make it 100 (can really be whatever number you like)
Take the default for all fields, but make sure the Listener Type is Basic Site and the Fronend IP Protocol is HTTP (remember we disabled HTTPS Only on the Function App)
Select Backend Targets tab
For Backend Target select the pool you defined previously
Click Add new for Backend Settings field
Backend protocol should be HTTP, with port 80
Indicate you wish to Override with new host name. Then choose to Pick host name from backend target – since we will let the Function App decide the hostname
Click Add a couple times
Finish up and create the Application Gateway.
Let’s test it out
When we deployed the Application Gateway we attached it to a public IP. Get the address of that Public IP and replace the hostname in your query – REMEMBER we must use HTTP!!
If everything is setup properly you should get back a response. Congratulations, you have created a private Azure Function App routable only through your Virtual Network.
Options for SSL
To be clear, I would not advocate the use of HTTP for any scenario, even in Development. I abstained from that path to make this walkthrough easier. Apart from create an HTTPS listener in the Application Gateway, Azure API Management operating in External mode with Developer or Premium SKU (only they support VNet Integration) would be the easiest way of support TLS throughout this flow.
Perhaps another blog post in the future – just APIM takes an hour to deploy so, it is a wait 🙂
Closing Remarks
Private endpoint is designed as a way to secure the flow of network data between services in Azure, specifically it is for high security scenarios where data needs to meet certain regulatory requirement for isolation. Using Private Endpoint for this case, as I have shown, is a good way to approach security without taking on the expense and overhead of an App Service Environment which creates an isolated block within the data center for your networking.
That said, using them for all data in your environment is not recommended. Data, by default, goes over the Azure backbone and stays securely on Microsoft networks so long as the communication is between Azure resources. This is advised for most data scenarios and can free your organization from the cost and overhead of maintaining Private Endpoints and Premium SKUs for apps that make no sense to have such capability.