Secret values in Kubernetes has always been a challenge. Simply put, the notion of putting sensitive values into a Secret with nothing more than Base64 encoding, and hopefully RBAC roles has seemed like a good idea. Thus the goal was always find a better way to bring secrets into AKS (and Kubernetes) from HSM type services like Azure Key Vault.
When we build applications in Azure which access services like Key Vault we do so using Managed Service Identities. These can either be generated for the service proper or assigned as a User Assigned Managed Identity. In either case, the identity represents a managed principal, one that Azure controls and is only usable from within Azure itself, creating an effective means of securing access to services.
With a typical service, this type of access is straightforward and sensible:

The service determines which managed identity it will use and contacts the Azure Identity Provider (and internal service to Azure) and receives a token. It then uses this token to contact the necessary service. Upon receiving the request with the token, the API determines the identity (principal) and looks for relevant permissions assigned to the principal. It then uses this to determine whether the action should be allowed.
In this scenario, we can be certain that a request originating from Service A did in fact come from Service A. However, when we get into Kubernetes this is not as clear.
Kubernetes is comprised of a variety of components that are used to run workloads. For example:
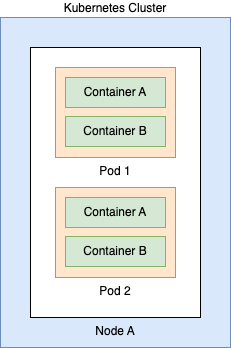
Here we can see the identity can exist at 4 different levels:
- Cluster – the cluster itself can be given a Managed Identity in Azure
- Node – the underlying VMs which comprise the data layer can be assigned a Managed Identity
- Pod – the Pod can be granted an identity
- Workload/Container – The container itself can be granted an identity
This distinction is very important because depending on your scenario you will need to decide what level of access makes the most sense. For most workloads, you will want the identity at the workload level to ensure minimal blast radius in the event of compromise.
Using Container Storage Interface (CSI)?
Container Storage Interface (CSI) is a standard for exposing storage mounts from different providers into Container Orchestration platforms like Kubernetes. Using it we can take a service like Key Vault and mount it into a Pod and use the values securely.
More information on this is available here: https://kubernetes-csi.github.io/docs/
AKS has the ability to leverage CSI to mount Key Vault, given the right permissions, and access these values through the CSI mount.
Information on enabling CSI with AKS (new and existing) is here: https://learn.microsoft.com/en-us/azure/aks/csi-storage-drivers
For the demo portion, I will assume CSI is enabled. Let’s begin.
Create a Key Vault and add Secret
Create an accessible Key Vault and create a single secret called MySecretPassword. For assistance with doing this, see these instructions: https://learn.microsoft.com/en-us/azure/key-vault/general/quick-create-portal and https://learn.microsoft.com/en-us/azure/key-vault/secrets/quick-create-portal#add-a-secret-to-key-vault
Create a User Managed Identity and assign rights to Key Vault
Next we need to create an Service Principal that will serve as our identity for our workload. This can be created in a variety of ways. For this demo, we will use a User assigned identity. Follow these instructions to create: https://learn.microsoft.com/en-us/azure/active-directory/managed-identities-azure-resources/how-manage-user-assigned-managed-identities?pivots=identity-mi-methods-azp#create-a-user-assigned-managed-identity
Once you have the identity, head back to the Key Vault and assign the Get and List permissions for Secrets to the identity. Shown here: https://learn.microsoft.com/en-us/azure/key-vault/general/assign-access-policy?tabs=azure-portal
That is it, now we shift our focus back to the cluster.
Enable OIDC for the AKS Cluster
OIDC (OpenID Connect) is a standard for creating federation between services. It enables the identity to register with the service and the token exchange occurring as part of the communication is entirely transparent. By default AKS will NOT enable this feature, you must enable it via the Azure Command line (or PowerShell).
More information here: https://learn.microsoft.com/en-us/azure/aks/use-oidc-issuer
Make sure to record this value as it comes back, you will need it later
Create a Service Account
Returning to your cluster, we need to create a Service Account resource. For this demo, I will be creating the account relative to a specific namespace. Here is the YAML:
Make sure to record these values, you will need them later.
Federate the User Assigned Identity with the Cluster
Our next step will involve creating a federation between the User assigned identity we created and the OIDC provider we enabled within our cluster. The following command can be used WITH User Assigned Identities – I linked the documentation for an unmanaged identities below:
As a quick note, the $RESOURCE_GROUP value here refers to the RG where the User Identity you created above is located. This will create a trusted relationship between AKS and the Identity, allow workloads (among others) to assume this identity and carry out operations on external services.
How to do the same using an Azure AD Application: https://azure.github.io/secrets-store-csi-driver-provider-azure/docs/configurations/identity-access-modes/workload-identity-mode/#using-azure-ad-application
Create the Secret Provider Class
One of the resource kinds that is added to Kubernetes when you enable CSI is the SecretProviderClass. We need this class to map our secrets into the volume we are going to mount into the Pod. Here is an example, an explanation follows:
Mount the Volume in the Pod to access the Secret Value
The next step is to mount this CSI volume into a Pod so we can access the secret. Here is a sample of what the YAML for a Pod like this could look like. Notice I am leveraging an example from the Example site: https://azure.github.io/secrets-store-csi-driver-provider-azure/docs/getting-started/usage/#deploy-your-kubernetes-resources
This example uses a derivative of the busybox image that is provided via the example. The one change that I made was adding serviceAccountName. Recall that we created a Service Account above and defined it as part of the Federated Identity creation payload.
You do not actually have to do this. You can instead use default which is the default Service Account all pods run under within a namespace. However, I like to define the user more specifically to be 100% sure of what is running and what has access to what.
To verify things are working. Create this Pod and run the following command:
kubectl exec --namespace blog-post busybox-secrets-store-inline -- cat /mnt/secrets-store/MySecretPassword
If everything is working, you will see your secret value printed out in plaintext. Congrats, the mounting is working.
Using Secrets
At this point, we could run our application in a Pod and read the secret value as if it were a file. While this works, Kubernetes offers a way that is, in my view, much better. We can create Environment variables for the Pod from secrets (among other things). To do this, we need to add an additional section to our SecretProviderClass that will automatically create a Secret resource whenever the CSI volume is mounted. Below is the updated SecretProviderClass:
Notice the new section we added. This will, at the time of the CSI being mounted create a secret in the blog-post namespace called secret-blog-post with a key in the data called Password.
Now, if you apply this definition and then attempt to get secret from the namespace, you will NOT get a secret. Again, its only created when we mount it. Here is the updated Pod definition with the Environment variable from the secret.
After you apply this Pod spec, you can run a describe on the pod. Assuming it is run and running successfully you can then run a get secret command and you should see the secret-blog-post. To fully verify our change, using this container, run the following command:
kubectl exec --namespace blog-post busybox-secrets-store-inline -- envThis command will print out a list of the environment variables present in the container, among them should be Password with a value matching the value in the Key Vault. Congrats, you can now access this value from application code the same way you could access any environment value.
This conclude the demo.
Closing Remarks
Over the course of this post, we focused on how to bring sensitive values into Kubernetes (AKS specifically) using the CSI driver. We covered why workload identity really makes the most sense in terms of securing actions from within Kubernetes, since Pods can have many containers/workloads, nodes can have many disparate pods, and clusters can have applications running over many nodes.
One thing that should be clear: security with Kubernetes is not easy. It matters little for such a demonstration however, we can see a distinct problem with the exec strategy if we dont have the proper RBAC in place to prevent certain operations.
Nonetheless, I hope this post has given you some insight into a way to bring secure content into Kubernetes and. Ihope you will try CSI in your cuture projects.
