In previous posts I have talked about the importance of Infrastructure as Code in creating a more complete solution that keeps with the core tenant of Cloud Native in that applications should manage their own architecture. In this post, I will walk through the process of deploying a container to an Azure App Service with Terraform.
Benefits of IaC (Infrastructure as Code)
When we start talking about cloud deployments we must inevitably come to see the configuration and deployment of Cloud services as being as much a part of the application as the source code itself. Any cloud application where the configuration for services is simply stored in the platform itself is encouraging disaster upon itself. A simple hit of the “Delete” key can leave teams scrambling for hours to restore service.
In addition, using IaC makes it very easy to spin up new environments which can be invaluable for testing. In fact, this is a chief benefit of a tool like Kubernetes (Jenkins X leverages this ability to create new environments per pull request). The end goal of DevOps is to see all environments and code handled in a way that requires a minimal amount of human interaction for management.
Terraform
Terraform is created by HashiCorp and is billed as a IaC tool which supports all of the major players in Cloud and infrastructure. It serves as an alternative to something like Cloud Formation or Azure Resource Manager. Files are defined using the HCL language and use code to represent the targeted infrastructure.
It can be installed from here: https://www.terraform.io/downloads.html
Our application
For this, I am referencing a microservice that I wrote for a side project (ListApp) that returns the Feed of events relevant to a user. At this stage of development, this is nothing more than a hard coded list which gets displayed in the UI.
I have already created the Dockerfile which builds the Docker image that I will use when deploying this image. You will see this referenced in the HCL code later.
Our application will be deployed on Azure. Reference HashiCorp’s documentation on their Azure provider here to get through the initial steps and get started.
Building the initial pipeline
So, how I like to approach Terraform with .NET Core application is, I store my .tf file at the same level as my solution file (or whatever constitutes the root of your application) in a folder called terraform.
Azure DevOps makes it very easy to build pipelines which output Docker images and store them in a registry. But there is a trick to this process if you are going to use Terraform to deploy your code – publishing an artifact.

So, the reason you need to this, Azure DevOps operates on the notion of passing artifacts between pipelines and then operating on that artifact (usually you and build an artifact and then release it). When your artifact is a Docker container, you will not have an artifact per se, rather the release pipeline often targets the tagged Docker image in a registry somewhere. But in this case, we need the build to ALSO output our Terraform contents so they can be executed in the Release pipeline. Adding this task will accomplish that.
For more information on the actual process of building DevOps pipelines, go here
Before we get into building the release let’s cover off what the .tf file needs to look like. I posted this entry previously (https://jfarrell.net/2019/02/23/infrastructure-as-code-with-terraform/) which describes the .tf file in detail and how you can use it, locally, to deploy a containerized NodeJS application to Azure.
Now let’s talk through of the changes needed to use it with Azure DevOps
Backend State
State is a very important aspect to Terraform, it has to know if it created something previously so it knows what to expect if it finds that resource. A great example is an Azure App Service. Without knowing this state, Terraform may try to create an Azure App Service with the same name as one which already exists, causing a failure.
By default, Terraform stores this state information in a .tfstate file which it references whenever plan and apply is run. This situation changes when you run in DevOps since you will never have the .tfstate file – builds should always be run from clean environments.
This is where we introduce the concept of “backend state” where Terraform stores its state to a central location that it can reference during the build. The docs are reasonably good here: https://www.terraform.io/docs/backends/types/azurerm.html.
In the end, what this amounts to is creating a storage account on Azure in which to store this state information. Here is mine for Feed service:
This file contains hidden or bidirectional Unicode text that may be interpreted or compiled differently than what appears below. To review, open the file in an editor that reveals hidden Unicode characters.
Learn more about bidirectional Unicode characters
| provider "azurerm" { | |
| version = "=1.22.0" | |
| } | |
| terraform { | |
| backend "azurerm" { | |
| resource_group_name = "ListApp-General" | |
| storage_account_name = "listapptfstatestorage" | |
| container_name = "tfstate" | |
| key = "listapp-feedservice" | |
| } | |
| } |
This is relatively easy to understand, I am laying out what resource group, storage account, container, and what blob key I want to use when storing the state.
What is missing here is access_key and very intentionally. The docs lay this out quite nicely here: https://www.terraform.io/docs/backends/config.html
Basically, as is often the case, we want to avoid committing sensitive credentials to source control, less they be discovered by others and give access where it was not intended. We can pass the access_key value when we call init in our Release pipeline.
This is the full .tf file I am going to commit to source control which I will plan and apply in the Release pipeline.
https://gist.github.com/xximjasonxx/422b50cbca80c14f89f5a4f0adecbe6a
Building the Release Pipeline
Returning to Azure DevOps we can now build our release pipeline. Its simply a set of 4 steps:
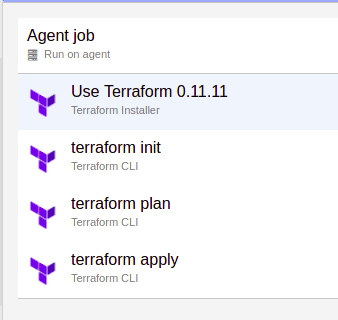
Step 1: We install terraform into the container the release pipeline is being executed
Step 2: We call init which installs plugins and configures our backend for state storage
Step 3: We plan the deployment, this allows Terraform to get an idea of what changes are needed
Step 4: We apply the changes which updates our infrastructure as we desire it
So let’s talk specific for each of these steps:
Step 2 – init

Notice the _FeedServiceCIBuild after the DefaultWorkingDirectory – this is the name of your build artifact as it exists the Build pipeline. You can find this on the designer screen for the Release pipeline
We specify the -backend-config option to init in this case providing a key value pair for the access_key. I have hidden the actual value behind a pipeline variable. This will initialize Terraform to use my Azure Storage Account to store the state information
Step 3 – plan
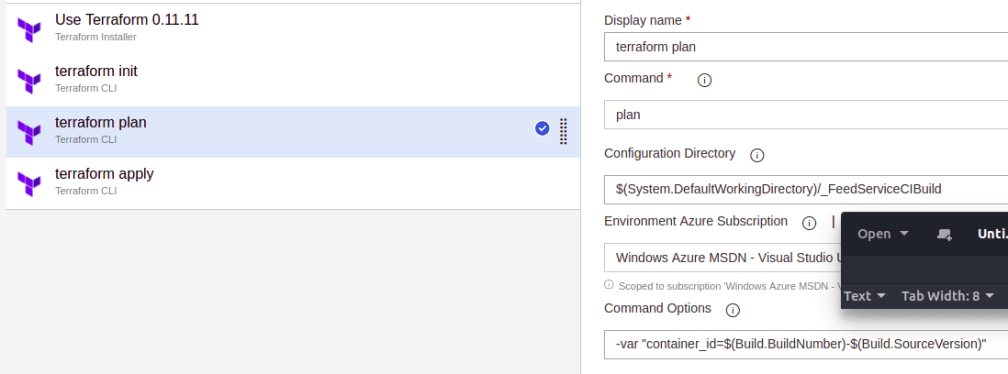
Again, notice the use of _FeedServiceCIBuild as the root of where the terraform command will be executed.
We are also specifying the tag for the container created by the build pipeline. Reference the completed .tf file above to see how this is used. This is essential to updating our App Service to utilize the latest and greatest version of our code
Step 4 – apply
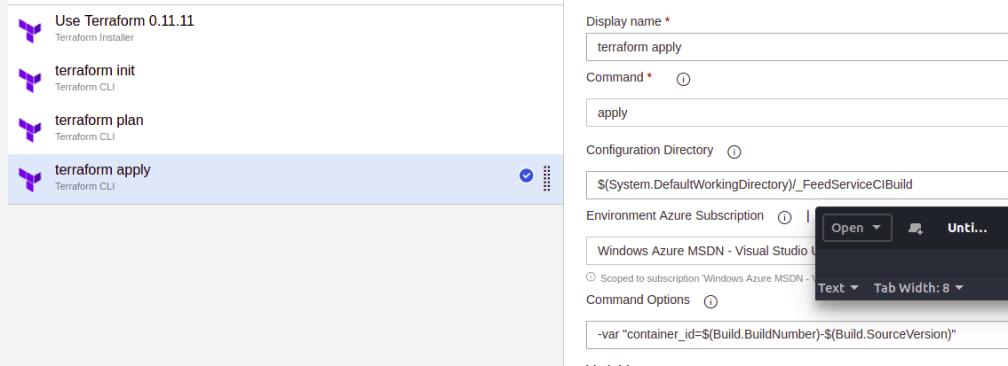
If this looks the same as the above, you are not going crazy. apply and plan often look the same.
One Important Note:
If you read only tutorials of using Terraform in CI they will make mention of a using
-input=false
with plan and apply to prevent the system from blocking. Often they will also recommend outputting a tfplan file for consumption by apply. With Azure, at least, you dont need to do this. The new -auto-approve is automatically appended to these commands which appears to be the new flavor for CI tools to use.
Testing things out
You should now be able to kick off builds (via CI or manual) which will build a container to hold the latest compiled source code. Once this is built a Release process can be kicked off (automatically or manually) to update the Azure App Service (or create it), to reference the new container.
And just like that, you have created a managed build and release that is not only automated but, also contains the information for your App Service that would otherwise be stored transiently in the portal. Pretty cool.

2 thoughts on “Pure Containerized Deploy with Terraform on Azure DevOps”