Kubernetes is the new hotness when it comes to orchestrating containers for both development and production scenarios. If that sentence doesn’t makes sense to you, dont worry, it didnt make sense to me either when I first got started.
One of the biggest trends in server development right now is the Microservice pattern, whereby we break up our monolithic backends into smaller services that we can then mash together to supper various scenarios. Containers helped make this process more efficient than straight server deploys. But as our deployments got larger and our availability needs grew things got complicated.
This is where the concept of orchestration comes in. Orchestration is a higher level tool which manages our sets of containers and ensures that we maintain operational status. Kubernetes is such a tool, developed by Google, which has gained immense popularity for its extensibility, efficiency, and resiliency (it can self heal). What’s more, since multiple containers can run on the same VM we can now more efficiently utilize our server resources, as opposed to previous models which saw an overuse of VMs to manage load.
Kubernetes has gained such a following that Azure, Amazon, and Google all provide managed versions enabling quick deployments without having to set everything up yourself (which is beyond painful). In this article, we are going to explore setting up a simple microservice on Google Cloud Platform.
Our Microservice
As part of my prototype Retail App I created a simple login service. The code is not important, just know that it utilizes PostgresSQL and Redis to handle user authentication and JWT token persistence.
Our goal is going to be to stand up a Kubernetes Cluster, in Google, to serve out this microservice.
A VERY Quick Intro to Kubernetes
Kubernetes is a HUGE topic that is getting larger every day, this blog post wont even cover a third of those concepts but, principally, there several you need to know for what I am going to say to make sense:
- Cluster: A cluster is a collection of nodes (think VMs, but not really) that we can provision resources to including Pods, Deployments, Services and others.
- Pod – the most basic unit of functionality within Kubernetes. A pod hosts one or more containers (created from Docker, if you dont know what these are click here). A Pod can be thought of, conceptually, as a machine
- Deployment – A set of rules around how we deploy Pods. This can include how many replicas exist and what the action is if a Container fails.
- Service – These allow Deployments of Pods to communicate either internally or externally. It can act as a Load Balancer for your deployment (if you have more than one Pod). Logically speaker it is what provides access into a cluster.
Overall, the goal of Kubernetes (often abbreviated k8s) is specify and adhere to an ideal state. For example, I can say I want three replicas which hold my API code and Kubernetes will guarantee that, at any given time, there will always be AT LEAST 3 Pods taking requests via the Deployment specification. I can also specify scaling conditions which allows Kubernetes to increase the number of Pods if necessary.
I often like to refer to Kubernetes as a “mini cloud” and in fact, that is what it is going for, a native cloud that can live in any Cloud. This lets us have all of the advantages of a Cloud without being tied to it.
Image Repositories
Throughout this process we will create Docker containers which run in our Pods. Google provides an automated way (via Container Repository -> Build Triggers) to automatically run Dockerfile code and build images that can then be used as Containers via the Kubernetes configuration file. I wont be covering how to set this up, instead I will assume you have already published your Microservice container somewhere.
Managed External Services
As I said above, we can often think of Kubernetes as our own personal Cloud that we can move around and run anywhere (both in the Cloud or on-prem). In my view, this is great for service code but, it loses interest for me when we start talking about running things like a database or a Redis cluster as well. You can do this but, I feel that since most Cloud providers have managed versions of these tools which already auto-scale and are reasonably cost effective, I would rather connect to those than try to run my own. I will be using Google managed Postgres and Redis in this example
Create & Connect to Your Cluster
Assuming you have a Google Cloud account and have already created a project, expand the Tools side menu and select Kubernetes Engine from underneath the Compute section.
This next part is very important and not really documented from what I saw. When the cluster finishes you will see a Connect next to it. This button will give you the credentials needed to connect to the cluster you just created. This is important because MANY of the options you will want to use are not available through the UI yet, this includes access to Secrets which are necessary to connected a Google Managed Database.
Run the given command in a terminal – the important line you are looking for is marked with kubeconfig. This is the context in which kubectl will run. Now we need to tell kubectl to use this context, to do that we execute the following command in the terminal, note my cluster name is test-cluster
kubectl config use-context <cluster-name>
Sometimes this wont work, it will say context does not exist. In this case run the following command to figure out what name the context is actually registered under
kubectl config get-contexts
It is usually pretty obvious which one is yours. Rerun the use-context command with the new name. Congrats you are connected.
Create the Proxy Account
Like most Cloud providers, Google advises you to not permit direct access to your managed service but rather utilize a “sidecar” pattern. In this pattern, we provision an additional Pod to the Pods within our Deployment to permit access to Postgres through a proxy account.
This means that our main Pod by itself does not have access to Postgres but rather must access it through the proxy. I wont bore you with instructions on how to do this, Google has done a good job laying this out:
https://cloud.google.com/sql/docs/postgres/connect-kubernetes-engine
Work up to Step 5 and then come back so we can talk about Secrets.
Creating our Secrets
I am not going to dive too deeply into how to create a managed Postgres and Redis service on GCP, they have documentation that suits that well enough. However, where things get a bit tricky is connecting to these services.
Kubernetes goal is to deploy and orchestrate containers relative to your “ideal state”. Containers can be provided environment variables which allows them to pull environment specific values in, a necessary element of any application.
On top of this, it is very common for production environment variables like usernames and passwords for databases. This is where Secrets come in, we can register these values with the Kubernetes cluster and then inject them as environment variables. It also keeps these sensitive variables out of source control.
Continue with https://cloud.google.com/sql/docs/postgres/connect-kubernetes-engine This was the hard part for me cause the part about connecting kubectl up to my cluster was not clear.
After you register your secrets come back here, I will elaborate more on the updating your Pod Configuration.
Creating the Configuration File
As it stands today, the primary way to setup Kubernetes is to use YAML files. There are a host of tools in development to alleviate this burden but, for now, its the best way to go. I want to present you with this YAML file which shows how to configure your config file so you can connect to Postgres
Within this file we can see that we specify the DB_HOST as 127.0.0.1. This works because of the sidecar pattern.
If you examine the YAML file you will notice our Pod (spec->container) containers TWO containers, one of which uses the gce-proxy image, this is the Cloud Proxy and since the two containers are running on the same Pod they are, effectively, said to be on the same machine. Thus 127.0.0.1 refers to the loopback for the Pod which can see both containers.
Next, the DB_USER and DB_PASSWORD values are being extracted from our secret files that we created in previous steps. The names should match whatever you used, I personally like to name my credential file with a hint to which service it refers to since I have more than one database being referenced within my cluster (for other services).
Honestly, my recommendation here is to follow the YAML file I referenced above as you make your config file. It really is the best way to build it up. Bare in mind you do NOT need to define a Service in this file, this is strictly for your Deployment (which GKE refers to a Workloads). You can define the service if you like, and for more complex projects I recommend it, so as to keep everything together.
Once you have completed this file we need to apply it. Run the following command
kubectl apply -f <your yaml file>
This will connect and apply your configuration. Return to GKE and click Workloads. After some times things should refresh and you should see your Pods running.
Debugging
So, as you can imagine debugging is pretty hard with Kubernetes so you will want to make sure you get most of it out of the way ahead of time. So here are some tips:
- Make use of minikube for local development. Get things in order before you deploy including secrets
- Add console logging to your code. You can access the Pod Log files right from the GKE console. Important, if you have multiple replicas you might need to enter each one to figure out which one got hit. I recommend starting with a replica count of 1 at first, makes this easier
- Set you ImagePullPolicy to always. I have found that sometimes Google will recreate a container from an existing image and you wont get your latest changes
- If you want to delete things you can use kubectl or the UI, I recommend waiting for everything to removed before redeploying things
Creating the Service
Your code is now deployed into Kubernetes but you wont be able to access it without a service. My preference for this is to define it in my YAML file, here is an example:
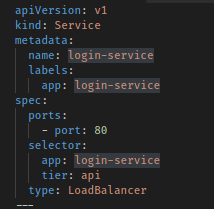
Alternatively, you can do this straight up on the UI. The important thing is the port and the type, here set to LoadBalancer. Others include ClusterIP which is predominantly used for internal services that are not accessible from outside.
Closing Thoughts
My goal is eventually to do a much larger series on Kubernetes and Microservices since this has become something I am very focused on and is a huge trend in development right now. I hope this article gets people thinking about Microservics and how they might use Kubernetes.
There is a lot of discussion around Docker vs Serverless for Microservices. Truthfully, this is a misnomer since, in most cases, we would want to host our serverless functions in Docker containers. There is even a project, Kubeless which allow you to map serverless function events into Kubernetes hosted functions. And there are Cloud events which seeks to standardize the event schema on Cloud platforms so events can be received the same way regardless of platform.
The real power of Kubernetes (and similar Cloud Native systems) is what it enables which is a platform that can efficiently use the resources given to it by the underlying provider. We have no reached a point where the big three providers are offering Kubernetes as a managed service so we have passed the point where it was too hard for most to standup. The next goal needs to be a way to make configuration easier through better tooling.
Source code for my login service: https://gitlab.com/RetailApp/retail-app-login-service

One thought on “Setting up Kubernetes on GKE”