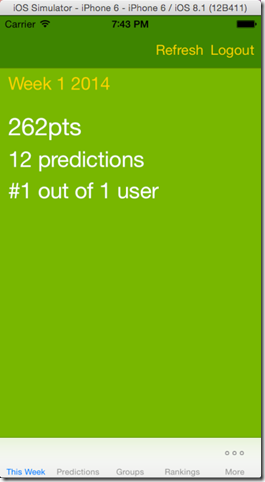
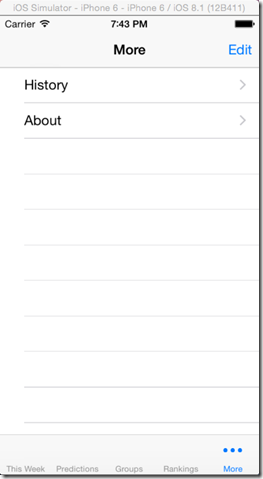
As part of developing Score Predict with Xamarin Forms it was necessary to customize the visual appearance to match the overarching theme being applied to the application. The first step was to change the background color, simple enough using the BackgroundColor attribute of TabbedPage
Sadly, this is the extent of the customization that I can do with Xamarin.Forms. To do any more we need to create a custom renderer and work with the underlying UITabBarController.
<?xml version="1.0" encoding="utf-8" ?>
<TabbedPage xmlns="http://xamarin.com/schemas/2014/forms"
      xmlns:x="http://schemas.microsoft.com/winfx/2009/xaml"
      xmlns:pages="clr-namespace:ScorePredict.Core.Pages;assembly=ScorePredict.Core"
      x:Class="ScorePredict.Core.Pages.MainPage"
      BackgroundColor="{StaticResource BackgroundColor}">
Renderers serve an integral purpose with Xamarin.Forms. It allows us to get at the native controls that are being used by the platform to actually build the interface. Creating one is easy. Below is the skeleton of a renderer which will handle our customizations.
[assembly: ExportRenderer(typeof(TabbedPage), typeof(TouchScorePredictTabbedRenderer))]
namespace ScorePredict.Touch.Rendering
{
    public class TouchScorePredictTabbedRenderer : TabbedRenderer
    {
        protected override void OnElementChanged(VisualElementChangedEventArgs e)
        {
            base.OnElementChanged(e);
            if (e.OldElement == null)
            {

            }
        }
    }
}
The OnElementChanged method is our primary hook into the rendering process. It gets called quite a bit so we need to make sure the customizations are only ever applied the first time it is run. So the first problem we want to address is the background color of the table cells. This is an auto-generated UI class from iOS mapped to Xamarin as UIMoreListController. It is completely hidden with the Xamarin assemblies are no access is given to external programs. I only know the name cause you can see it in the debugger.
    public class TouchScorePredictTabbedRenderer : TabbedRenderer
    {
        protected override void OnElementChanged(VisualElementChangedEventArgs e)
        {
            base.OnElementChanged(e);
            if (e.OldElement == null)
            {
                var vc = MoreNavigationController.ViewControllers[0];
                var tableView = (UITableView)vc.View;
                tableView.TableFooterView = new UIView(CGRect.Empty);
                tableView.BackgroundColor = UIColor.FromRGB(119, 183, 57);
            }
        }
    }
Luckily, like all other Controllers it is an implementation of UIViewController and thus has all the properties you would expect including, most importantly View. What the More List Controller effectively is, is a Navigation Controller with a TableView inside. So, we can cast the root View to a TableView and work with it directly.
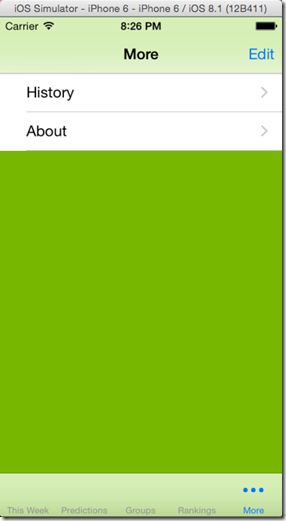
Above, the TableFooterView is eliminated hiding empty cells. We also set the background color of those empty cells, which basically gives the appearance of a background color. However, as you can see, the cells with content are still white, as is the Navigation bar. However, since at the point this code is called the View Controller has not yet been generated, we have no way to actually get at the non-empty cells or the title. To do that we will need a delegate, so we will need to create a custom implementation using the IUINavigationControllerDelegate.
    public class TouchScorePredictTabbedRenderer : TabbedRenderer
    {
        protected override void OnElementChanged(VisualElementChangedEventArgs e)
        {
            base.OnElementChanged(e);
            if (e.OldElement == null)
            {
                MoreNavigationController.Delegate = new CustomNavigationControllerDelegate();

                var vc = MoreNavigationController.ViewControllers[0];
                var tableView = (UITableView)vc.View;
                tableView.TableFooterView = new UIView(CGRect.Empty);
                tableView.BackgroundColor = UIColor.FromRGB(119, 183, 57);
            }
        }
    }

    public class CustomNavigationControllerDelegate : UINavigationControllerDelegate
    {
        public override void WillShowViewController(UINavigationController navigationController,
            UIViewController viewController, bool animated)
        {

        }
    }
By defining the CustomNavigationControllerDelegate we gain access to the overridable WillShowViewController method. It is within this method that we will perform the remainder of our visual customizations. Its important to understand that WillShow* gets called whenever the More View Controller goes to show a new View Controller; this includes the More controller itself. That being the case, we want to make sure we are looking at the right controller, so we attempt to cast the root view of the viewController parameter to a UITableView. If it succeeds, we are looking at the More Table List.
    public class CustomNavigationControllerDelegate : UINavigationControllerDelegate
    {
        public override void WillShowViewController(UINavigationController navigationController,
            UIViewController viewController, bool animated)
        {
            var tableView = viewController.View as UITableView;
            if (tableView != null)
            {
                viewController.NavigationController.NavigationBar.BarTintColor = UIColor.FromRGB(0x3C, 0x85, 0x13);
                viewController.NavigationItem.RightBarButtonItem = null;
                viewController.NavigationController.NavigationBar.TintColor = UIColor.FromRGB(0xFC, 0xD2, 0x3C);
            }
        }
    }
Once we are sure which view controller we are looking at, our first target will be the Navigation Bar. We can adjust the BarTintColor (background color), remove the default Edit button on the right side of the menu.
One important thing to note is the TintColor. This affects ALL INTERACTIVE items in the Navigation bar, so the coloring of buttons, NOT the color of the Title. So if you run this code, you get something like this:
It took me a bit to figure out how to change the text color of the title, turns its done through the Cocoa Appearance API. While there are a number of appearance settings that can be applied, the code below shows how to use this API to change the text color.
navigationController.NavigationBar.TitleTextAttributes = new UIStringAttributes()
{
    ForegroundColor = UIColor.FromRGB(0xFC, 0xD2, 0x3C)
};
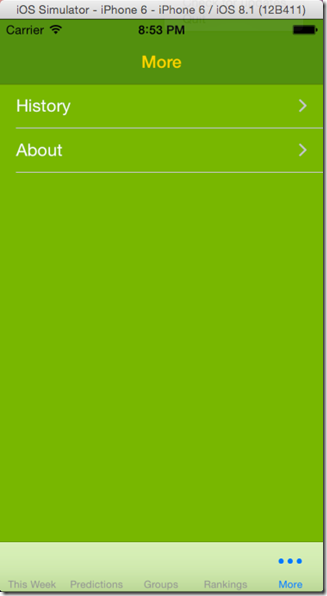
Not intuitive, I know, but it gets the job done. If you run now, we get the appropriate text color, background, and interactive elements. All that remains is the cells themselves. To apply our styling to these, we need to iterate over the VisibleCells collection of the table view, below is the full Custom Navigation Controller Delegate class.
public class CustomNavigationControllerDelegate : UINavigationControllerDelegate
{
    public override void WillShowViewController(UINavigationController navigationController,
        UIViewController viewController, bool animated)
    {
        var tableView = viewController.View as UITableView;
        if (tableView != null)
        {
            viewController.NavigationController.NavigationBar.BarTintColor = UIColor.FromRGB(0x3C, 0x85, 0x13);
            viewController.NavigationItem.RightBarButtonItem = null;
            viewController.NavigationController.NavigationBar.TintColor = UIColor.FromRGB(0xFC, 0xD2, 0x3C);

            navigationController.NavigationBar.TitleTextAttributes = new UIStringAttributes()
            {
                ForegroundColor = UIColor.FromRGB(0xFC, 0xD2, 0x3C)
            };

            tableView.SeparatorInset = UIEdgeInsets.Zero;
            foreach (var cell in tableView.VisibleCells)
            {
                cell.BackgroundColor = UIColor.FromRGB(119, 183, 57);
                cell.TextLabel.TextColor = UIColor.White;
                cell.Accessory = UITableViewCellAccessory.None;
                cell.SeparatorInset = UIEdgeInsets.Zero;
            }
        }
    }
}
As you can see, what this really amounts to is programming against Xamarin.iOS and knowing the iOS programming model. In reality, once you start using Renderers on any of the platforms you are effectively beginning to work with the native controls provided through Xamarin; at this point knowing the native platform becomes exception helpful.
I have to thank Jason Smith, PM of the Xamarin.Forms team, for really spelling out the delegate approach. Although, in hindsight, he basically told me to use my knowledge of Xamarin.iOS 🙂 Either way, still very helpful to have him in your corner.
As always, you can check out the project as it evolves at: https://github.com/xximjasonxx/ScorePredictForms
Cheers!!


Just what I was looking for. Thank you.
LikeLike
Just fixed a significant issue with my app with your code, thank you
LikeLike